11. Safire Smart AI / Event
The AI Event part might be the most interesting and important part of the Recorder
Event Notification
Alarm-out | E-mail | Display | Buzzer | Push Message | Audio | Light | Alarm Server
AI Event
People/Vehicle Detection | Face Recognition | LPR | More
General Event
Motion | Sensor | Combination Alarm | IPC Offline | Exception Alarm
System Disarm
System Disarm
Alarm Status
Alarm Status
Event Notification
Alarm-out | E-mail | Display | Buzzer | Push Message | Audio | Light | Alarm Server
Alarm out: When using alarm out on an event like motion detection to turn on lights
A. Click on the Alarm-out to enter the Alarm-out config page
B. Set the alarm out according to the needs.
E-mail: In order to Add a receiver, there need to be a sender email address in the network setting.
B. When clicking on the Edit Sender, this will give access to the Sender settings
After this is done and tested, there is the option to add and receiver email address.
Event Display: Duration Pop-up Video and Pop-up Message Box
Buzzer: Set the buzzer duration on the recorder time
Push Message: Select the Schedule for the recorder to send the Push Message
To edit the schedule, click on Schedule Management
Audio: Set the Voice Broadcast and audio settings from the camera and the Recorder
A: Select Audio to enter the settings
B: Camera audio settings
C: Local Audio Alarm Setting
Light: Edit the camera light settings (this is not for the IR lights)
Alarm Server: More info coming soon
AI Event
People/Vehicle Detection | Face Recognition | LPR | More
AI event: This might be the most interesting part of the AI setting
On the A1 series, in combination with the "i" series 4 MP camera, there is only one task at the same time available.
Overview AI Event page:
A. Setup AI events
B: Select the camera
C: Here all AI tasks that are available for that camera
D: The setting for the selected AI option
Note:
Settings this changes depending on the Event
Parameters Settings
Schedule:
Select the time schedule for the task
Rule:
Duration: is the duration of the alarm event (20 Sec Recorder beep beeping when active in trigger Mode)
Line: are the available lines for the event (depending on the camera)
Direction: Is the movement direction over the line
Regional Activities: sample Appear or cross
Direction: Entrance or Exit
Area: the areas of detection (depending on the camera and option till 4 areas
Snapshot interval: Select the number of intervals from the drop-down menu
Snapshot number: Select the number of intervals from the drop-down menu
Face exposure: 0~100 default 50
Face Size: Depending on the model (Range:3%~50%)
Detection Target:
People/Vehicle Detection
Line Crossing
Intrusion
Face Recognition
Face Detection
Face Recognition
Face Database
LPR: Coming soon
More
Fire Detection: Coming soon
Temperature Detection: Coming soon
Video Metadata
Target Counting
Object Abandoned/missing
Exception Detection: Coming soon
Crowd Density: Coming soon
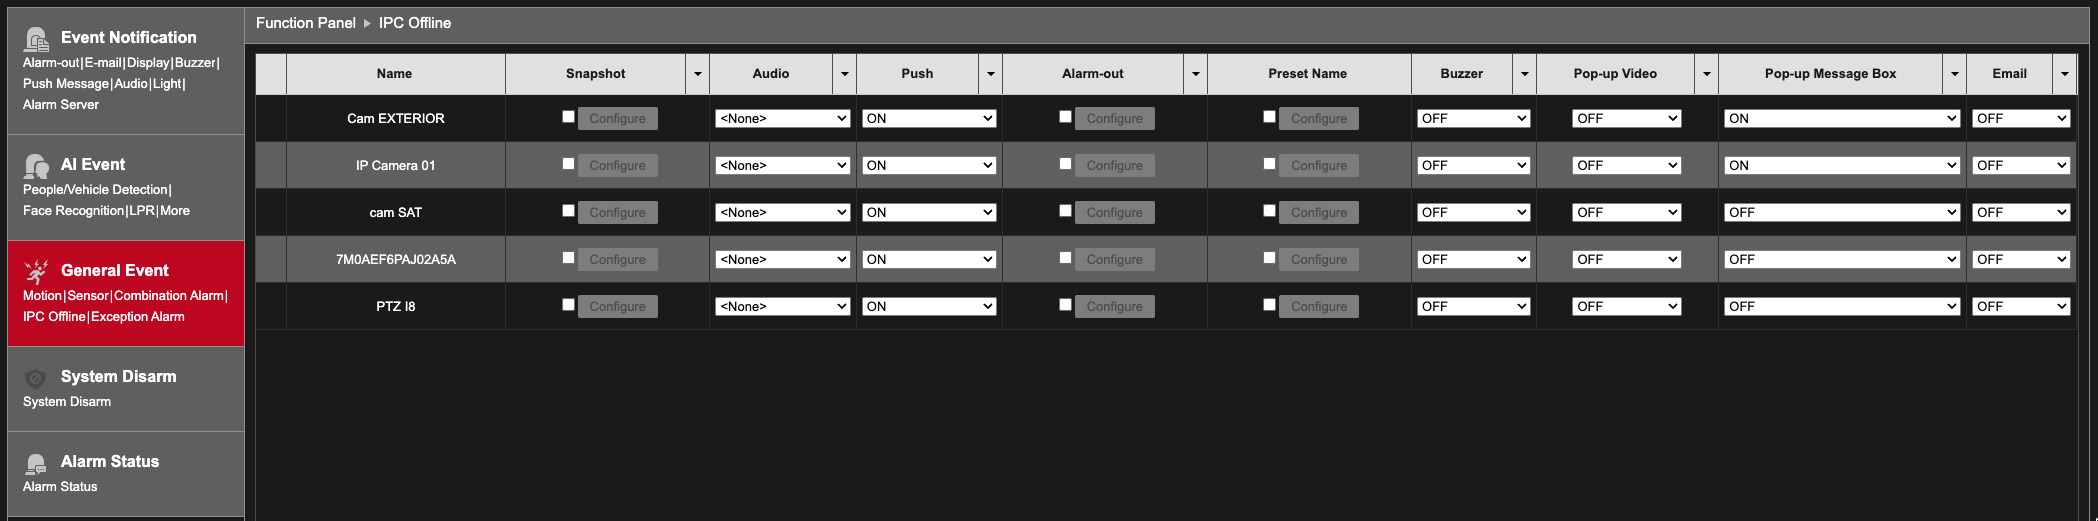
General Event
Motion | Sensor | Combination Alarm | IPC Offline | Exception Alarm
Motion Detection: notification settings
Sensor: are the IO input form the recorder or cameras
Combination Alarm:
IPC Offline: notification settings
 Exception Alarm: notification settings
System Disarm:
To access the System disarm menu via the web interface, the option needs to be first activate in recorder.
Through Settings of the recorder, open the AI / Event menu
A. Select System Disarm
B. Remote client
C. Then Apply to make this active
Now it is possible to enter the System Disarm menu on the web interface
A. To add a sensor or camera
B. Select the cameras and sensors and click on OK
A. Open the config window
B. Select the items to disarm (when it is not needed to receive notifications but still keep recording the events)
C. Then OK to confirm
Then apply to save all.
Alarm Status: overview
12. Safire Smart Hard Drive Disk – Visiotech (visiotechsecurity.com)
Was this article helpful?
Bu bilgiler sorununuzu çözmeye yardımcı oldu mu?
Still need help?
Uzman ekibimiz size yardımcı olmak için burada.