How to use Wisenet cameras with 3rd party VMS
S
Super Admin
How to use Wisenet cameras with 3rd party VMS, Explore the Hanwha Vision IP camera range and find the security camera that best fits your needs. With a wide range of camera models on offer, Hanwha Vision provides a CCTV solution for all budgets. Delivering good-quality, innovative CCTV products at an affordable price, Hanwha Vision cameras are a popular choice for many businesses and organisations.
 To find ports in Immix:
S# - represents the ServerID.
A# - represents the Input of Response.
E# - represents the Event Number associated with the Server Type,
e21 is defaulted to IPC Object Detection.
NOTE: Ensure that the user is Admin or Full user permissions. You must
create an Immix user and assign them as an administrator. A default
admin account cannot be used.
NOTE: Many of Hanwha’s fisheye cameras can use additional camera side dewarp
channels. These should be created first before the camera is added to
exacqVision, so they are identified and configurable inside of exacqVision.
These channels have no motion detection so they either need to record 24/7
or be used for live video only.
NOTE: The Video tab does not exactly match what is in the camera.
To find ports in Immix:
S# - represents the ServerID.
A# - represents the Input of Response.
E# - represents the Event Number associated with the Server Type,
e21 is defaulted to IPC Object Detection.
NOTE: Ensure that the user is Admin or Full user permissions. You must
create an Immix user and assign them as an administrator. A default
admin account cannot be used.
NOTE: Many of Hanwha’s fisheye cameras can use additional camera side dewarp
channels. These should be created first before the camera is added to
exacqVision, so they are identified and configurable inside of exacqVision.
These channels have no motion detection so they either need to record 24/7
or be used for live video only.
NOTE: The Video tab does not exactly match what is in the camera.
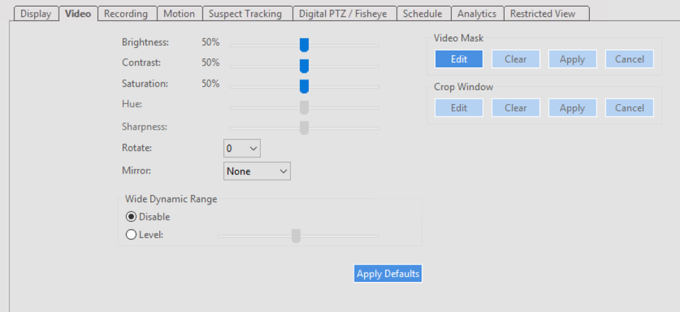 Brightness = Brightness
Contrast = Contrast
Saturation = Color Level in the camera
Wide Dynamic Range = controls SSDR in the camera
Video Mask = controls the camera’s Privacy Areas
Brightness = Brightness
Contrast = Contrast
Saturation = Color Level in the camera
Wide Dynamic Range = controls SSDR in the camera
Video Mask = controls the camera’s Privacy Areas

 Resolution:
 .
.
 TIP: If you see a Bad logon error, move your mouse over the text and an Add button will appear.
Enter the username and password of the camera then click the Add button.
TIP: If you see a Bad logon error, move your mouse over the text and an Add button will appear.
Enter the username and password of the camera then click the Add button.
 After a few moments the status should change to Added.
 .
NOTE: Sometimes the status in Genetec sticks on Bad logon. To resolve this
issue, click Clear All at the bottom of Unit enrollment and add the camera
again. The camera has now been added to Genetec Security Center 5.9.
.
NOTE: Sometimes the status in Genetec sticks on Bad logon. To resolve this
issue, click Clear All at the bottom of Unit enrollment and add the camera
again. The camera has now been added to Genetec Security Center 5.9.
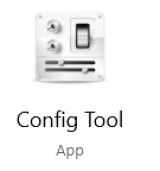 Figure 1
2. Click on the green plus symbol (Figure 2)
3. Select Video Unit (Figure 2)
Figure 1
2. Click on the green plus symbol (Figure 2)
3. Select Video Unit (Figure 2)
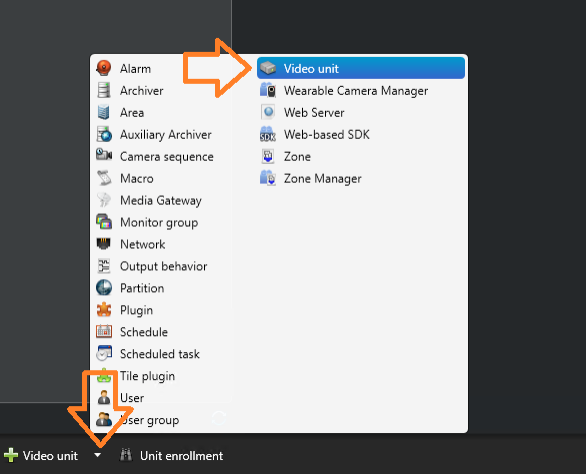 Figure 2
4. Select Hanwha as the manufacturer (Figure 3)
5. The IP Address can be a single device or a range of devices. (Figure 3)
6. Provide the proper credentials and click "Add and close" or "Add." Then, repeat for further units. (Figure 3)
Figure 2
4. Select Hanwha as the manufacturer (Figure 3)
5. The IP Address can be a single device or a range of devices. (Figure 3)
6. Provide the proper credentials and click "Add and close" or "Add." Then, repeat for further units. (Figure 3)
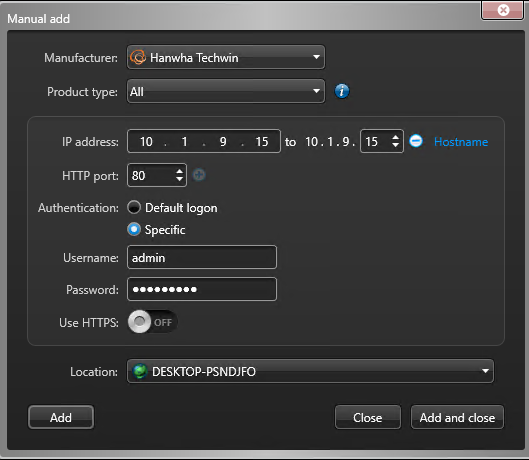 Figure 3
7. Once added to the system, you will be able to view the stream from the Video Unit (Figure 4)
Figure 3
7. Once added to the system, you will be able to view the stream from the Video Unit (Figure 4)
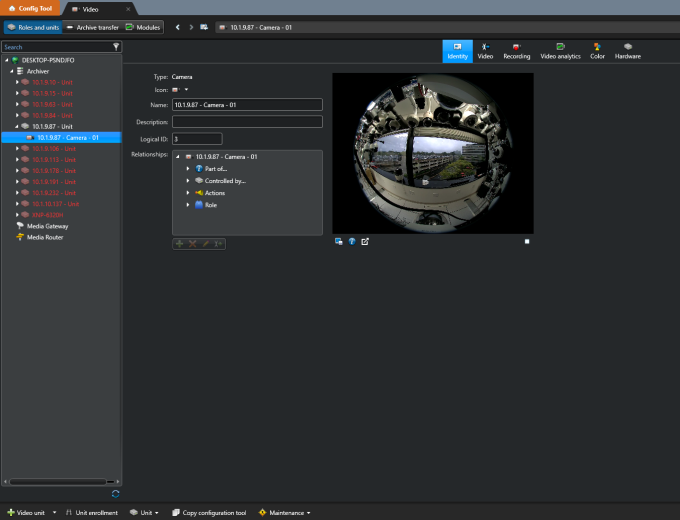 Figure 4
 2. Select the Video Unit in question.
.
2. Select the Video Unit in question.
. 3. Select the Hardware Tab of the Fisheye camera to be configured.
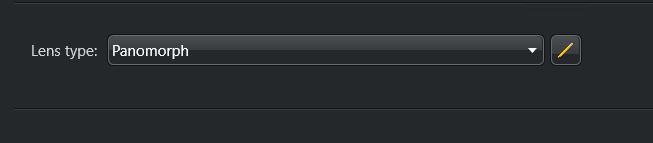
 4. Set the Lens Type to Panamorph.
.
4. Set the Lens Type to Panamorph.
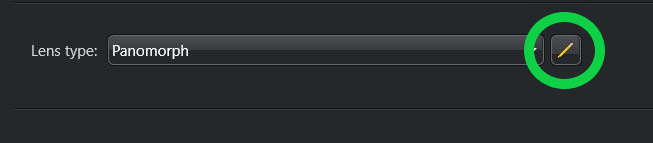
. 5. Click the Pencil to the right of the Panamorph dropdown.
.
5. Click the Pencil to the right of the Panamorph dropdown.
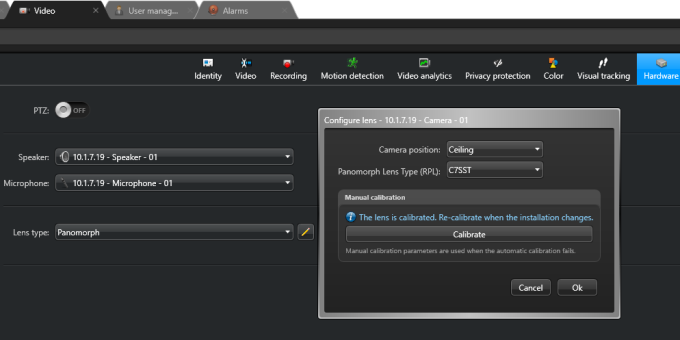
. 6. Set the orientation to either ceiling or wall.
 7. Select the proper Lens Type from the list (See De-warp Code article link below.)
 8. Click calibrate once the code is registered.
 Note: If it fails check the motion detection tab for an improperly configured Event or
Motion Schedule.
Click here for Immervision De-warping codes
.
Note: If it fails check the motion detection tab for an improperly configured Event or
Motion Schedule.
Click here for Immervision De-warping codes
.
How do I integrate Hanwha IP cameras and SUNAPI with Immix?
Summary
This article details the steps to integrate Hanwha IP cameras and SUNAPI with Immix.Integrate Hanwha with Immix
To begin the integration, a suitable port for Immix must be located. NOTE: These are default ports only (they can be configured and may be different to what is listed).
To find ports in Immix:
1.Log into the Hanwha IPC device.
2.Select Setup > Basic > IP & Port > Port. The ports needed by the integration appear.
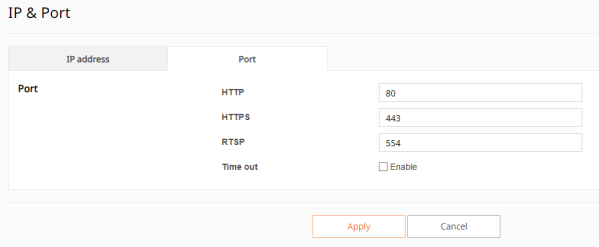
3.HTTP or HTTPs are populated in the Port section. The RTSP port must be forwarded for internal API access.
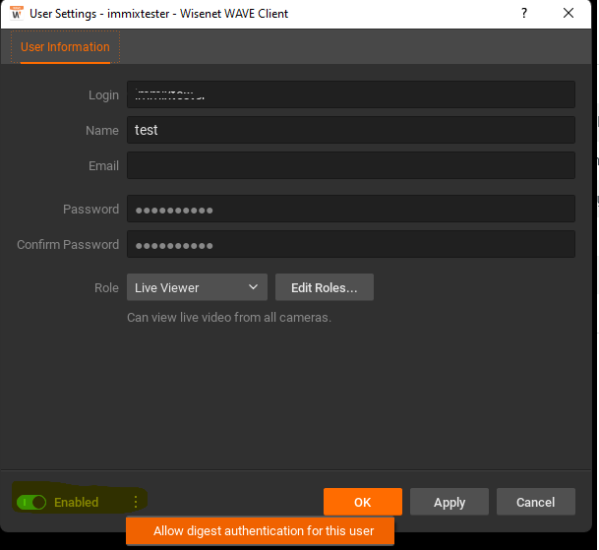
Configuring Users in Hanwha Vision for Immix
To configure users:
1.Ensure that the user is a type of administrator or has full permissions; users without full permissions might experience issues.
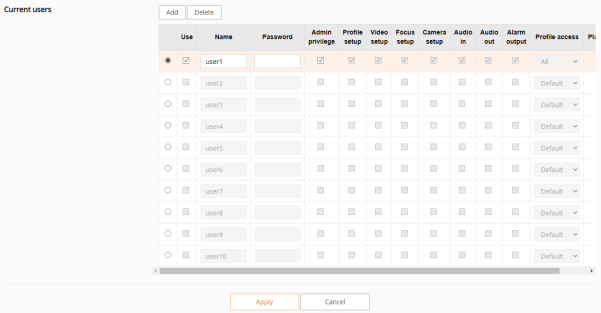
2.Select Setup > Basic > User.
3.Select the checkbox under Use to enable the next available Current User.
4.Assign a name, password, and appropriate permissions.
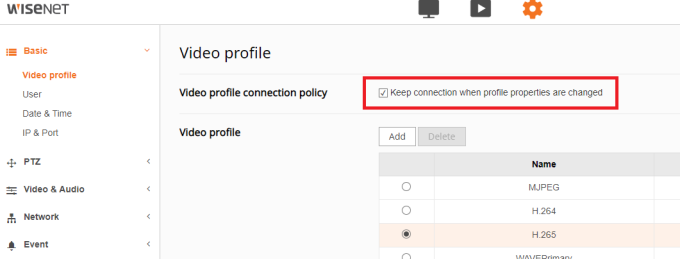
Video Profile
The integration has capabilities to switch between different video profiles. To switch between profiles:
1.Select Setup > Basic > Video Profile.
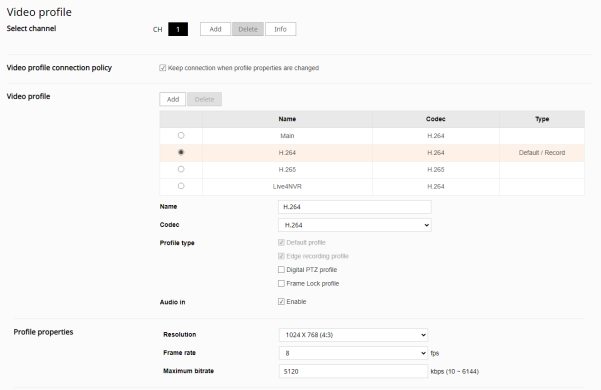
2.Set the Video Compression to H264 for the integration.
3.Check the Enable checkbox at Audio In.
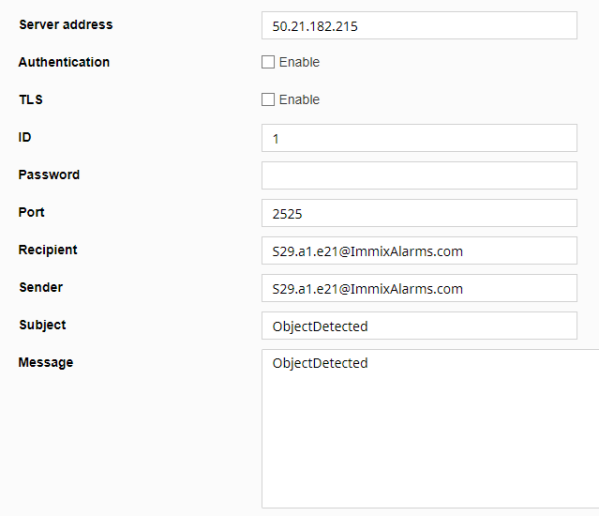
Configuring a Hanwha IPC SMTP Alarm
To configure the alarm into Immix:1.Log into Immix.
2.Select Setup > Edit Sites > Customer >Site.
3.In the Site Actions for Site_Name pane on the right, select View Summary. A report is generated.
4.Format the recipient and sender addresses as follows: S#.a#.e#@immixalarms.com. For example: s29.a1.e21@immixalarms.com
IPC Email Example
Subject: ObjectDetected Sendor: S29.a1.e21@ImmixAlarms.com To: S29.a1.e21@ImmixAlarms.com Date: 20240514-12:03:47XMailer:NFMail https://support.immixprotect.com/hc/en-us/articles/25738891242395-Hanwha-IP-Camera-SUNAPI-Integration 4/7 XMailer: NF Mail MIME-Version: 1.0 Content-Type: multipart/mixed; boundary=594786580.1111.samsungipolis.com --594786580.1111.samsungipolis.com Content-Type: text/plain; charset="iso-8859-1" Content-Transfer-Encoding: 7bit ObjectDetected Time : 20240514-12:03:47 Camera IP : 192.168.1.166 Event Type : EventRule_5_CH1 --594786580.1111.samsungipolis.com Content-Type: application/octet-stream; Content-Transfer-Encoding: base64 Content-Disposition: attachment; /9j/4AAQSkZJRgABAQEAYABgAAD/2wBDABQODxIPDRQSEBIXFRQYHjIhHhwcHj0s LiQySUBMS0dARkVQWnNiUFVtVkVGZIhlbXd7gYKBTmCNl4x9lnN+gXz/2wBDARUEnabling Digest Auth
If you are having trouble using GetConfig, enable Digest Auth for your Hanwha user. The image below shows where to enable this:
NOTE: Ensure that the user is Admin or Full user permissions. You must
create an Immix user and assign them as an administrator. A default
admin account cannot be used.
Configuring a Hanwha IPC SMTP Event
To configure the system-based events into Immix:1.Log into the Hanwha IPC device.
2.Select Setup > Event > Event Rule. Users may configure an action for each event type.
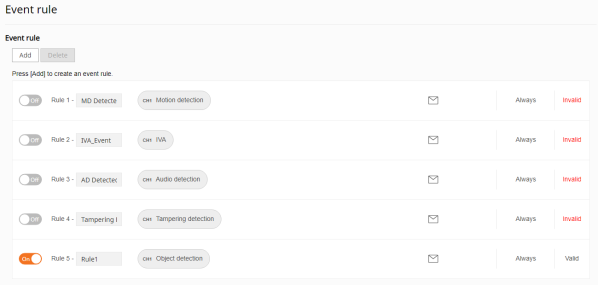
3.Click Add to create a new rule for the event type.
4.Assign a name to the Rule, then click anywhere in the +Add pane.
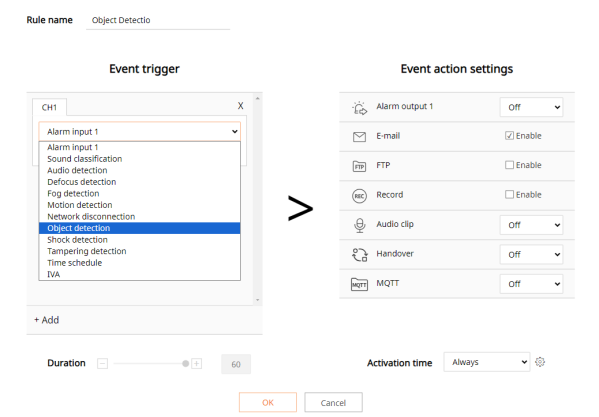
5.Expand the dropdown to display a list of event types.
6.Select one or more event types.
7.In the Event Actions Settings area, select the E-mail checkbox.
8.Select the Activation Time and click OK.
Obtaining the S Number
To obtain the S number:1.Log into Immix.
2.Select Setup > Edit Sites > Customer > Site.
3.In the Site Actions, for Site_Name pane on the right, select View Summary. A report preview is generated, indicating the Identifier or S number of the device.

Configuring Devices within Immix
To configure a device within Immix:1.Log in to Immix with username and password.
2.Navigate to Device Details.
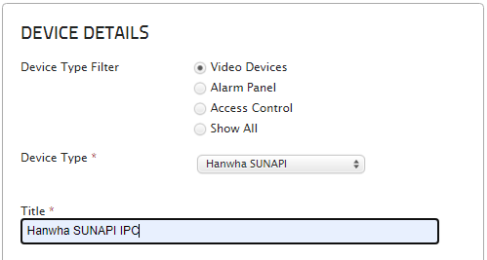
3.Enter information into the following screen.
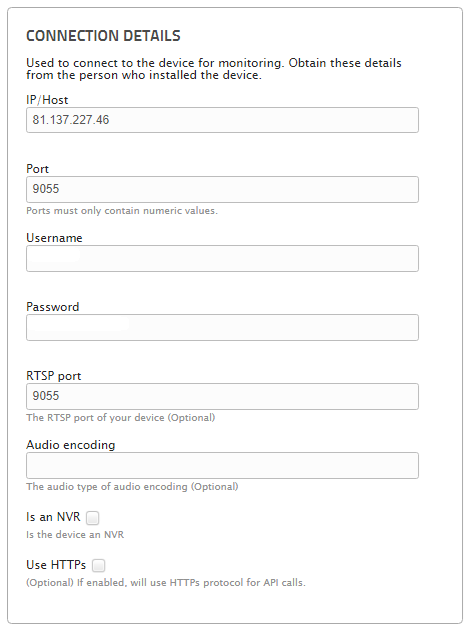
•
• Host - The public address of the Hanwha IPC.
• Port - The http port of the Hanwha IPC.
• User - Username configured in Hanwha IPC.
• Password - Password configured in Hanwha IPC.
• RTSP Port - The RTSP Port configured in Hanwha IPC.
Obtaining the ID of a Camera for Use in the Extra Value
To obtain the ID of the camera:1.Open the Hanwha system desktop client.
2.In the left side, find the appropriate camera.
3.Right click it, and click on Camera Settings. The camera settings open on the General tab.
4.Click More Info. The ID of the camera is under the field Camera ID.
5.Click Copy to copy the id for use in Immix.
SSL Error Alarms
By default, the alarm receiver is configured to disallow insecure connections. To allow connections to insecure devices (no SSL, invalid cert, etc.), change the RequireCertificate config key in appsettings.json to false.Alarms Not Decoding
By default the alarm JSON messages are saved in the file store in the same folder as any alarm footage. To diagnose decoding issues, confirm that this message is what is expected. A typical alarm message looks like the following snippet. Alarm messages always have the broadcastAction alarm. { "Tran": { "Command": "broadcastAction", "Params": { "Params": "eyJhY3Rpb25JZCI6InthYWNiMjdmOC1lYTcwLTRlOGEtOGE1YS03YjZiNzk5ZTliMGR9IiwiYWRkaXRpb25hbFJlc291cmNlcyI6WyJ7MDAwMDAwM "RuntimeParams": "eyJkZXNjcmlwdGlvbiI6Il90aHVtYl9kb3duIiwiZXZlbnRSZXNvdXJjZUlkIjoie2RhZWU5ZWIyLTEyZDYtZTUwNy00Y2MxLWM4ZmUxNG } } } A second approach is to review the service logs, as all messages (even non-alarm messages) are logged there.How to use Wisenet cameras with exacqVision
Summary:
This article provides information on using Wisenet cameras with exacqVision.Step By Step Guide:
Wisenet Camera Settings
Mandatory
The following settings are mandatory:• Configure IP address and password.
• Under Date and Time, check DST if needed.
The exacqVision server also functions as an NTP server and will push its address to the camera for time synchronization.
NOTE: exacqVision needs the camera to be set to the GMT time zone and will
set it to GMT when connected. If the camera is changed afterwards,
recording issues may occur.
• Set at least one motion zone on the camera.
exacqVision by default records on motion but does not create a motion zone on the camera.
NOTE: If the Camera Recording mode says Motion Not Supported after adding
the camera, the most common cause is that motion detection is not enabled.
To resolve this, enable motion detection on the camera and then disable/
re-enable the camera.
Optional
The following settings are optional:• Fine tune motion configuration on the camera to minimize false alarms.
• Configure analytics that may be used such as line crossing, intrusion, etc.
• If the camera has AI capabilities, enable the Object Detection and Best/Detection shot for the AI metadata in exacqVision.
• Enable optional camera settings as detailed at the end of this article.
After Adding to exacqVision
exacqVision defaults to using the Hanwha default H.264 stream (profile 2) but can be changed to H.265. This changes exacqVision to utilize the default H.265 stream on the camera (profile3). NOTE: It is not possible to set h.265 via exacqVision on a fisheye camera. You need to log in to the camera interface and manually change the FISHEYE profile to H.265. To change the default stream to H.265:1.Navigate to the exacqVision Camera Settings page and click the Recording tab.
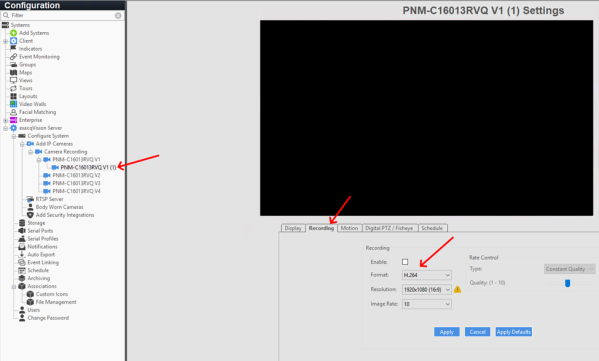 In the Rate Control field, the default is Constant Quality which equates to Variable Bit Rate in Hanwha cameras.
The Quality slider default of 2 sets a low cap.
1 = minimum VBR cap for that stream
10 = maximum VBR cap for that stream
For 4MP+ resolution cameras it is beneficial to increase the quality to 3 or 4; otherwise, the video may be compressed too much thus decreasing quality.
In the Rate Control field, the default is Constant Quality which equates to Variable Bit Rate in Hanwha cameras.
The Quality slider default of 2 sets a low cap.
1 = minimum VBR cap for that stream
10 = maximum VBR cap for that stream
For 4MP+ resolution cameras it is beneficial to increase the quality to 3 or 4; otherwise, the video may be compressed too much thus decreasing quality.
2.If needed, select a stream to add from the Multistreaming dropdown menu and click Add Stream.
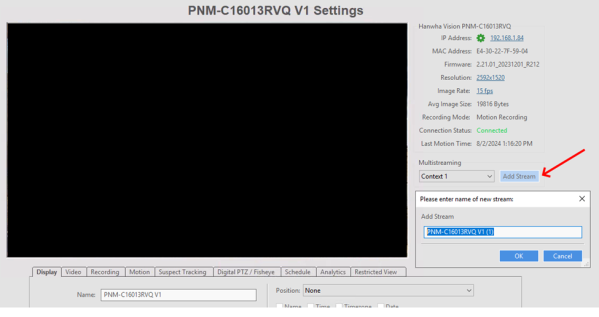
NOTE: With high-resolution cameras, it is best practice to create lower
resolution live viewing streams to save on decoding and bandwidth. These
streams can be added in exacqVision on the Camera Settings page.
3.Click the Motion tab to edit motion on the camera (although exacqVision does not have all the options available that are in the Hanwha cameras).
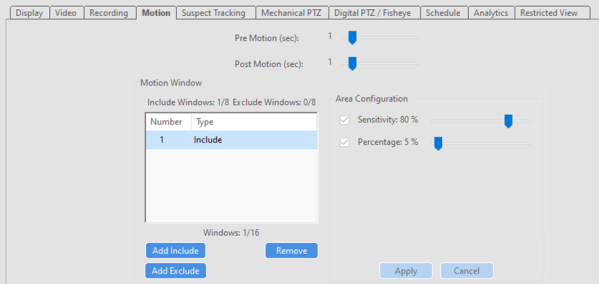
NOTE: It is possible to add motion, including windows, without adding\
multiple points to create unique shapes.
• Sensitivity in exacqVision = Sensitivity setting in the camera
• Percentage in exacqVision = Level of Detection setting in the camera
• Minimum duration for each area is not available in exacqVision.
• Configuring the minimum and maximum object size for motion detection is not available in exacqVision.
4.Click the Analytics tab to see several options for displaying and recording data.
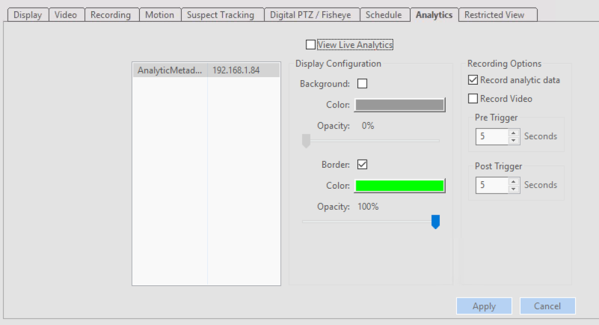
• Display Configuration affects the bounding boxes displayed in exacqVision.
• Record analytic data records the metadata from the camera for searching later.
• Record Video will trigger a recording when an analytic event is triggered and recognized by exacqVision like motion.
5.If the camera is a fisheye, click the Digital PTZ/Fisheye tab to configure the proper dewarp code.
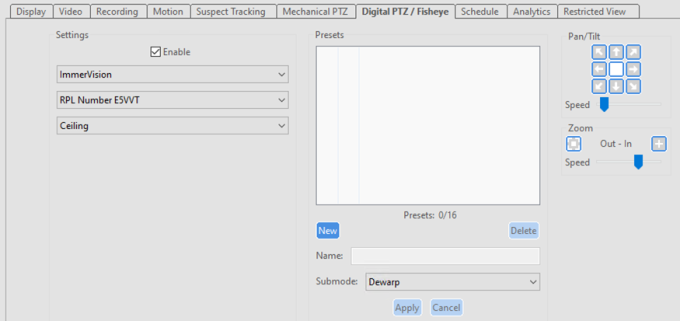 a. Select Immervision from the first dropdown menu.
b. Select the proper code from the second dropdown menu.
Refer to the following article for Hanwha Fisheye Lens Codes: Immervision Fisheye Dewarp Lens Codes
c. Select how the camera is mounted for proper dewarping from the third dropdown menu.
a. Select Immervision from the first dropdown menu.
b. Select the proper code from the second dropdown menu.
Refer to the following article for Hanwha Fisheye Lens Codes: Immervision Fisheye Dewarp Lens Codes
c. Select how the camera is mounted for proper dewarping from the third dropdown menu.
a. Select Immervision from the first dropdown menu.
b. Select the proper code from the second dropdown menu.
Refer to the following article for Hanwha Fisheye Lens Codes: Immervision Fisheye Dewarp Lens Codes
c. Select how the camera is mounted for proper dewarping from the third dropdown menu.
Brightness = Brightness
Contrast = Contrast
Saturation = Color Level in the camera
Wide Dynamic Range = controls SSDR in the camera
Video Mask = controls the camera’s Privacy Areas
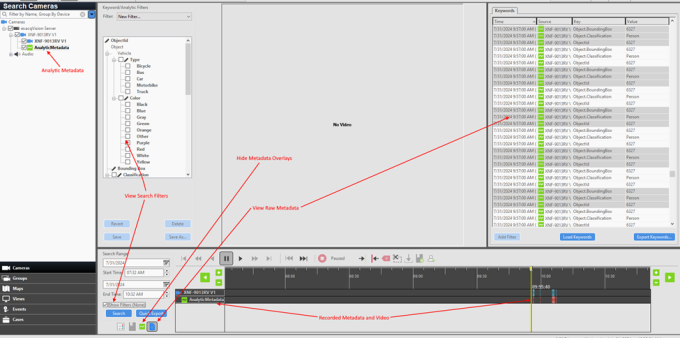
Searching AI Metadata
To search AI metadata:1.From the exacqVision home page, click the Search ( ) icon in the top left corner of the screen.
) icon in the top left corner of the screen.2.Expand the camera tree then select the camera and the analytic metadata associated with it.
3.Select the Search Range to search for then click Search.
4.Click the Paper ( ) icon to view the raw metadata.
A pane to the right of the video will appear with the raw data of that time.
) icon to view the raw metadata.
A pane to the right of the video will appear with the raw data of that time.
) icon to view the raw metadata.
A pane to the right of the video will appear with the raw data of that time.
5.Check the Show Filters checkbox to filter data.
6.In the pane to the left of the video, check the checkboxes to filter.
7. Click Save then click the Search button again.
NOTE: Save filters can be selected from the dropdown menu at the top.
8.If certain overlays for the metadata need to be hidden, click the Green ( ) icon and select which overlays should be hidden.
) icon and select which overlays should be hidden.
Creating Events Based on Analytics
NOTE: The analytics must be configured in the camera first. Once done and the camera is added to exacqVision, disable and re-enable the camera. To create events based on analytics:1.In exacqVision, go to Configuration and select Event Linking.
2.Under Event Type, select Analytics.
NOTE: The Event Source is the analytic to trigger the Event. There can
potentially be many of these so use the filter to find the camera.
3.Select the Action Type and Action Target.
Monitoring Analytic Events
To monitor analytic events, follow the steps in the Creating Events Based on Analytics section. However, use Event Monitoring instead of Event Linking.
Special Considerations
Take the following into consideration when setting up a camera:
• exacqVision only allows four channels per license. If a camera has more than four channels, refer to the exacqVision IP Camera Integration page for special instructions.
For example:
• SPE-1630 has 16 channels. With four channel licensing, this camera will need four licenses and be added per the exacqVision integration entry for this camera.
• PNM-C3404RQPZ has five channels. This camera will need to be added twice per the exacqVison integration entry for this camera.
• If a camera disconnects from the exacqVision server, refer to the following article to utilize edge storage for “trickle back”: Configuring Samsung|Hanwha Camera Edge Storage for Use with Server “Network Loss Recording” Feature
• Because fisheye cameras only have one default profile it is not possible to set h.265 via exacqVision. Log in to the camera and set the FISHEYE profile to h.265 then apply it and disable/re-enable in exacqVision to reflect the changes.
• Refer to the following article for information regarding integrating the Hanwha RoadAI camera data into exacqVision: Road AI LPR application with Hanwha Cameras
Optional Common Camera Settings
The following camera settings are optional:
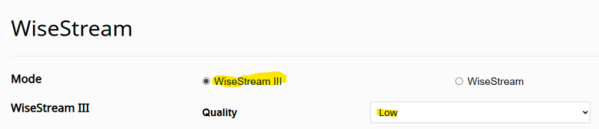
• WiseStream 3 – Setup > Video & Audio > Wisestream
Wisestream uses an algorithm that compresses non-moving objects at a higher rate, saving bandwidth and storage. AI cameras utilize Wisestream 3, which employs AI-driven algorithms for this process, while non-AI cameras use a pixel-based algorithm. The quality setting determines the level of compression applied: a higher value means greater compression of non-moving objects.
• Dynamic GoV/FPS – Setup > Video Profiles > Select Recording Profile
These utilize the Wisestream algorithm to control the framerate of the profile and/or the key-frame interval to save on bandwidth and storage.
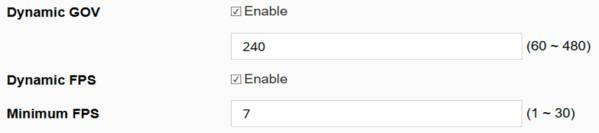
NOTE: Ensure the correct profile that exacqVision is using (264 or 265) is
selected.
• AI Based Shutter – Setup > Video & Audio > Camera Setup > Exposure
This setting is only available on AI-based cameras. It controls the shutter speed based on the presence of objects, reducing motion blur in low-light conditions.
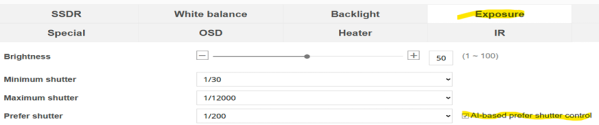
NOTE: This option is not available if WDR is turned on.
• WiseNR2 Noise Reduction – Setup > Video & Audio > Camera Setup > Exposure
This setting is not available in all cameras. Wise NR II utilizes an additional algorithm to improve low-light images and reduce noise.

Verint recorders using different FPS for normal and event recording
Summary: When a Hanwha camera is registered to a Verint NVR, the use of different FPS can be engaged on the NVR Explanation of Behavior:• Enabling this option is required to keep the video connection alive for Verint EdgeVR recorders using different frame rates between normal and event.
• Firmware can be easily updated via the NVRs web interface, the NVRs monitor/mouse interface, Wisenet Device Manager, or Wisenet Viewer. The process takes approximately 5 minutes.
• The way Verint operates is that the recorder will dictate the camera's FPS, and changing the video profile on the camera, by default, momentarily drops and reestablishs the connections.
How to add a Wisenet camera to Genetec Security Center 5.9
Summary:
This article provides instructions for adding a Wisenet camera to Genetec Security Center 5.9 and the additional steps needed if the camera has a fisheye lens.Step By Step Guide:
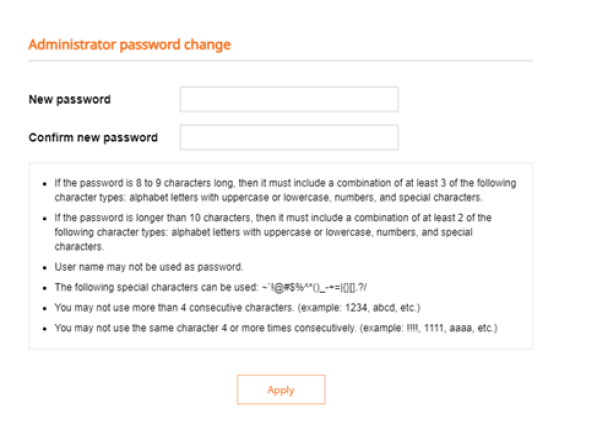
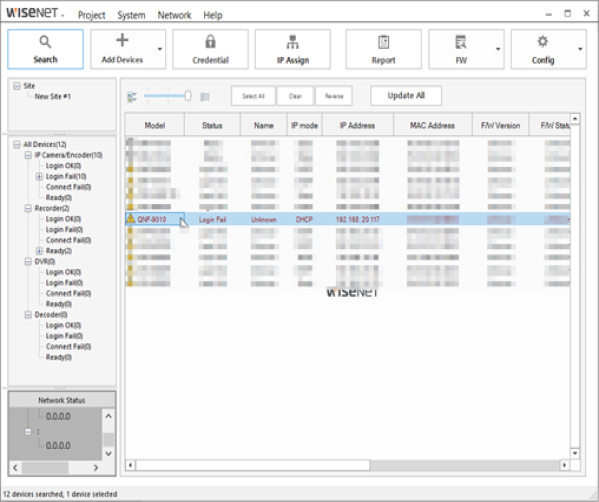
To add a Wisenet camera to Genetec Security Center 5.9:1.Open Wisenet Device Manager.
2.Double-click your camera to load the camera's webpage.
3.Enter and confirm your new password, then click Apply.
NOTE: If a password has already been configured and you need to default
the camera, press and hold the Reset button for 5-10 seconds.
.
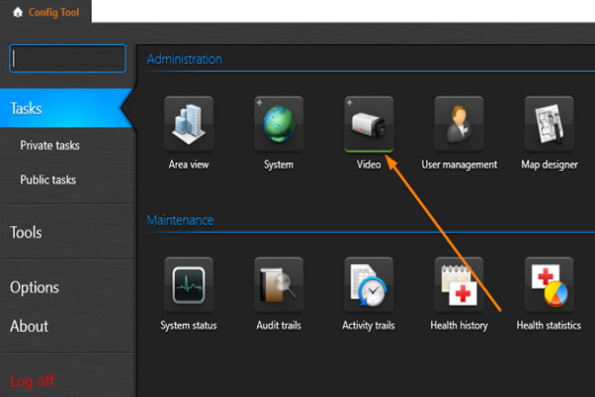
4.From the Genetec Config Tool application, click the Video icon.
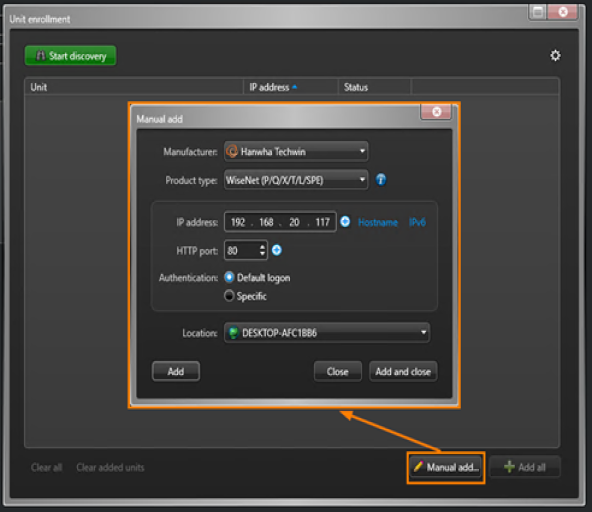
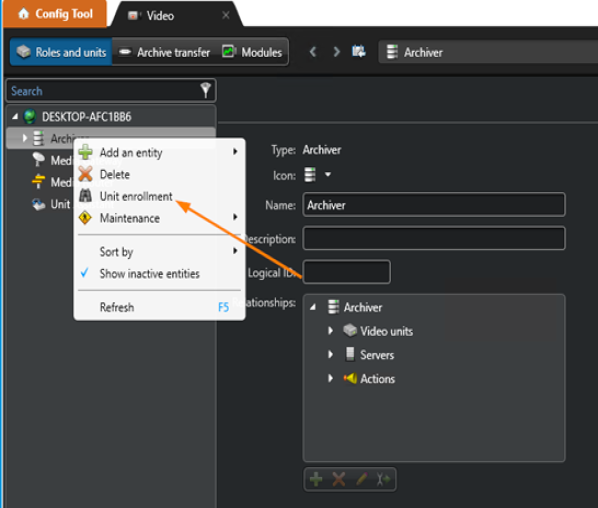
5.Right-click Archiver and select Unit enrolment.
6.Click Manual add then select Hanwha Techwin from the Manufacturer dropdown menu, select Wisenet from the Product type dropdown menu, and enter the IP address of the camera.
NOTE: You can find the IP address of the camera in the Wisenet Device
Manager results screen. Click Add and close to enroll the camera.
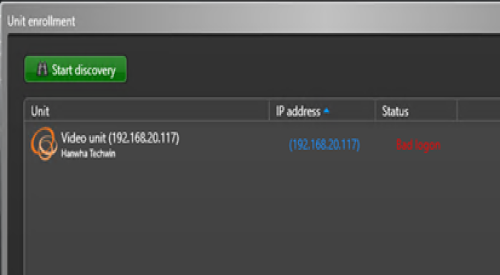
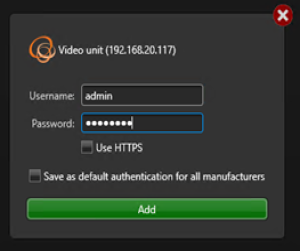
TIP: If you see a Bad logon error, move your mouse over the text and an Add button will appear.
Enter the username and password of the camera then click the Add button.
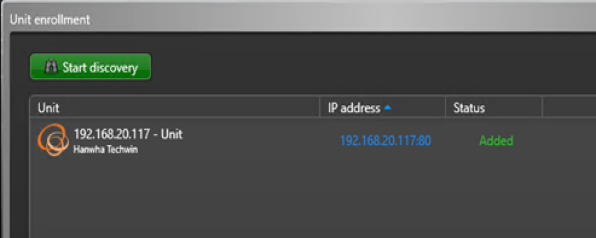
After a few moments the status should change to Added.
.
NOTE: Sometimes the status in Genetec sticks on Bad logon. To resolve this
issue, click Clear All at the bottom of Unit enrollment and add the camera
again. The camera has now been added to Genetec Security Center 5.9.
Configuring a Fisheye Camera
The following additional steps are required if the camera has a fisheye lens:1.From the Video tab, select the newly added camera under Archiver then click Hardware and edit the Lens type.
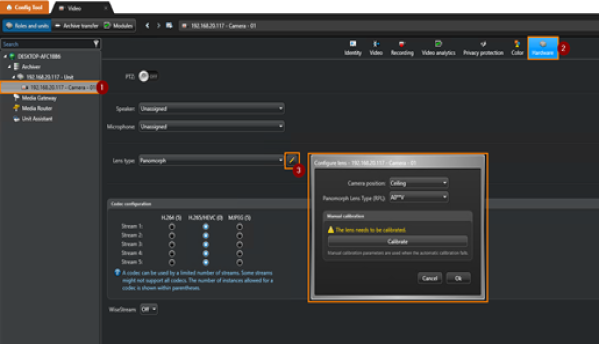
2.Select your Camera position from the dropdown menu.
NOTE: Genetec may not automatically pick the correct lens type and
could fail to calibrate.
3.Select the correct Lens Type from the dropdown menu.
4.Click Ok and Apply at the bottom of the page to save changes.
 The fisheye camera settings are now complete.
The fisheye camera settings are now complete.
Viewing the Newly Added Camera
To view the newly added camera:1.Open the Security Desk application from the Windows Start menu.
2.Log in and and select Monitoring.
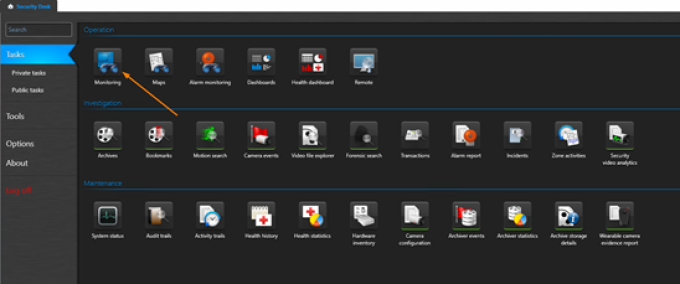
3.Double-click the newly added camera to see live video.
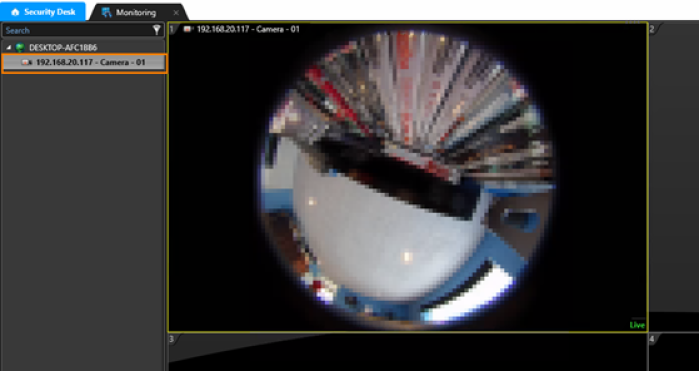
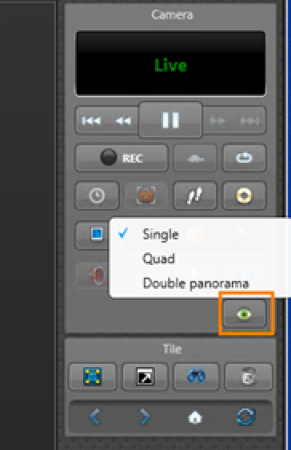
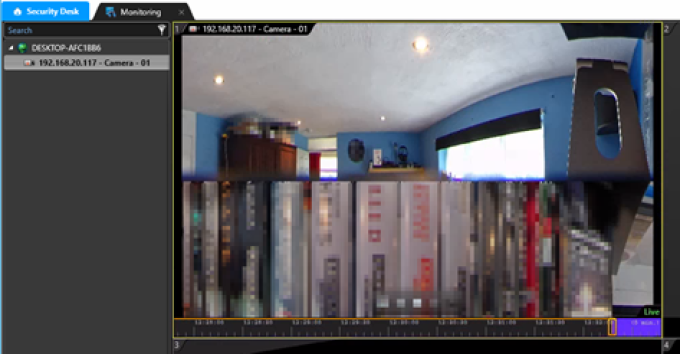
4.Use the scroll wheel on the mouse or click the Viewing Mode icon to manipulate the image.
Genetec - Adding a Hanwha Camera to Genetec 5.7 or later
Summary:
This article will provide a step-by-step guide for adding a Wisenet camera to Genetec.Step By Step Guide:
1. Open the Config Tool (Figure 1)
Figure 1
2. Click on the green plus symbol (Figure 2)
3. Select Video Unit (Figure 2)
Figure 2
4. Select Hanwha as the manufacturer (Figure 3)
5. The IP Address can be a single device or a range of devices. (Figure 3)
6. Provide the proper credentials and click "Add and close" or "Add." Then, repeat for further units. (Figure 3)
Figure 3
7. Once added to the system, you will be able to view the stream from the Video Unit (Figure 4)
Figure 4
How do calibrate a Hanwha Fisheye Camera for use on a Genetec VMS?
Applies to Models: XNF, SNF, and QNF Series CamerasSummary:
This article describes how to add a Hanwha Fisheye camera to Genetec, by set a lens code and calibrate the camera. Note: The lens code will be determined by the model. See this article for a complete list of codes.Step By Step Guide:
1. Open the Config Tool, go to Video Unit.
2. Select the Video Unit in question.
.
3. Select the Hardware Tab of the Fisheye camera to be configured.
4. Set the Lens Type to Panamorph.
.
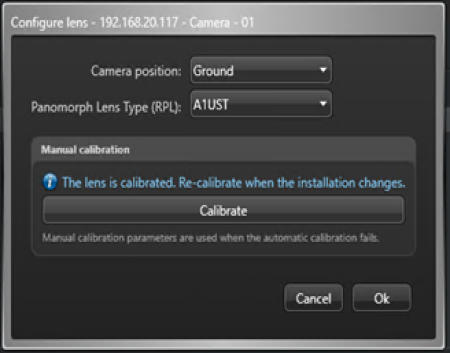
5. Click the Pencil to the right of the Panamorph dropdown.
.
6. Set the orientation to either ceiling or wall.
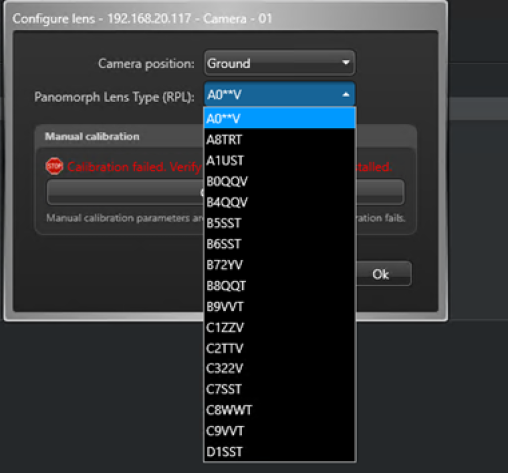
7. Select the proper Lens Type from the list (See De-warp Code article link below.)
8. Click calibrate once the code is registered.
Note: If it fails check the motion detection tab for an improperly configured Event or
Motion Schedule.
Click here for Immervision De-warping codes
. Yorumlar (0)
Henüz yorum yapılmamış. İlk yorumu siz yapın!