
How to test PTZ functionalities in the ONVIF Device Manager
QUESTION
How to test PTZ functionalities in the ONVIF Device Manager
ANSWER
There are three ONVIF PTZ moves (or functions), Absolute move, Relative move and Continuous move. To check if the camera can be controlled using any of those moves, please follow the next steps:
Step 1. Open ONVIF Device Manager (v2.2.250 was used for this tutorial)
Step 2. Log in using the camera username and password.
Note: this username and password will be applied to all the cameras.
Step 3. Find the camera in the Device list and double click on it. You can also type the camera IP.
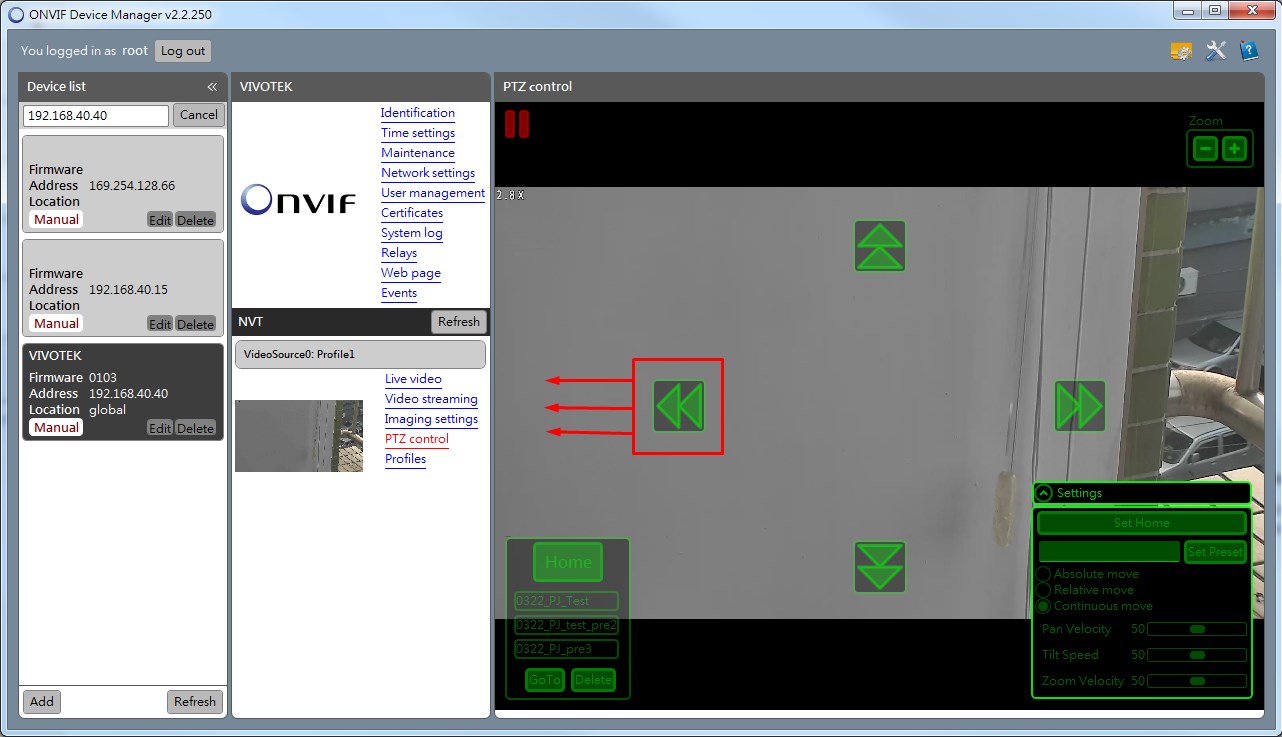
Step 4. After connecting to the camera, select the camera “PTZ control” option. This will take you to the PTZ control window
Step 5. In the right bottom corner you will find the “Settings” options in where you can choose which type of move (Absolute, Relative or Continuous) you want to test.
Absolute move (move to point):
Control the camera by specifying the PTZ coordinates of the position you want to move as well as the Pan/Tilt/Zoom speed used to move to those coordinates (e.g when camera going to point (x,y) it will move at an speed of Tilt = 50 and Pan = 50). To test if the camera can be moved using the absolute move, please follow the next steps:
Step 1. In the setting window, select the coordinate where you want to move
Step 2. Then, press the “Move” button, The device will position in the selected coordinates.
Relative move (move on click):
Control the PTZ by clicking the buttons, this will make the camera move once. To test if the camera can be moved using the relative move, please follow the next steps:
Step 1. In the setting window, select the "pan" and "tilt" distance you want to move (e.g Tilt = 10 will move 10 steps when tilting). Note: you can also set the Pan/Tilt/Zoom speed used when moving.
Step 2. Then, click in the directional arrows (depending on where you want to move)
Continuous move (move continuously):
Move the camera continuously without stopping. To test if the camera can be moved using the continuous move, please follow the next steps:
Step 1. In the setting window, select the Pan/Tilt/Zoom speed you want to move
Step 2. Then, click in the directional arrows (depending on where you want to move). If the button keeps pressed the camera will keep moving (not available in relative move)

Did this security guide help you?
Rate this article to help fellow engineers find the best guides.

Alex Vance
Senior Security Systems Architect & IoT Consultant with over 15 years in digital surveillance design.

Discussion (0)
No comments yet. Be the first to share your thoughts!
Leave a Comment