
Hik-Connect Camera / NVR / DVR Guide
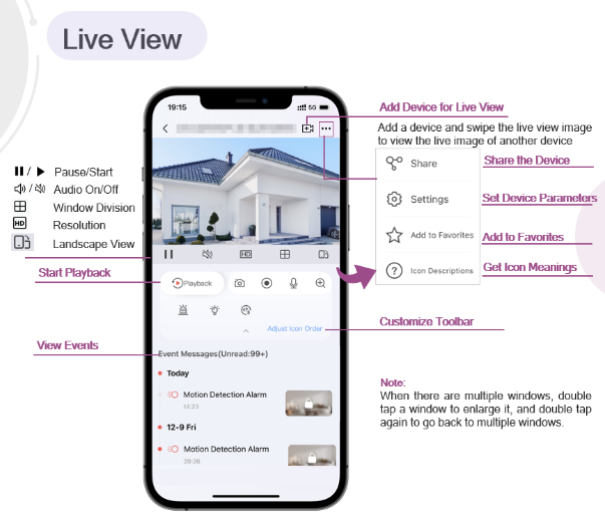
Hik-Connect Camera / NVR / DVR Guide, The Mobile Client supports adding cameras, NVRs, and DVRs. After you add the devices, you can start live view, playback on the client. You can also link cameras with NVR/DVR, set motion detection alarms for network cameras, and reset password of NVRs or DVRs, etc.
Adjust the brightness of the camera light.
Light Linkage
If enabled, when activities of human beings or animals are detected at night in the areas specified by you (see Light Linkage Area Settings, the camera light will be automatically turned on.
Light Linkage Area Settings
Tap the areas to specify them as the light linkage areas.
Batch Arm/Disarm Cameras Linked to NVR
For cameras linked to NVRs and areas of NVRs, you can batch arm/disarm them, and silence alarms.
Note
Only NVRs with the firmware version 4.63.000 and newer support these updates.
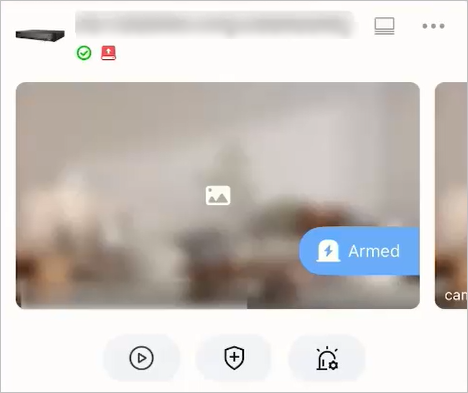 Figure 1 NVR
Edit Settings of Cameras Linked to NVR/DVR
For cameras linked to NVR/DVR, you can edit their names, hide or show them in the device list, and enable camera cascading.
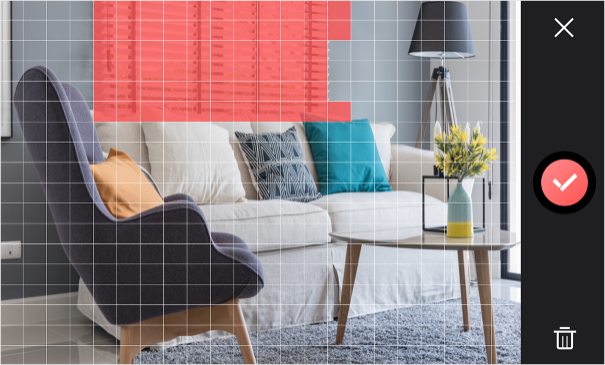 Figure 1 Draw Motion Detection Area
Moving persons, large moving pets, and any other large moving objects in the motion detection area will trigger the alarm, while smaller objects will not.
Medium
Moving small pets and any other medium-sized moving objects in the motion detection area will trigger the alarm, while smaller objects will not.
High
Moving insects, moving leaves, and any other larger objects will trigger the alarm.
Go back to the Notification page and make sure Notification is enabled.
Note
For details about how to enabling notification, see Enable Notifications
.
Figure 1 Draw Motion Detection Area
Moving persons, large moving pets, and any other large moving objects in the motion detection area will trigger the alarm, while smaller objects will not.
Medium
Moving small pets and any other medium-sized moving objects in the motion detection area will trigger the alarm, while smaller objects will not.
High
Moving insects, moving leaves, and any other larger objects will trigger the alarm.
Go back to the Notification page and make sure Notification is enabled.
Note
For details about how to enabling notification, see Enable Notifications
.
 > Settings on an NVR card to enter the Settings page of the NVR, and then tap Network Camera Topology to enter the topology page. On the page, you can perform the following operations.
 in the upper right corner to refresh the topology structure.
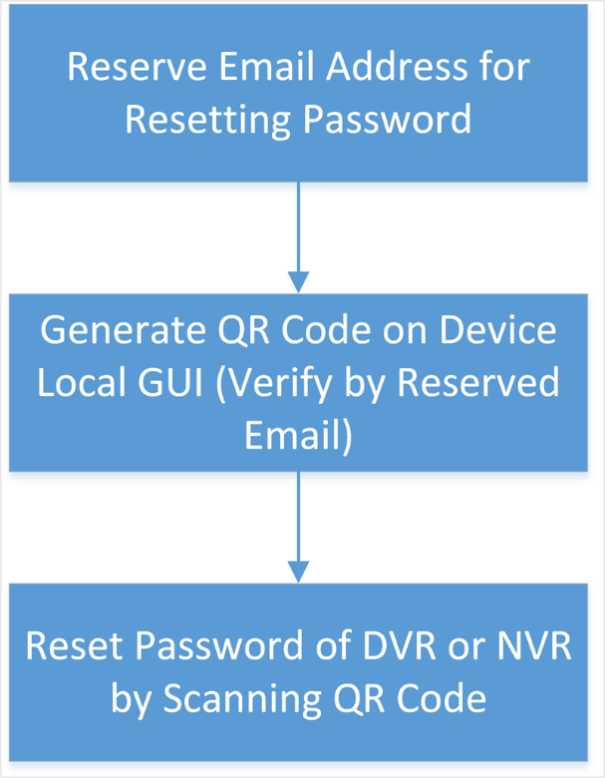 Figure 1 Flow Chart
Reset Password by Hik-Connect
You can reset the password of DVR or NVR via Hik-Connect.
Reserve Email Address for Resetting Password
Make sure you have reserved email address for resetting the admin password of NVR or DVR if you want to change the password by scanning QR code.
Note
The DVR or NVR should support the function.
Generate QR Code by Reserved Email
If you forgot the admin password of the DVR or NVR, you can generate a QR code on the device's local GUI and then scan the QR code via the Mobile Client to reset the admin password.
Make sure you have reserved an email address for resetting password.
Note
The DVR or NVR should support this function.
Figure 1 Flow Chart
Reset Password by Hik-Connect
You can reset the password of DVR or NVR via Hik-Connect.
Reserve Email Address for Resetting Password
Make sure you have reserved email address for resetting the admin password of NVR or DVR if you want to change the password by scanning QR code.
Note
The DVR or NVR should support the function.
Generate QR Code by Reserved Email
If you forgot the admin password of the DVR or NVR, you can generate a QR code on the device's local GUI and then scan the QR code via the Mobile Client to reset the admin password.
Make sure you have reserved an email address for resetting password.
Note
The DVR or NVR should support this function.
PTZ is an abbreviation for "Pan, Tilt, and Zoom". With the PTZ Control functionality provided by the Mobile Client, you can make the cameras pan and tilt to the required positions, and zoom in or out the live video images.
Start live view of the camera, and tap  to pop up the PTZ control panel.
Note
PTZ control should be supported by the camera. For details about starting live view, refer to Start and Stop Live View.
to pop up the PTZ control panel.
Note
PTZ control should be supported by the camera. For details about starting live view, refer to Start and Stop Live View.
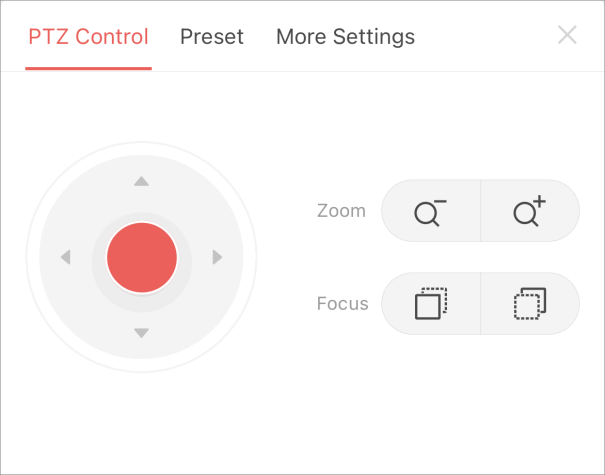 Figure 1 PTZ Control
On the PTZ Control panel, the following operations are supported.
Figure 1 PTZ Control
On the PTZ Control panel, the following operations are supported.
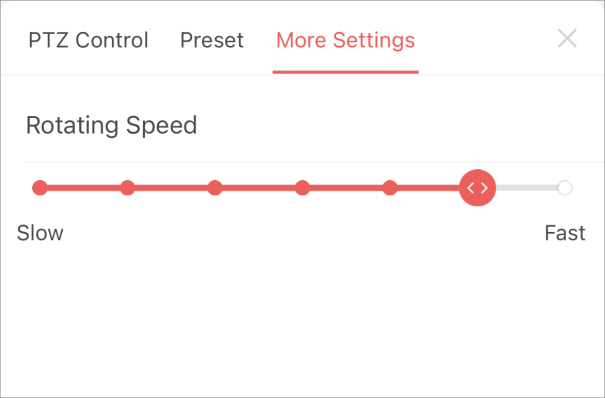 Figure 2 More Settings
Drag
Figure 2 More Settings
Drag  to the right or left to set the PTZ rotating speed.
 , and then enter the device verification code to open the door.
Note
The default device verification code is usually on the device label. If no verification code found, enter the device verification code you created when enabling Hik-Connect service.
, and then enter the device verification code to open the door.
Note
The default device verification code is usually on the device label. If no verification code found, enter the device verification code you created when enabling Hik-Connect service.
 Select a date.
Note
The date during which video files were recorded is marked with a yellow dot.
Playback Time
Set the start time point for the playback in the selected date.
Select a date.
Note
The date during which video files were recorded is marked with a yellow dot.
Playback Time
Set the start time point for the playback in the selected date.
Note
Download Video Segment from Device
During playback of the cameras linked to a DVR or NVR, you can download a specific video segment as an evidence if it contains important information about incidents such as violent crimes in case of the need for settling disputes or legal cases.
Note
The function should be supported by the device.
 when the video footage is played to 00:00:30, the segment from 00:00:20 to 00:02:30 will be selected.
Note
In special occasions when 130-seconds duration is not available to be selected following the above-mentioned rule, the segment will extend afterwards or backwards until the segment duration reaches 130 seconds. For example, if you start downloading from the very beginning of the video footage, the selected segment will be from 00:00:00 to 00:02:10.
when the video footage is played to 00:00:30, the segment from 00:00:20 to 00:02:30 will be selected.
Note
In special occasions when 130-seconds duration is not available to be selected following the above-mentioned rule, the segment will extend afterwards or backwards until the segment duration reaches 130 seconds. For example, if you start downloading from the very beginning of the video footage, the selected segment will be from 00:00:00 to 00:02:10.
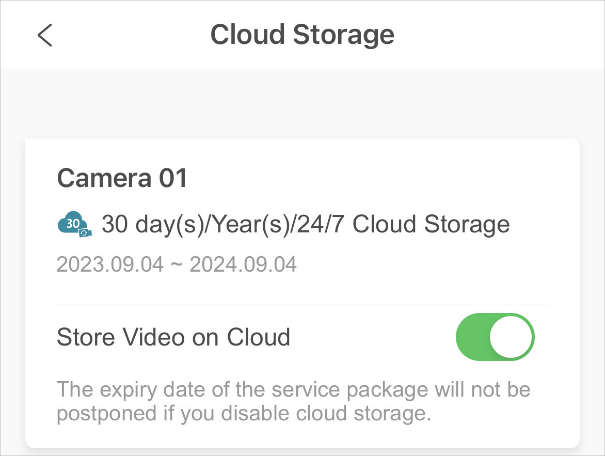 Figure 1 Cloud Storage
Note
You can adjust the playback speed to up to 8 times faster.
Figure 1 Cloud Storage
Note
You can adjust the playback speed to up to 8 times faster.
.
Manage Solar Camera
After adding a solar camera to the Mobile Client, you can control and manage it remotely. The supported functions include waking up the device, viewing its network signal strength, switching power consumption mode, etc.Wake Up Solar Camera
Unlike using other network cameras, you need to wake up a solar camera before you can control it. You can wake it up in the following two ways:• On the device list page, tap  > Settings to enter the device settings page. Once you enter this page, the camera will start waking up.
 > Settings to enter the device settings page. Once you enter this page, the camera will start waking up.
• On the device list, tap the device to enter its live view page. Once you enter this page, the camera will start waking up.
View Network Signal Strength
Enter the device settings page of the solar camera, and then tap Network Strength to view its network strength level.Switch Power Consumption Mode
Enter the device settings page of the solar camera, tap Power Consumption Mode and then select a mode. Note After switching power consumption mode, you need to reboot the solar camera to make the new settings take effect on the device. Set Light for Floodlight Camera You can set light for the Floodlight camera. Make sure you have added a Floodlight camera to the Mobile Client.1.On the device list page, tap  > Settings on a device card to enter the Settings page of a Floodlight camera.
 > Settings on a device card to enter the Settings page of a Floodlight camera.
2.Tap Light Settings to enter the Light Settings page.
3.Set the parameters.
Adjust Brightness
1.On the device list page, find the device card of an NVR.
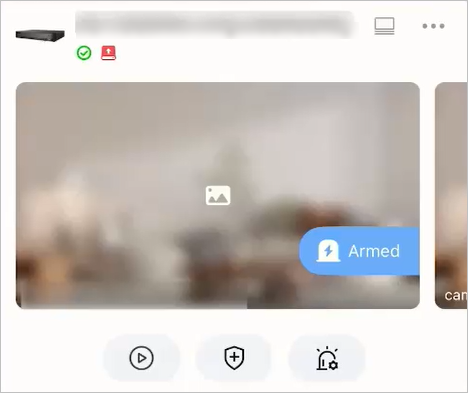 Figure 1 NVR
2.Optional: You can perform the following operations.
| Batch Arm/Disarm Cameras and Areas or Arm Them Silently | Tap  , and tap Arm / Arm Silently / Disarm at the bottom of the page, and all cameras linked with the NVR will be armed / armed silently / disarmed. , and tap Arm / Arm Silently / Disarm at the bottom of the page, and all cameras linked with the NVR will be armed / armed silently / disarmed. |
| Arm/Disarm a Single Camera or Area or Arm One Silently | Tap  to go to the area and camera details page.
Tap a camera or area, and tap Arm / Arm Silently / Disarm at the bottom of the page, and the selected camera or area will be armed / armed silently / disarmed. to go to the area and camera details page.
Tap a camera or area, and tap Arm / Arm Silently / Disarm at the bottom of the page, and the selected camera or area will be armed / armed silently / disarmed. |
| Edit Area/Camera Details | Tap  to go to the area and camera details page.
Tap to go to the area and camera details page.
Tap  in the lower-right corner of an area or camera to edit its information in the lower-right corner of an area or camera to edit its information |
1.On the device list page, tap  > Settings on a device card to enter the Settings page of an NVR or DVR.
 > Settings on a device card to enter the Settings page of an NVR or DVR.
2.Tap Linked Camera to enter the Linked Camera page, and then edit camera settings.
| Edit Camera Name | Tap  to enter the camera details page, and then tap Channel Name to edit the camera name, and finally tap to enter the camera details page, and then tap Channel Name to edit the camera name, and finally tap  to save the settings. to save the settings. |
| Hide/Show Camera | Tap  or or  to hide or show the camera on the device list respectively. to hide or show the camera on the device list respectively. |
Set Motion Detection Alarm for Network Camera
Motion detection is a way of detecting motion in a security scene by analyzing image data and differences in a series of images. After setting motion detection area within the field of view of the network camera, the network camera will be able to detect the objects in motion within the area you set and at the same the Mobile Client will receive an event notification about the motion detection alarm.1.On the device list page, tap  > Settings on a device card to enter the Settings page of the network camera.
 > Settings on a device card to enter the Settings page of the network camera.
2.Tap Notification to enter the Notification page.
3.Draw motion detection area.
a.Tap Draw Motion Detection Area to enter the motion detection area settings page.
b.Swipe on the screen to draw the motion detection area.
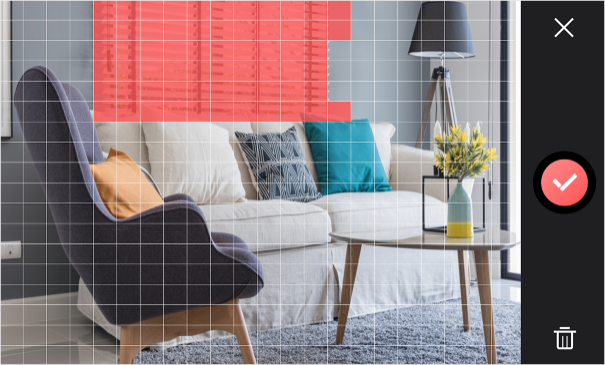 Figure 1 Draw Motion Detection Area
c.Optional: Tap  to undo the drawing.
 to undo the drawing.
d.Tap  to save the motion detection area settings.
 to save the motion detection area settings.
4.Tap  to go back to the Notification page and tap Motion Detection Sensitivity, and then adjust the slider to adjust the motion detection sensitivity.
Low
 to go back to the Notification page and tap Motion Detection Sensitivity, and then adjust the slider to adjust the motion detection sensitivity.
View Network Topology of NVR
You can view network topology of the cameras connected to an NVR. Note The NVR should support the network topology functionality. On the device list page, tap > Settings on an NVR card to enter the Settings page of the NVR, and then tap Network Camera Topology to enter the topology page. On the page, you can perform the following operations.
View Network Status
On the topology, you can know the type of the network connection between each node (i.e., an NVR or a network camera) by the type of the line between the two nodes: solid line represents wired connection, dotted line Wi-Fi connection. You can also view network status of the cameras. If a camera icon is grayed out, the camera is offline.Zoom In/Out
You can pinch fingers together to zoom in, and spread them apart to zoom out.Refresh Topology Structure
Tap in the upper right corner to refresh the topology structure.
Show/Hide Cascaded Camera
You can enable the topology to display a specific camera's cascaded camera(s). Note The NVR should support this function.1.On the device list page, tap  > Settings on an NVR card to enter the Settings page of the device, and then tap Linked Camera to enter the Linked Camera page.
 > Settings on an NVR card to enter the Settings page of the device, and then tap Linked Camera to enter the Linked Camera page.
2.Tap a camera on the Linked Camera page to enter the Details page.
3.Turn on Cascading Status to display cascaded camera(s) of a specific camera in the topology.
Turn off to hide.
Reset Password of DVR or NVR via the Mobile Client
If you forgot the admin password of a DVR or NVR, you can reset the password by using the Mobile Client to scan the QR code generated on the local GUI of the device. Two verification methods are provided for resetting the password of DVR or NVR: verifying by reserved email or verifying by Hik-Connect.Procedures of Resetting Password via Hik-Connect Verification
It is recommended that you use this way to reset the password of DVR or NVR, which is comparatively simpler and more convenient. For details, see Reset Password by Hik-Connect.Procedures of Resetting Password via Email Verification
The flow chart below shows the procedures of resetting password by email verification.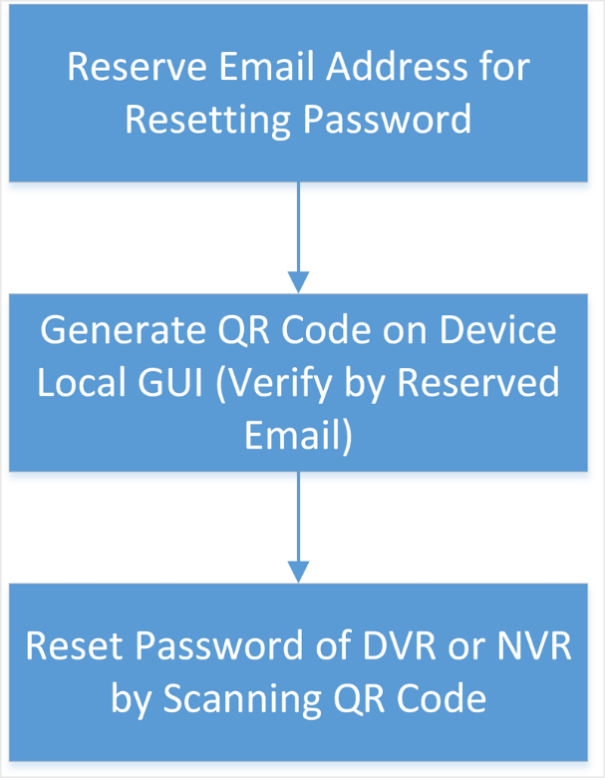 Figure 1 Flow Chart
• Reserve Email Address for Resetting Password: See Reserve Email Address for Resetting Password for details.
• Generate QR Code on Device Local GUI (Verify by Reserved Email): See Generate QR Code by Reserved Email for details.
• Reset Password of DVR or NVR by Scanning QR Code: See Reset Password by Reserved Email for details.
1.On the user login interface of the device, click Forgot Password.
2.On the password reset type interface, select Verify by Hik-Connect.
The QR code will be generated on the local GUI of the device.
3.Go to the Hik-Connect Mobile Client, enter the Reset Device Password page.
◦ Tap Applications > Basic Tool > Reset Device Password.
◦ Tap Me > Reset Device Password.
4.Scan the QR code.
A verification code will be displayed on the Mobile Client.
5.Go to the local GUI of the device and enter the received verification code, and then click OK to continue.
6.Create a new password and then confirm the password on the local GUI of the device.
• Upgrade the firmware of the NVR or DVR to make the device support self-service password reset.
• If the device is inactivated, check Reserved Email Settings when activate it. For details about activating NVR or DVR, see the user manual of the device.
1.Go to Configuration > User on the local GUI of the device.
2.Select admin user and then click Edit.
3.Enter the password of the device in the Old Password field.
4.Click the Settings icon in Reserved E-mail Settings field.
5.Enter an email address for receiving verification code, and then click OK.
1.On the login page of the device's local GUI, click Forgot Password.
2.Select Verify by Reserved Email and then click OK.
3.Read and agree the Legal Disclaimer, and click OK to continue.
The QR code for resetting password pops up.
Reset Password by Reserved Email
If you forgot the admin password of DVR or NVR, you can reset the password by scanning the QR code generated on the local GUI of the device.• Make sure you have allowed the Mobile Client to access your phone's camera.
• Make sure you have reserved email address for resetting device password and generated QR code on the device's local GUI. For details, see Reserve Email Address for Resetting Password and Generate QR Code by Reserved Email for details.
1.Enter the Reset Device Password page.
◦ Tap Applications > Basic Tool > Reset Device Password.
◦ Tap Me > Reset Device Password.
2.Scan the QR code on the local GUI of the DVR or NVR.
A verification code will be sent to the reserved email address.
Note
◦ The verification code will be valid for 48 hours.
◦ If you reboot the device or change the reserved email address, the verification code would be invalid.
3.Go to the device's local GUI.
4.Enter the received verification code on the Verify by Reserved Email window and then click OK to reset the password.
Video & Cloud Storage
With the Mobile Client, you can remotely view live videos of the added encoding devices (e.g., cameras, NVRs, and DVRs) and play back their video footage. If cloud storage is activated on the video devices, you can browse, search, play back, and download the video footage on cloud.Live View
You can view live video of the devices' connected cameras. And some basic operations are supported during live view, including picture capturing, manual recording, PTZ control, etc.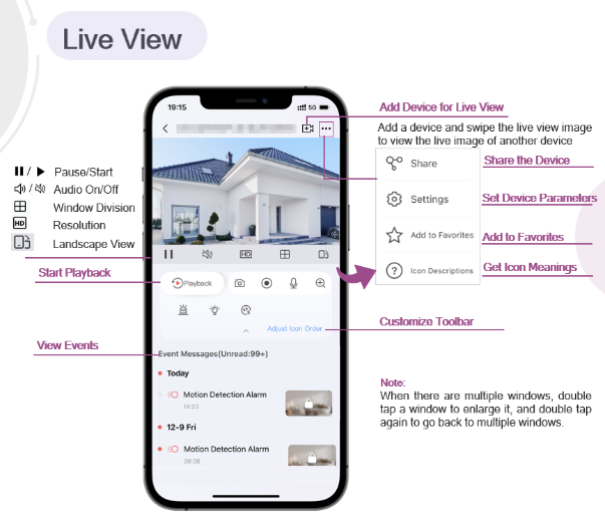
Start and Stop Live View
Live view shows you the live video getting from cameras. Perform the following task to start and stop live view.1.Tap a camera or tap Applications > Live View to enter the Live View page.
◦ If the Video and Image Encryption function is disabled, the live video will start playing automatically.
◦ If the Video and Image Encryption function is enabled, you should enter the encryption password before live view.
Note
· For details about Video and Image Encryption function, see Enable Video and Image Encryption.
· The default device verification code is usually on the device label. If no verification code found, enter the device verification code you created when enabling Hik-Connect service.
· The live video from the video intercom device lasts 5 minutes.
· Up to 6 users can view the live video of a same door station simultaneously. If the upper-limit is reached, other users can only use the audio function of the door station.
2.Optional: Perform the following operations.
| View Full Screen Live Video | Rotate the phone to view live video in full screen mode. |
| Switch Camera | Swipe the live view page to the left or right to switch camera and view its live video. |
| Reselect Device for Live View |
a.Tap
 to reselect device(s) for live view. to reselect device(s) for live view.b.Reselect cameras and then tap OK.
|
| Switch to Playback | Tap Playback to switch to playback. Note For details about playback, see Playback. |
| Toolbar Operations | For details about toolbar operations, see Live View and Playback Icons. |
| View Events | If there are any events, they will be displayed in the Event Messages section. |
1.Stop live view of a camera.
a.Press and hold a window under live view.
b.Drag the window upwards to the appearing  at the top of the page.
 at the top of the page.
 to pop up the PTZ control panel.
Note
PTZ control should be supported by the camera. For details about starting live view, refer to Start and Stop Live View.
to pop up the PTZ control panel.
Note
PTZ control should be supported by the camera. For details about starting live view, refer to Start and Stop Live View.
PTZ Control
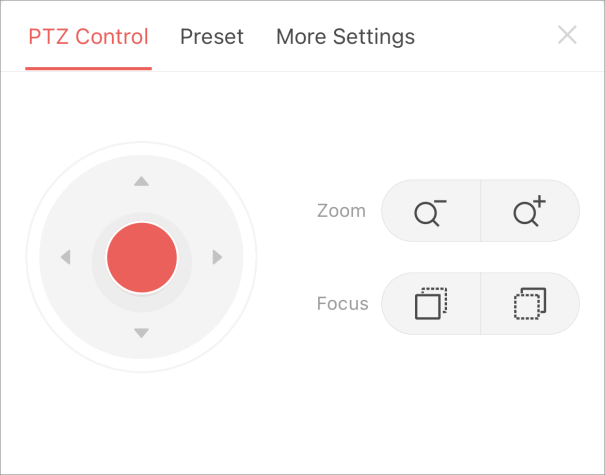 Figure 1 PTZ Control
On the PTZ Control panel, the following operations are supported.
Figure 1 PTZ Control
On the PTZ Control panel, the following operations are supported.
• Drag the red circle button to control the camera to the desired direction.
• Tap  /
/ to zoom out/in the lens.
 /
/ to zoom out/in the lens.
• Tap  /
/ to make near objects become clear and distant objects become vague, or make distant objects become clear and near objects become vague.
 /
/ to make near objects become clear and distant objects become vague, or make distant objects become clear and near objects become vague.
Preset
On the Preset panel, the following operations are supported.• Edit Name: Tap  > Edit Name to edit the preset name.
> Edit Name to edit the preset name.• Set as Preset: Tap  > Set as Preset to set the current scene as a new preset.
> Set as Preset to set the current scene as a new preset.More Settings
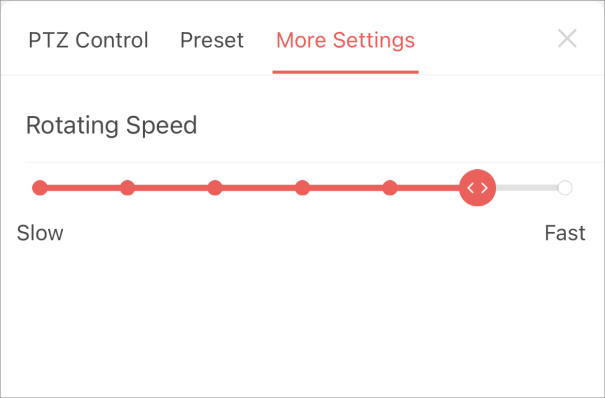 Figure 2 More Settings
Drag
Figure 2 More Settings
Drag  to the right or left to set the PTZ rotating speed.
Set Image Quality for Device Added by IP/Domain
For devices added via IP/Domain, you can set its image quality to Fluent or Clear. You can also customize image quality for the devices. Note• If you change the image quality, the live view and recording of the device may be affected due to the new settings.
• In multi-window mode, you can only set the image quality to Fluent, or customize the image quality and the stream type can only be Sub Stream.
1.Start live view of a device added via IP/Domain.
Note
See Start and Stop Live View for details.
2.Tap . on the live view page to enter the quality switching panel.
Note
The icon vary with the actual video quality.
3.Set the image quality as desired.
◦ Tap Clear to set the image quality as Clear.
◦ Tap Fluent to set the image quality as Fluent.
◦ Tap Custom to open the Custom Settings window, and then configure the parameters and tap Confirm to confirm the custom settings.
Live View for Fisheye Camera
In the fisheye view mode, the whole wide-angle view of the fisheye camera is displayed. Fisheye expansion can expand images in five modes: 180° panorama, 360° panorama, 4-PTZ, semisphere, and cylindrical-surface. Note The function is only supported by fisheye camera.1.Start live view of a fisheye camera.
Note
See Start and Stop Live View for details.
2.Tap  to show the fisheye expansion panel.
 to show the fisheye expansion panel.
3.Select mounting type.
| Icon | Description |
|---|
4.
| Table 1 Mounting Type | |
|---|---|
| Icon | Description |
 |
Wall Mounting |
 |
Ceiling Mounting |
5.Select fisheye expansion mode.
| Table 2 Fisheye Expansion Mode | |
|---|---|
| Icon | Description |
 |
Fisheye view for ceiling mounting and wall mounting. In the Fisheye view mode, the whole wide-angle view of the camera is displayed. The mode is the vision of a fish's convex eye. The lens produces curvilinear images of a large area, while distorting the perspective and angles of objects in the image. In this mode, you can pinch the fingers together to zoom out the image, and spread them apart to zoom in. |
 |
Dual-180° panorama view for ceiling mounting. The distorted fisheye image is transformed to normal perspective image. In this mode, you can swipe to the left or to the right to adjust the field of view. |
 |
360° panorama view for ceiling mounting and wall mounting. The distorted fisheye image is transformed to normal perspective image. In this mode, you can swipe to the left or to the right to adjust the field of view. |
 |
4 PTZ Views for ceiling mounting and wall mounting. The PTZ view is the close-up view of some defined area in the Fisheye view or Panorama view. In this mode, you can pinch the fingers together to zoom out the image, and spread them apart to zoom in. You can also swipe the screen to perform pan and tilt movement. |
 |
Semisphere-shaped view for wall mounting. In this mode, the whole wide-angle view of the camera is displayed. The lens produces curvilinear images of a large area, while distorting the perspective and angles of objects in the image. In this mode, you can drag the image to adjust the view angle, and pinch the fingers together to zoom out the image, and spread them apart to zoom in. |
 |
Cylindrical-surface-shaped view for wall mounting. In this mode, the whole wide-angle view of the camera is displayed. The lens produces curvilinear images of a large area, while distorting the perspective and angles of objects in the image. In this mode, you can drag the image to adjust the view angle, swipe to the left or to the right to adjust the field of view, as well as pinch the fingers together to zoom out the image and spread them apart to zoom in. |
Open Door During Live View
You can open or close the door when viewing the live video of a video intercom device, a face recognition terminal, or a related camera of an access control device. This function allows you to check the visitor or the situation nearby the door before you open it. Note• The device should support this function.
• For face recognition terminals, you can enabling opening door by fingerprint authentication or facial authentication. For details, see Manage Access Control Devices.
For the access control device's related cameras, select a live view window and tap Open Door, and then enter the device verification code to open the door.
For the video intercom device, select a live view window and tap  , and then enter the device verification code to open the door.
Playback
You can search the recorded video files stored in the added device for remote playback.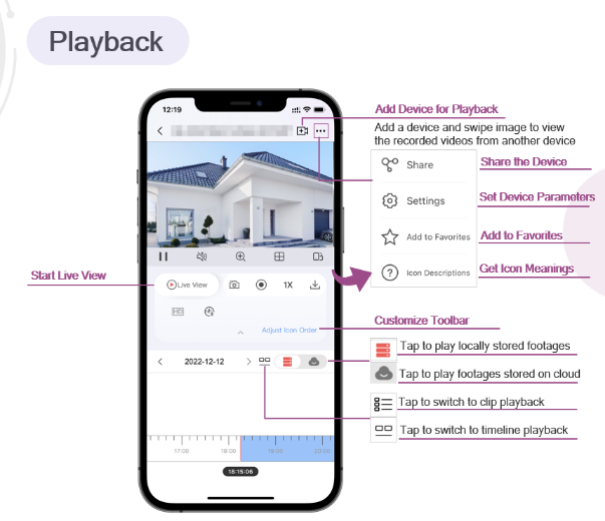
Normal Playback
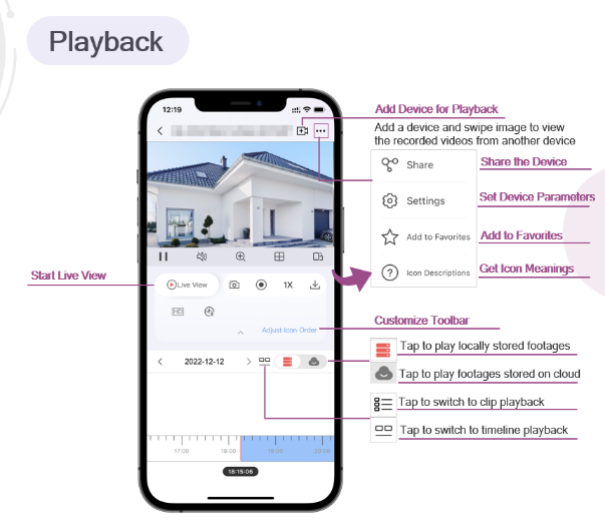
Normal playback refers to the playback based on timeline. You can search the camera's recorded video files in a selected time period and then start playback.1.On the device list page, tap  in the upper-right corner or tap Applications > Playback to enter the Select Item(s) page.
 in the upper-right corner or tap Applications > Playback to enter the Select Item(s) page.
2.Set the date and time for playback.
Playback Date
3.Select camera(s).
Note
You can select up to 4 cameras.
4.Tap Start Playback to enter the Playback page.
5.Optional: Perform the following operations.
| Play Video Footage Stored on Cloud | Tap  on the playback page to play back video footage stored on cloud.
Note
See details in Play Back Video Footage on Cloud. on the playback page to play back video footage stored on cloud.
Note
See details in Play Back Video Footage on Cloud. |
| Play Video Footage Stored on Local | Tap  on the playback page to play back video footage stored locally. on the playback page to play back video footage stored locally. |
| Clip Playback | Tap  to switch to clip playback. to switch to clip playback. |
| Adjust Playback Time | Tap  to switch timeline playback. Slide the timeline to adjust the playback time.
Spread two fingers apart to scale up the timeline or pinch them together to scale down.
Note to switch timeline playback. Slide the timeline to adjust the playback time.
Spread two fingers apart to scale up the timeline or pinch them together to scale down.
Note
 represents continuous recording and represents continuous recording and  represents event-triggered recording. You can determine the recording type (continuous or event-triggered) when setting recording schedule. For details, see Set Recording Schedule. represents event-triggered recording. You can determine the recording type (continuous or event-triggered) when setting recording schedule. For details, see Set Recording Schedule. |
| Toolbar Operations | For details about toolbar operations, see Live View and Playback Icons. |
Capturing and Recording
During playback, you can capture pictures and record video footage.1.Start playback.
Note See Normal Playback for details.
2.Capture a picture or record video footage.
| Capture a Picture | Tap  to capture a picture. to capture a picture. |
| Record Video Footage | Tap  to start recording video footage, tap again to stop. to start recording video footage, tap again to stop. |
3.The captured pictures and recorded videos will be saved in Applications > Personal Applications > Personal Album.
Set Playback Quality for Device Added by IP/Domain
For devices added by IP/Domain, you can set the image quality of playback for them. Note For details about adding device by IP/Domain, see Add a Device by IP/Domain.1.Select a device added by IP/Domain on the device list and then start playback.
Note
For details about starting playback, see Normal Playback.
2.Tap . on the playback page to enter the quality switching panel.
Note
The icon may vary with the actual video quality.
3.Set the image quality as desired.
◦ Tap Clear to tap the image quality to Clear.
◦ Tap Custom to open the Custom Settings window, and then configure the parameters (Resolution, Frame Rate, and Bitrate) and tap Confirm to confirm the custom settings.
◦ The image effect is related to the performance of your network and phone or tablet. If the image is not fluent or the screen appears blurred, reduce the resolution, frame rate and bitrate of the camera in custom mode.
◦ The following table shows the recommended Android and iOS frame rate and bitrate configuration for different resolution at H.264, H.264+ and H.265 video compression by Moto X Pro (CPU: Snapdragon805, Android 5.0.2).
1.Start playback.
2.Tap  if important information occurs on the image.
By default, the video segment which lasts 130 seconds (from 10 seconds before the tapping, to 120 seconds after that) will be automatically selected for download. For example, if you tap  if important information occurs on the image.
 when the video footage is played to 00:00:30, the segment from 00:00:20 to 00:02:30 will be selected.
Note
In special occasions when 130-seconds duration is not available to be selected following the above-mentioned rule, the segment will extend afterwards or backwards until the segment duration reaches 130 seconds. For example, if you start downloading from the very beginning of the video footage, the selected segment will be from 00:00:00 to 00:02:10.
when the video footage is played to 00:00:30, the segment from 00:00:20 to 00:02:30 will be selected.
Note
In special occasions when 130-seconds duration is not available to be selected following the above-mentioned rule, the segment will extend afterwards or backwards until the segment duration reaches 130 seconds. For example, if you start downloading from the very beginning of the video footage, the selected segment will be from 00:00:00 to 00:02:10.
3.Optional: Drag the slider(s) to lessen the duration of the segment for download.
Note
The duration should not be shorter than 10 seconds.
4.Optional: Tap the Play icon to preview the selected segment.
Note
If the segment is encrypted, you should enter the device verification code before you can preview it. For details about video encryption.
5.Tap Start Downloading to start downloading.
Note
Downloading at the background is supported. Download task(s) continues if you exit the Download page or the Mobile Client.
6.Optional: Go to Applications > Personal Applications > Personal Album to view the downloaded video segment.
Cloud Storage
With cloud storage, your cameras, DVRs, and NVRs can upload recorded video clips to the cloud automatically. You can easily access, play, and download the video footage of your video devices on cloud. Enable/Disable Cloud Storage Service for a Channel You can enable/disable cloud storage service for a specific channel of a device supporting storing video footage on cloud. You can also view details of the cloud storage service package, including service package type, effective period, and status (activated or expired). Make sure your Service Provider has activated the cloud storage service for your device. Otherwise, you cannot enable cloud storage.1.Enter the settings page of the device.
2.Tap Cloud Storage to enter the Cloud Storage page.
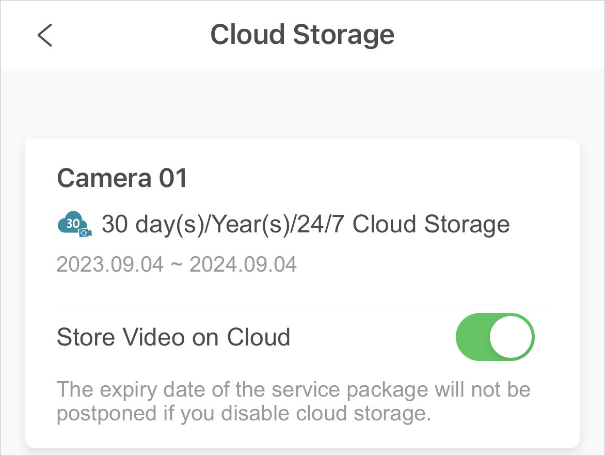 Figure 1 Cloud Storage
3.Switch on/off to enable/disable the cloud storage service of a specific channel.
Play Back Video Footage on Cloud
You can play back video footage stored on cloud. Note Make sure your Service Provider has activate cloud storage service for your devices and you have enabled it. See details in Enable/Disable Cloud Storage Service for a Channel. To play back the video footage on cloud:1.Start playing back the recorded video footage of a video device.
Note
See instructions in Normal Playback.
2.Tap  to play back video footage stored on cloud.
 to play back video footage stored on cloud.
Download Video Footage from Cloud
The Mobile Client allows you to browse through the video footage stored on cloud of each date to quickly locate the footage you need. And you can download the video footage to your phone. Note Make sure your Service Provider has activate cloud storage service for your devices and you have enable it. See details in Enable/Disable Cloud Storage Service for a Channel.1.Start playing back video footage stored on cloud.
Note
See details in Play Back Video Footage on Cloud.
2.Tap  to play video stored on cloud.
 to play video stored on cloud.
3.Tap  to enter the Download Video page.
 to enter the Download Video page.
4.Select a date.
Note
The date marked with a blue dot is the date during which video footage is recorded.
5.Tap  , and then select the video footage you want to download.
 , and then select the video footage you want to download.
6.Tap  to download the selected video footage to your phone.
 to download the selected video footage to your phone.
View Pictures and Videos
After capturing pictures and recording videos during live view, you can view these pictures and videos, and perform more operations such as saving them to the local mobile phone, share them with others, etc. Go to Applications > Personal Album to enter the Pictures and Videos page, and you can perform the following operations.| Table 1 Supported Operations | |
|---|---|
| Description | Operation |
| Batch Share Pictures and/or Videos | Tap Edit, select pictures and/or videos, and tap  to share the selected ones with others. to share the selected ones with others. |
| Batch Delete Pictures and/or Videos | Tap Edit, select pictures and/or videos, and tap  to delete the selected ones. to delete the selected ones. |
| Save to Local Mobile Phone | Tap a picture or video, and tap  in the lower-right corner to save it to the local mobile phone. in the lower-right corner to save it to the local mobile phone. |
| Play Video | Tap a video, and tap  in the lower-right corner to play the video. in the lower-right corner to play the video. |
| Share a Picture or Video | Tap a picture or video, and tap  in the lower-right corner to share it with others. in the lower-right corner to share it with others. |
| Delete a Picture or Video | Tap a picture or video, and tap  in the lower-right corner to delete it. in the lower-right corner to delete it. |
Advertisement

Topics:
#Hik Connect Adding New Device
#Hik Connect Advanced Settings Nvr
#Hik Connect Analog Camera Integration
#Hik Connect Camera Compatibility
#Hik Connect Camera Installation
#Hik-Connect camera live view
#Hik-Connect camera recording settings
#Hik-Connect camera setup guide
#Hik-Connect cloud service setup
#Hik-Connect complete guide camera
#Hik-Connect device management
#Hik-Connect DVR network settings
#Hik-Connect DVR remote viewing setup
#Hik-Connect DVR setup steps
#Hik-Connect FAQs NVR/DVR
#Hik-Connect firmware update NVR/DVR
#Hik-Connect guide for beginners
#Hik-Connect IP camera adding
#Hik-Connect mobile access camera
#Hik-Connect motion detection setup
#Hik-Connect NVR configuration
#Hik-Connect NVR connection guide
#Hik-Connect NVR offline issues
#Hik-Connect official guide
#Hik-Connect P2P connection issues
#Hik-Connect password reset DVR/NVR
#Hik-Connect playback guide
#Hik-Connect port forwarding guide
#Hik-Connect push notifications NVR
#Hik-Connect support guide
#Hik-Connect system integration
#Hik-Connect tips and tricks camera
#Hik-Connect troubleshooting cameras
#Hik-Connect user manual
#Hik-Connect video loss solution
Did this security guide help you?
Rate this article to help fellow engineers find the best guides.

Written by
Alex Vance
Senior Security Systems Architect & IoT Consultant with over 15 years in digital surveillance design.
Discussion (0)
No comments yet. Be the first to share your thoughts!
Leave a Comment