
EverFocus CMS Setup and User Guide
EverFocus has sought to the integrity and accuracy of the contents of the user’s manual during the compilation process and will not be held liable for any errors or omissions. EverFocus reserves the right to change the software mentioned in the user’s manual at any time without prior notice. Thank you for choosing our products. Please carefully read this manual before operation. We assume no economic and legal responsibility for the losses caused by the operation not according to the stipulations.
1.Product Description
1.1Important Disclaimer
EverFocus CMS Setup and User Guide
1.2Software Related Files
Software Installation Directory:
The default software installation path is C:\Program Files (x86)\EverFocus\EverFocus CMS. You can define the path for installation.1.3Application Environment
• CPU: Intel Core 2 Duo 2.4GHZ or higher
• RAM: 2GB or higher
• VGA: DirectX 9.0 compatible VGA card, NVIDIA GeForce 9500GT or higher, with video memory of 512MB or larger (Please make sure the graphics driver provided by the computer supplier has been installed properly)
• Network Card: Recommend to use gigabit NIC (Including network card, router, switch and network cables of 5e or higher specifications for RJ45 port)
• Disk Space: At least 1GB space should be available except the required space for recording
• Operating System:
Window 7 Professional, Enterprise, Ultimate (32 bit or 64 bit)
Window 8, Window 8 professional, DirectX 9.1 or higher
Window 10 (32 bit or 64 bit)
Mac OS: 10.6 or higher
2.System Overview
2.1Operation Management
• All the operators should be trained so as to avoid forming the artificial weak point of protection system.
• Sound user management mechanism and level should be established and the low level user’s access should be restricted so as to avoid the possibility of the incorrect operation.
2.2Software Installing & Uninstalling
2.2.1Software Installing
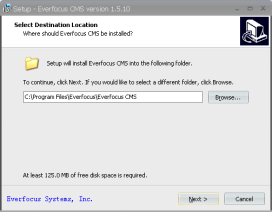
1.Double click the installation file “EverFocus CMS_xxx_xxxx_xx_xx.exe”, the following window will pop up. The system default installation path is C:\Program Files (x86)\EverFocus\Everfocus CMS. To change the installation path, click Browse to customize. Confirm the installation path and then click Next.
 .
.
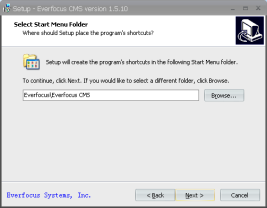
2.Confirm the shortcuts in the Start Menu. Click Next.
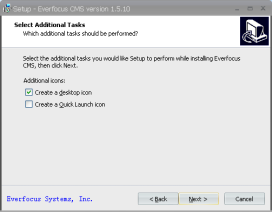
3.Select the additional tasks. Click Next.
 .
.
4.Click Install to start installing.
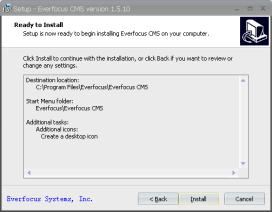
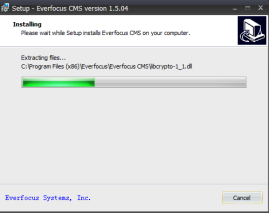 .
.
5.Click Finish to exit Setup.
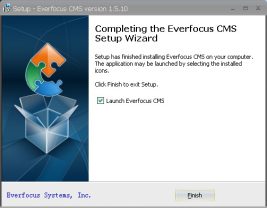
2.2.2Software Uninstalling
1.Go to Control Panel > Programs > Uninstall a program. Find the EverFocus CMS and select it. Click the
Uninstall button.
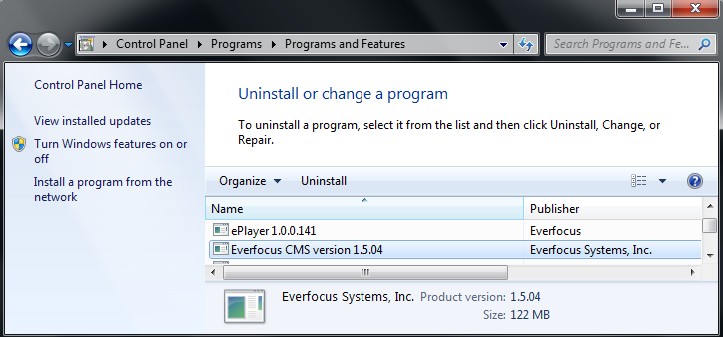 .
.
2.The following window will pop up.
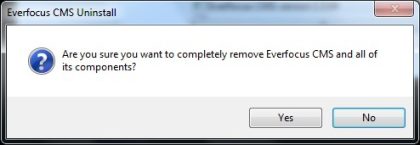
3.Click Yes and also confirm to delete the user profiles.
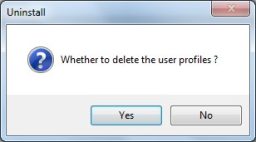
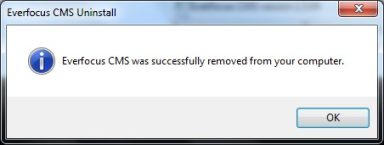
4.Click Yes, and EverFocus CMS has been successfully removed from your computer.
3.Getting Started
3.1Software Start-up
3.1.1Start-up Wizard
1.When first-time running the Everfocus CMS, the start-up Wizard appears. Follow the instructions to configure the basic settings.
Note: If the Wizard does not appear, please click Help Open Wizard to manually open it.
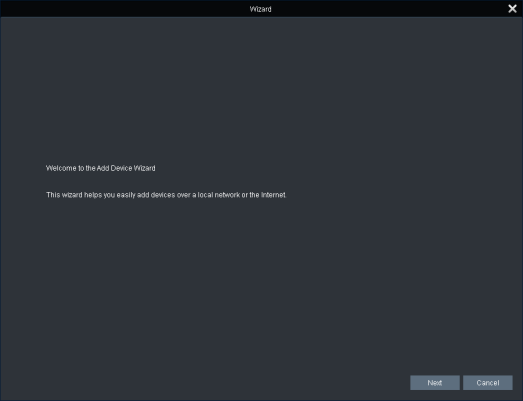
2.Click Next, the following page appears. You can add devices using this page.
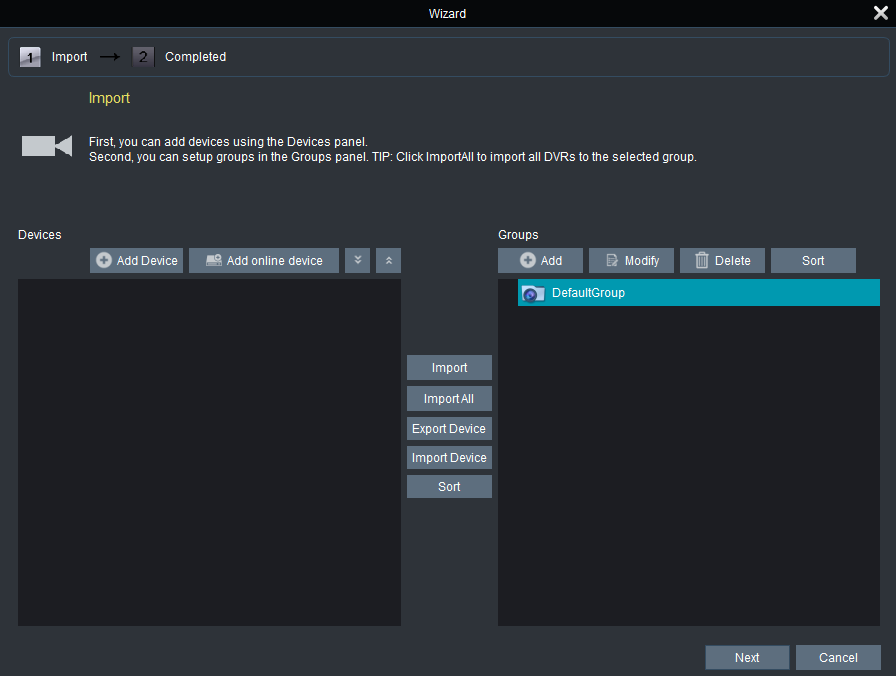

3.To automatically add devices to the system, click Add Online Device and the system will scan all the online devices in the same LAN.
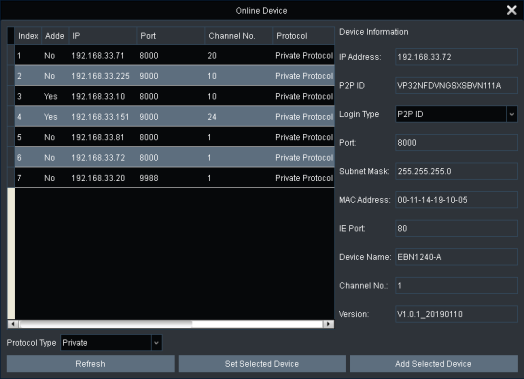
a.Select a protocol type from the Protocol Type drop-down list and then click Refresh to search for the devices.
b.You can check the device info by directly clicking on the device, the device info will be automatically displayed on the left-side pane.
c.If you want to add only one device, select a device by single-click on it. The selected device will be highlighted with a gray background.
d.You can also select multiple devices by clicking the first device and then press and hold the Ctrl or
Shift keys to select multiple devices.
e.After selecting the desired device(s), click Add Selected Device, the below window appears.
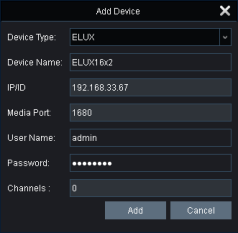
f.Input a name in the Device Name field, e.g. home, office. Also input the User Name and Password of the device. The default User Name is “admin”; while default Password is blank.
g.Click Add, the device(s) are now added to the Devices list.
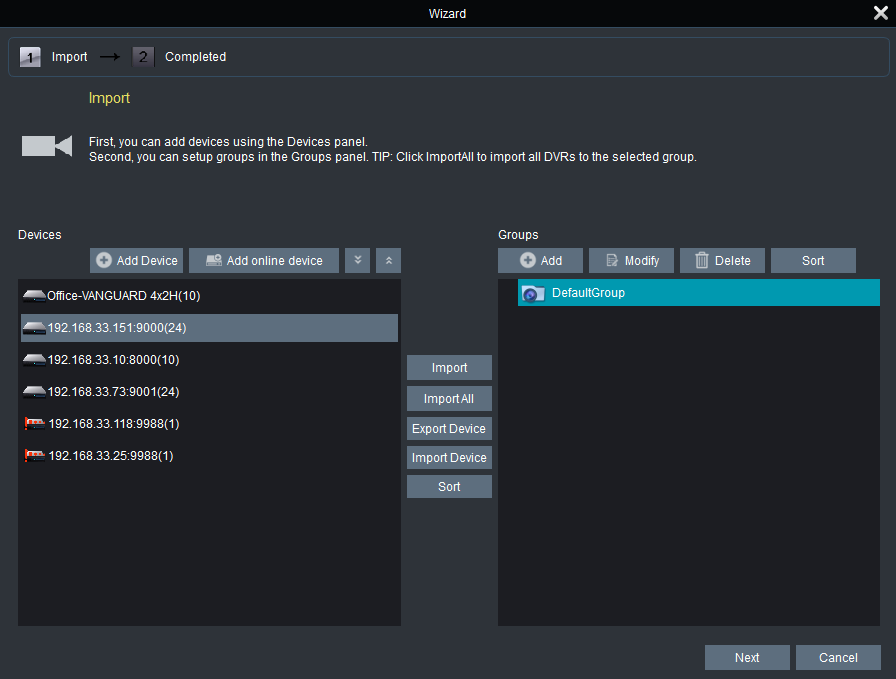 .
.

h.You can optionally edit the device info by clicking the Modify icon on the right-side of each device.
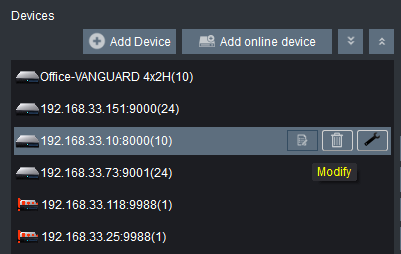 .
.
4.To group the devices, click Import All to import all device(s) from the Devices list to the default group.
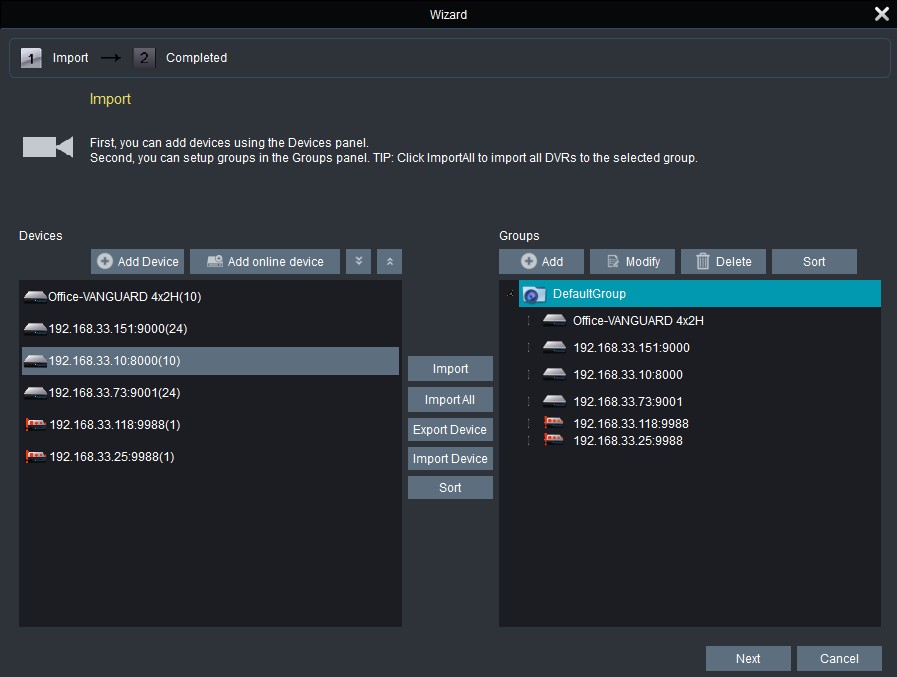


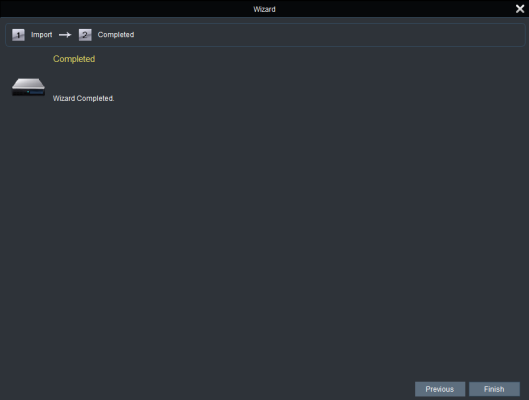
5.Click Next and then click Finish to complete the wizard.
3.2Login Window
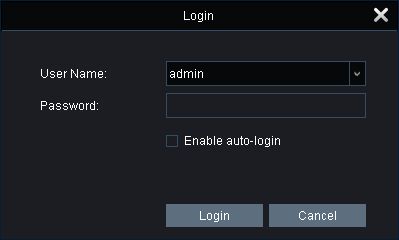 .
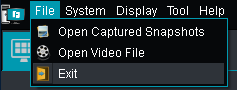
To exit the system, on the Top Navigation Bar, click File > Exit.
.
.
To exit the system, on the Top Navigation Bar, click File > Exit.
.
 .
.
3.3General Function Setup
3.3.1Adding Devices from Other Servers (Client Servers)
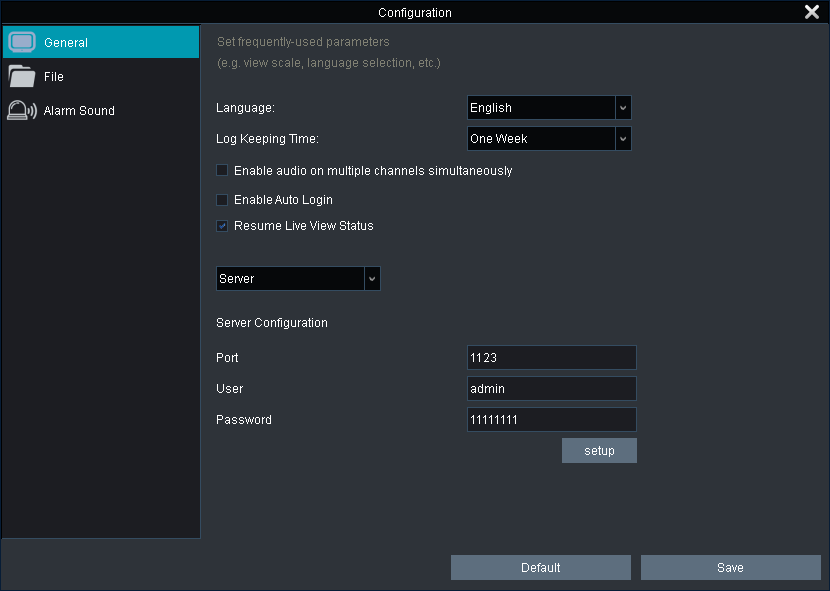
1.On Server B, enter the System Configuration page (Control Panel > System Configuration > General).
 .
.
a.Select Server from the drop-down list.
b.Set up the Port, User Name and Password for Server B. The port number should be greater than 1000.
c.Click Setup to configure the Server B.
d.Click Save to save the settings.
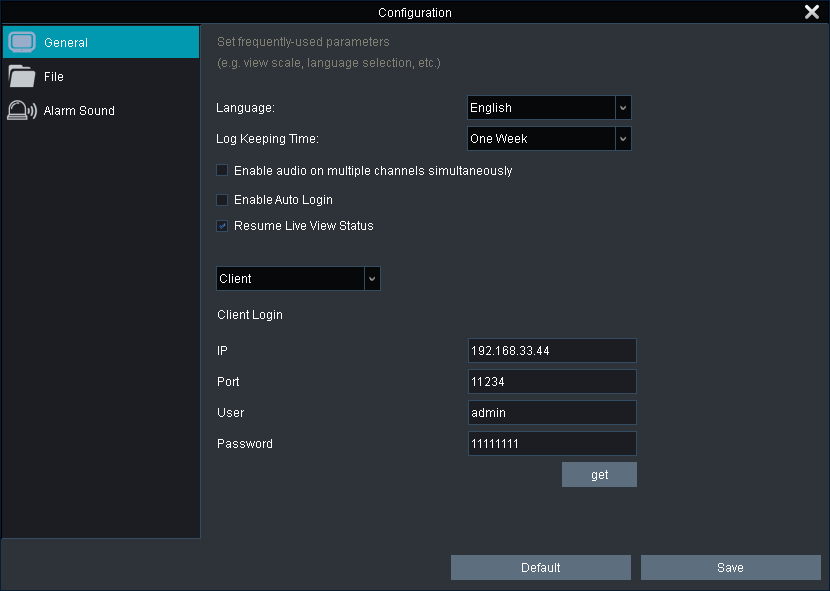
2.On Server A, enter the System Configuration page (Control Panel > System Configuration > General).
 .
.
a.To add devices from Server B, select Client from the drop-down list.
b.Enter the IP, Port, User Name and Password of Server B.
c.Click get to get the devices from Server B.
d.Click Save to save the settings.
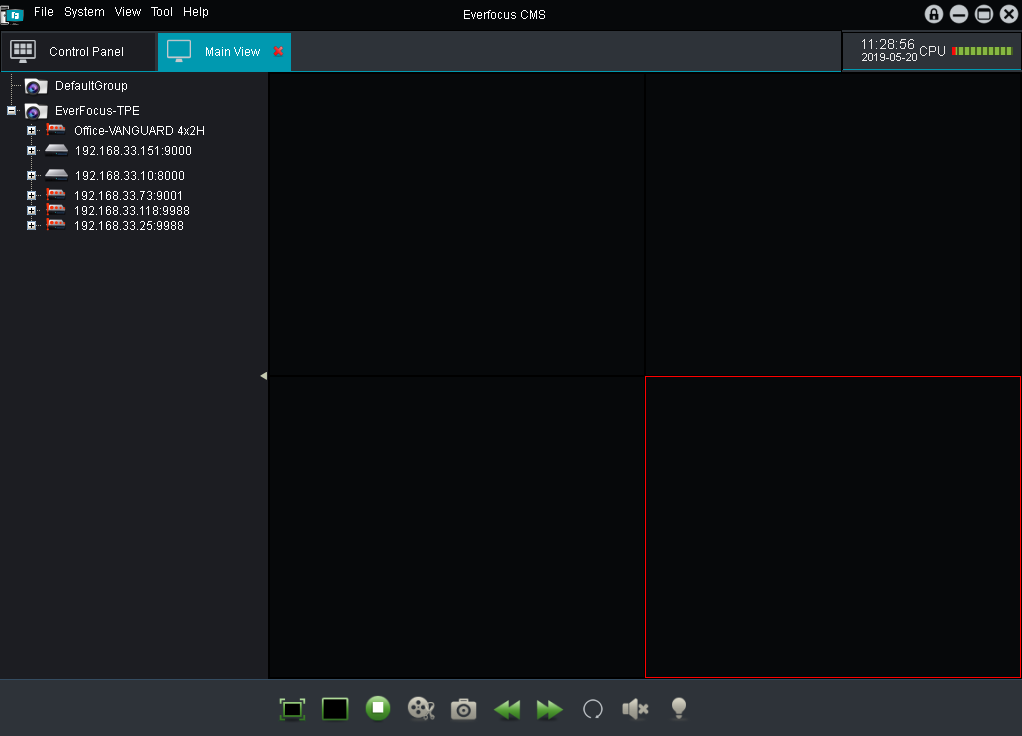
3.Devices from Server B have been added to Server A. Go to the Main View and you can see the devices on the Device List.
 .
.
3.3.2Adding Devices and Grouping Devices
1.Enter the Group Device Management page (Control Panel > Group Device Management).
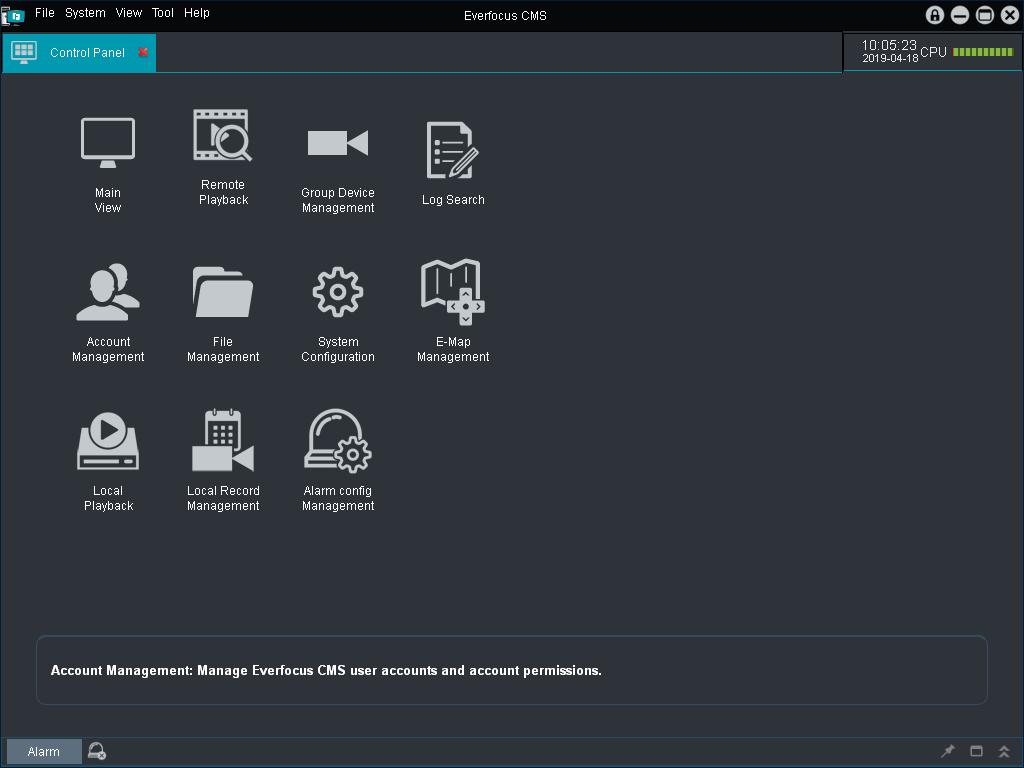
 .
.
.
.
2.To automatically add devices to the system, click Add Online Device and the system will scan all the online devices on the same LAN.
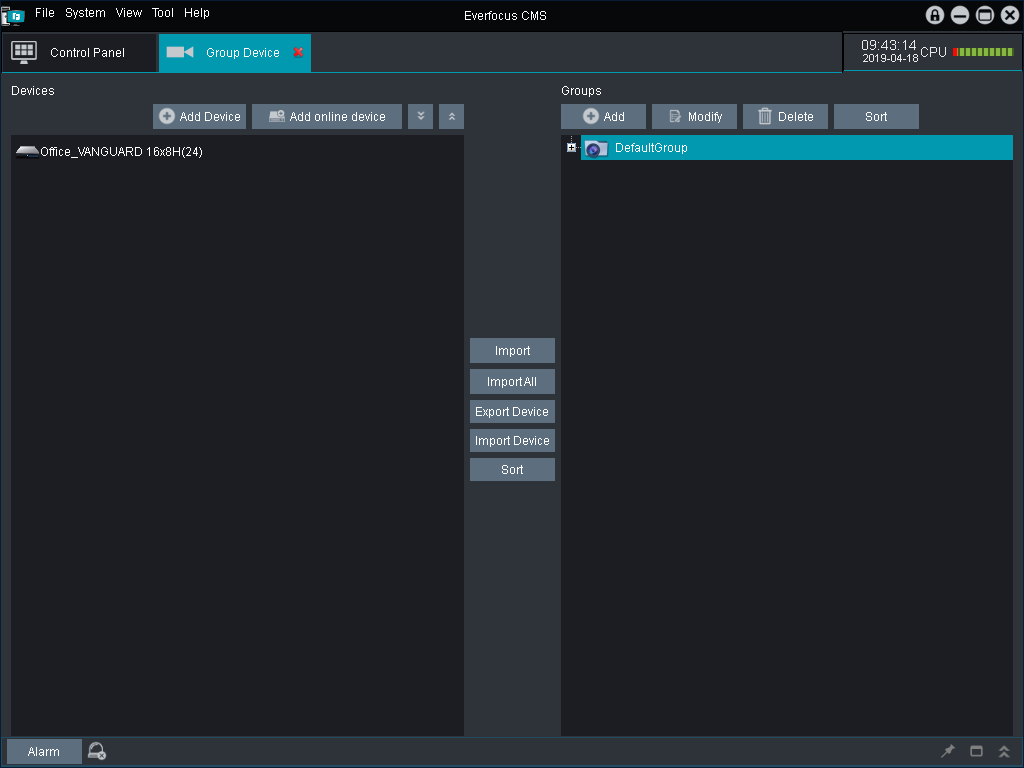
 .
.
.
.
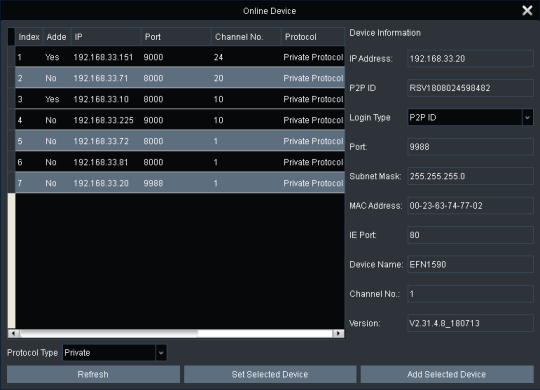
a.Select a protocol type from the Protocol Type drop-down list and then click Refresh to search for the devices.
b.You can check the device info by directly clicking on the device, the device info will be automatically displayed on the right-side pane.
c.If you want to add only one device, select a device by single-click on it. The selected device will be highlighted with a gray background.
d.If multiple devices are using the same user name and password, you can select multiple devices by clicking the first device and then press and hold the Ctrl or Shift keys to select multiple devices.
e.After selecting the desired device(s), click Add Selected Device, the below window appears.
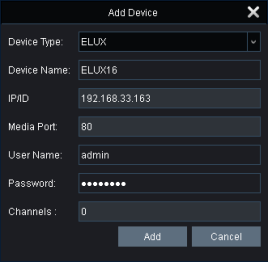
f.Input a name in the Device Name field, e.g. home, office. Also input the User Name and Password. The default User Name is “admin”; while default Password is blank.
g.Click Add, the device(s) are now added to the Devices list.
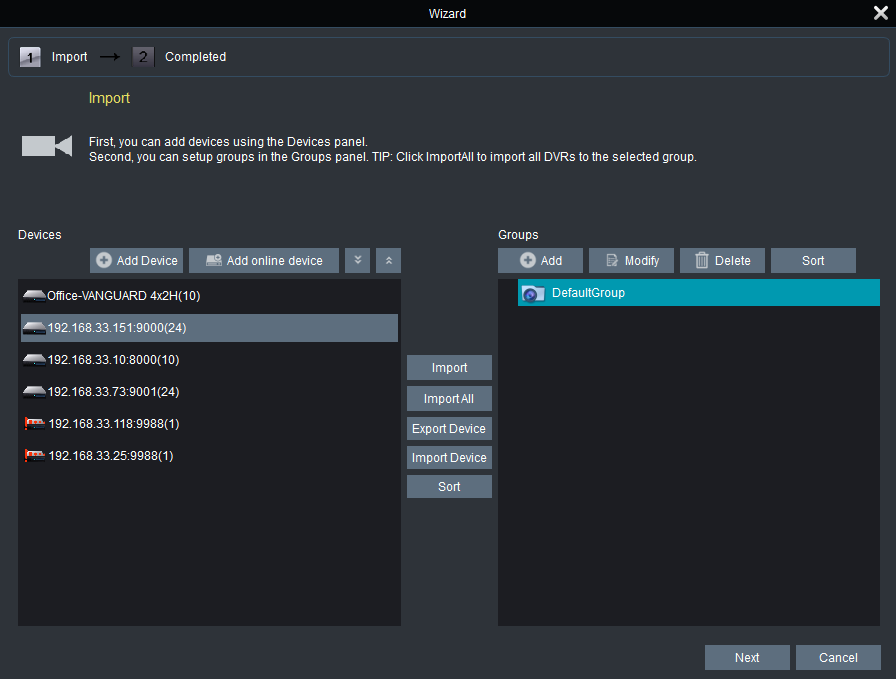 .
.
h.You can optionally edit the device info by clicking the Modify icon on the right-side of each device.
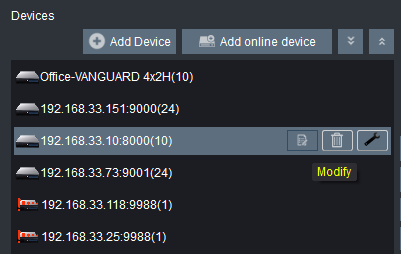 .
. .
.
3.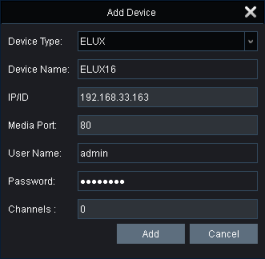 To manually add devices to the system, click Add Device to bring up the Add Device window. Input the device information. The default media port is 9000, default User Name is “admin”; while default Password is blank. Click Add, the device is now added to the Devices list.
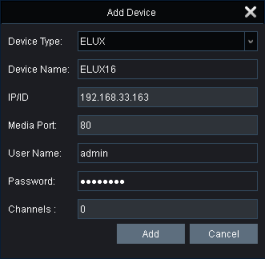 To manually add devices to the system, click Add Device to bring up the Add Device window. Input the device information. The default media port is 9000, default User Name is “admin”; while default Password is blank. Click Add, the device is now added to the Devices list.
4.To group the devices:
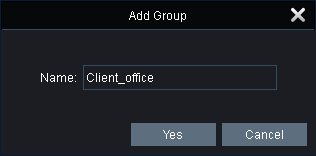
a.If you want to create a new group, on the Groups list, click the Add button and input a group name to add a new group. Click Yes, the group name is now added to the Groups list.
b.To import the devices to the desired group:
1)Select the desired group by clicking on it, the selected group will be highlighted with a green background.
2)Select the desired device(s) by clicking on it, the selected device(s) will be highlighted with a gray background. You can also select multiple devices by clicking the first device and then press and hold the Ctrl or Shift keys to select multiple devices.
3)Click the Import button, the selected device(s) will be added to the group.
3.3.3Displaying Live Streams on the Main View
1.Enter the Main View page (Control Panel > Main View).
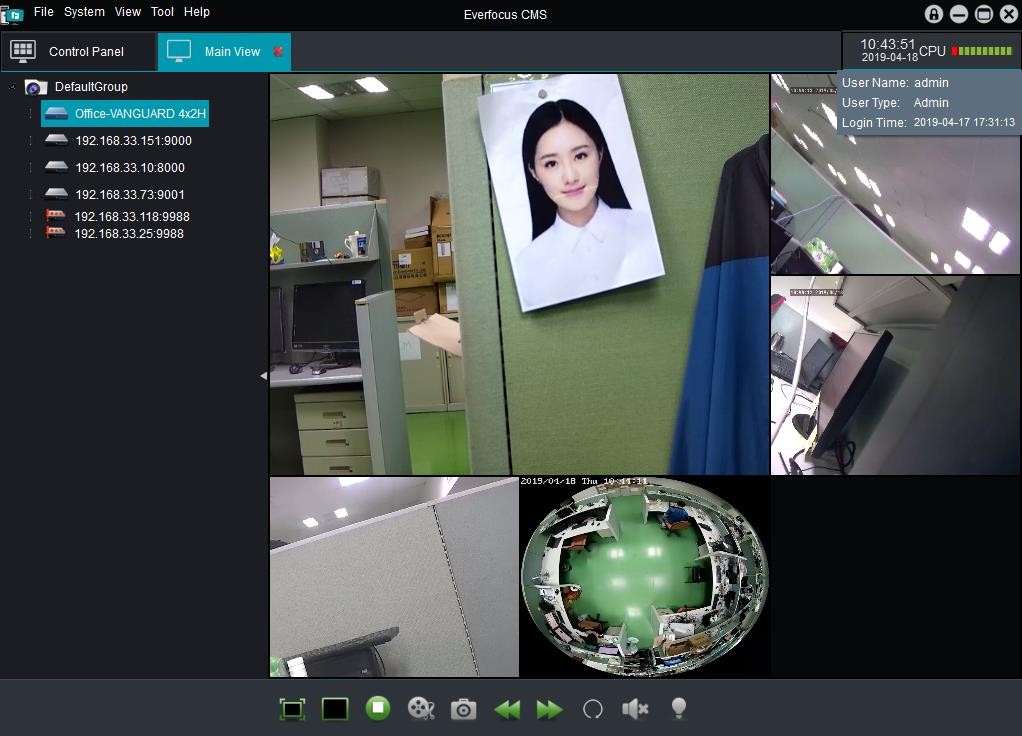



2.Drag the Groups, Devices or Channels from the Device List and drop it to the Display Window. Drag a Group: Displays all the streams of the devices in this Group.
Drag a Device: Displays all the streams of this Device. Drag a Camera: Displays the stream of this camera.
3.The streams will be displayed.
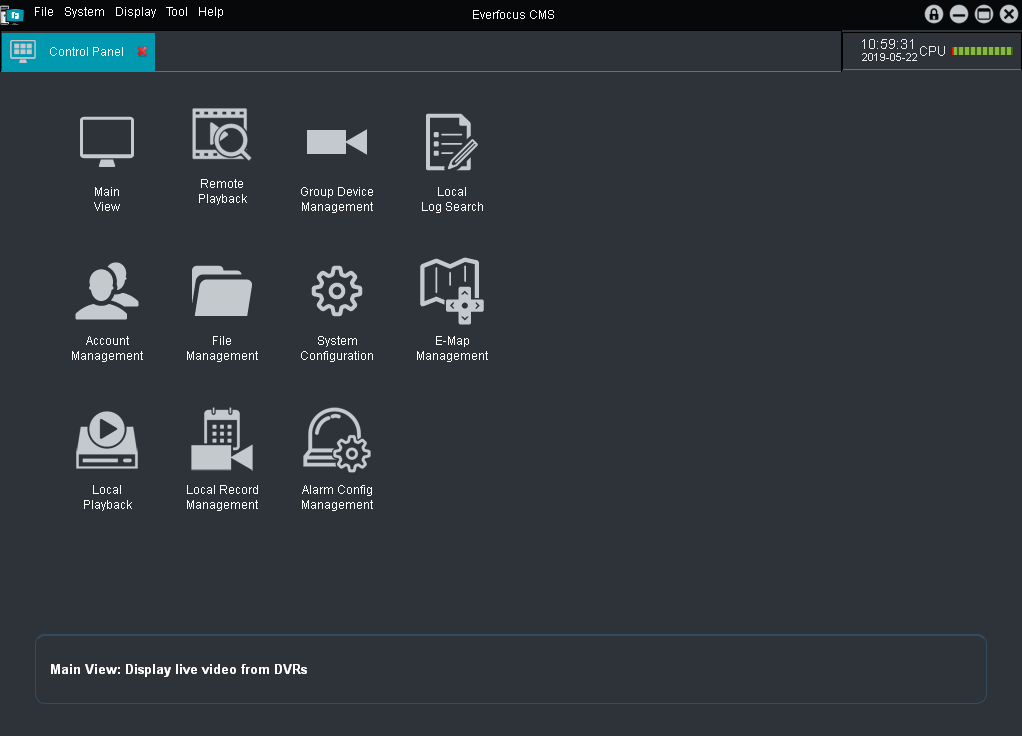
4.Control Panel
 .
.
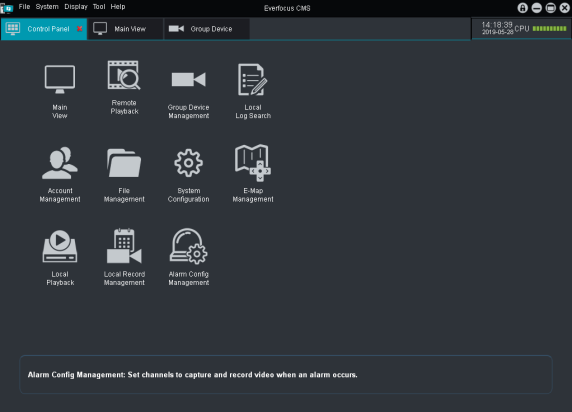
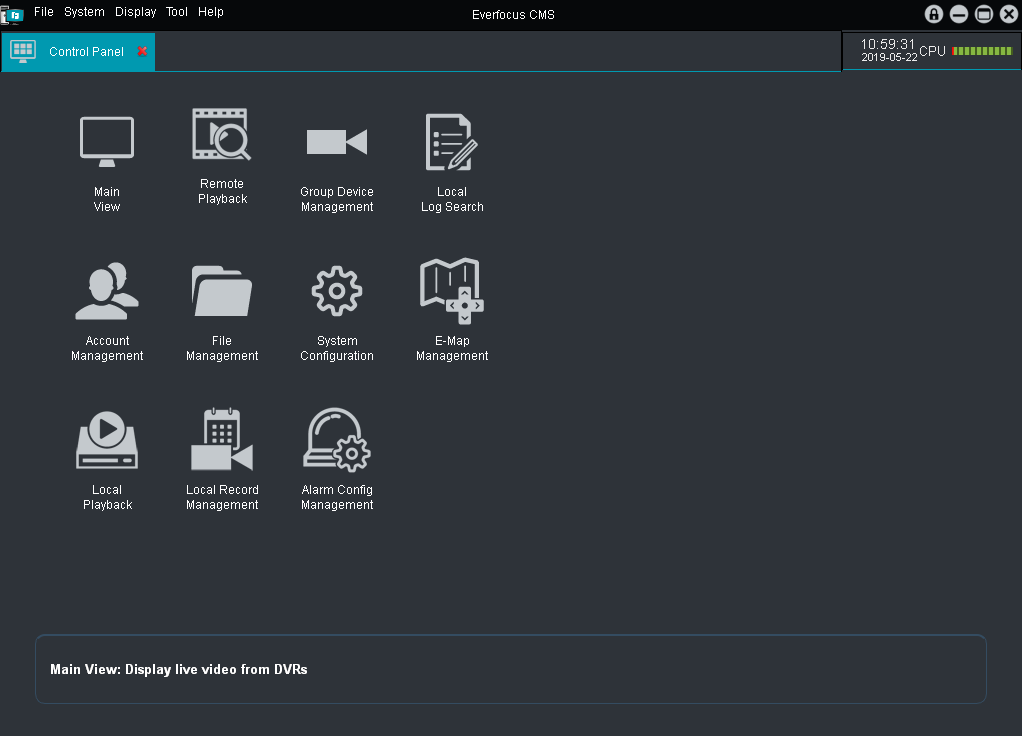
• Main View: Displays device live streams. Please refer to 4.1 Main View.
• Remote Playback: Directly playback the recordings from the connected device(s). Please refer to 4.2 Remote Playback.
• Group Device Management: Manage the devices and groups. Please refer to 4.3 Group Device Management.
• Local Log Search: Search all kinds of log info including alarm, operation, system or devices log. Please refer to 4.4 Local Log Search.
• Account Management: Manage the user accounts and privileges of the system. Please refer to 4.5 Account Management.
• File Management: Search or backup the snapshots and recordings. Please refer to 4.6 File Management.
• System Configuration: Configure the system settings including language, client-server configuration, file storage path or alarm sound. Please refer to 4.7 System Management.
• E-Map Management: Set up E-Map configurations. Please refer to 4.8 E-Map Management.
• Local Playback: Playback the recordings stored in the system. Please refer to 4.9 Local Playback.
• Local Record Management: Configure the local record settings. Please refer to 4.10 Local Record Management.
• Alarm Config Management: Configure the alarm settings. Please refer to 4.11 Alarm Config Management.
4.1Main View
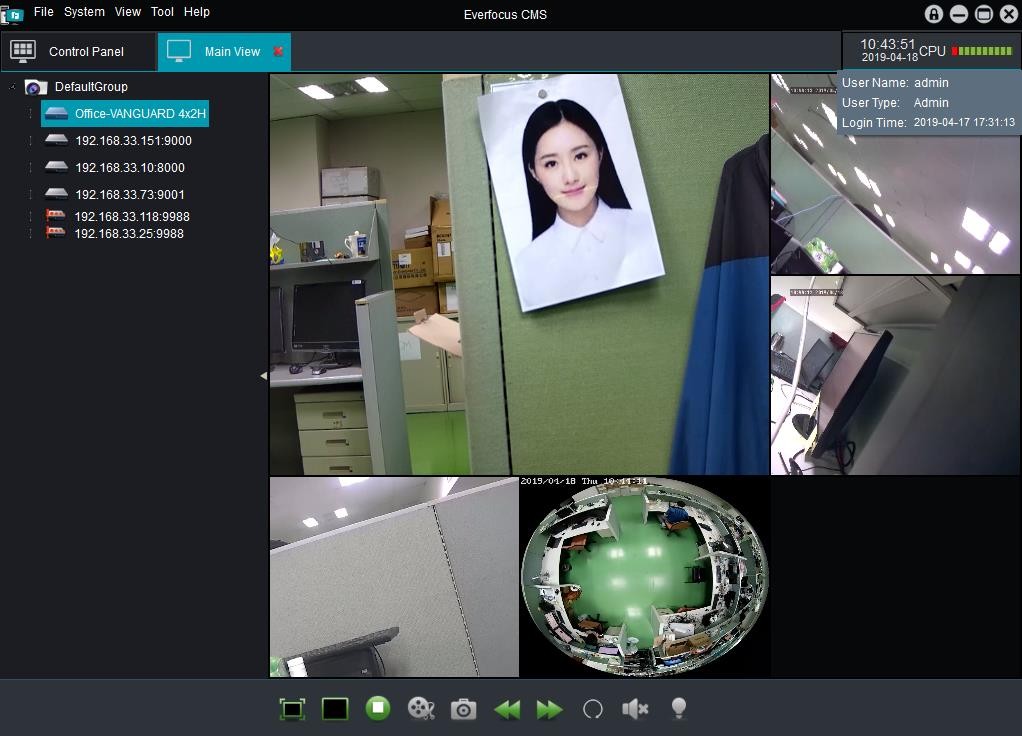

| No. | Name Description | |
| . 1 | . Device List | Displays all the connected devices. You can also perform some functions on the Device List. Please refer to 4.1.1 Device List for more details. |
| 2 | Device List Button | Click to display or hide the Device List. |
| . 3 | . Toolbar | You can perform some functions on the Main View using the Toolbar. Please refer to 4.1.2 Toolbar for more details. |
| . 4 | Alarm Control Panel | Click the Alarm button to display or hide the alarm control panel. Please refer to 4.1.3 Alarm Control Panel for more details. |
| 5 | CPU Status | Displays CPU utilization status. |
| . 6 | . Display Window | Displays the streams from the Device List. You can also perform some functions using the Live Channel Toolbar. Please refer to 4.1.4 Display Window for more details. |
| . 7 | . Top Navigation Bar | Click to perform some functions or enter to setup pages. Please refer to 5. Top Navigation Bar for more details. |
4.1.1Device List
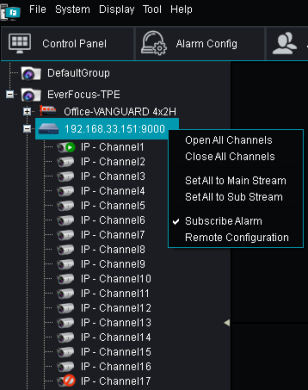 .
.
The icons on the Device List represents:
| . | Online | Offline | Preview |
| Group |  |
- | - |
| DVR | .
 |
.
 |
- |
| Camera | .
 |
.
 |
.
 |
To display device streams, drag the Group, Devices or Channels from the Device List and drop it to the Display Window.
Drag a Group: Displays all the streams of the devices in this Group. Drag a Device: Displays all the streams of this Device.
Drag a Camera: Displays the stream of this camera.
Double-click on a preview camera can display the camera in full screen.
Right-click on the Group, Device or Camera to:
Group: Set all the streams to Main Stream or Sub Stream.
Device: Open or close all channels on the Display Window; set all the streams to Main Stream or Sub Stream; subscribe alarm, remotely configure the device or voice intercom (you can use voice intercom function to transmit or receive audio from IRONGUARD by connecting microphones and speakers to your PC.)
Camera: Set the camera stream to Main Stream or Sub Stream.
4.1.2Toolbar
| No. | Name | Description |
| . 1 | . Full Screen | Click to display the Display Window in full screen. Press the ESC key to exit full screen mode. |
| 2 | Layout | Click to select a layout. |
| 3 | Stop All Streams | Click to stop and close all streams on the Display Window. |
| . 4 | . Record | Select a channel by clicking on it and the channel will be highlighted with a red frame, click the Record button to manually record the selected channel. Click again to stop recording. |
| . 5 | . Snapshot | Select a channel by clicking on it and the channel will be highlighted with a red frame, click the Snapshot button to take a snapshot of the selected channel. |
| 6 | Previous | Click to display the previous layout pages. |
| 7 | Next | Click to display the next layout pages. |
| 8 | Sequence | Click to configure sequence mode. Please refer to 4.1.2.1 Sequence Mode. |
| 9 | Audio | Click to turn on or turn off the audio. |
| 10 | Fisheye | This function is project-based. Click to turn on the Fisheye camera. |
| 11 | Floodlight | This function is project-based. Click to turn on the Floodlight of the camera. |
4.1.2.1Sequence Mode
1.On the Main View, click the Sequence button  on the Toolbar to bring up the Sequence Mode Control window.
 on the Toolbar to bring up the Sequence Mode Control window.
2.As EverFocus CMS allows users to open a single Main View window (Single-Window) or multiple Main View windows (Multi-Window), you can optionally apply different sequence interval to a
Single-Window or Multi-Window. To set up Multi-Window, please refer to 4.1.2.2 Multi-Window View.
a.Current Main View: If you want to apply the Sequence Mode only to the current Main View window, click the Current Main View button.
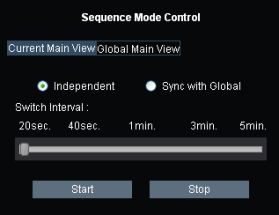
i.Select Independent or Sync with Global to apply the Interval setting.
Independent: Select Independent if multi-window has been set up, but you want to apply the Sequence Interval to the current main view only.
Sync with Global: Select Sync with Global if you want to synchronize the Sequence Interval of the current main view with the global main view. If this option is selected, the Sequence Interval of the current Main View will follow the Sequence Interval of global main view.
ii.Adjust the slide bar of the Switch Interval to set up the Sequence Interval.
iii.Click Start to start the Sequence Mode. Click Stop to stop the Sequence Mode.
b.Global Main View: If you want to apply the Sequence Mode to all of the Main View windows, click the Global Main View button.
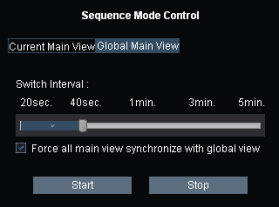
i.Adjust the slid bar of the Switch Interval to set up the Sequence Interval.
ii.If you want to synchronize the Sequence Interval of all the Main View windows with the one setup for the Global Main View, check the “Force all main view synchronize with global view” checkbox.
iii.Click Start to start the Sequence Mode. Click Stop to stop the Sequence Mode.
4.1.2.2Multi-Window View
1.On the Main View, select a layout and apply streams to the Display Window.
2.Drag the Main View tab out of the EverFocus CMS window, the new Main View window has been created. You can also display the new Main View window on another monitor.

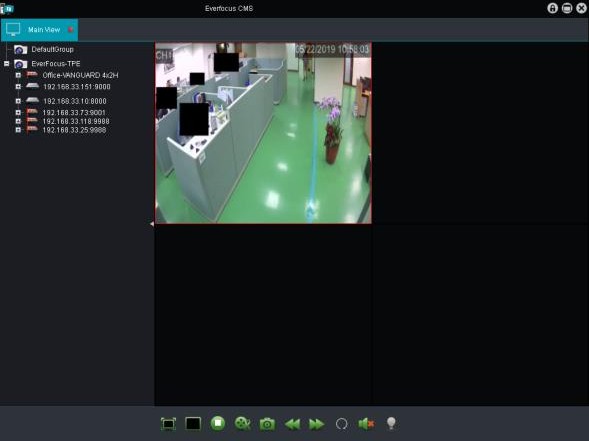

3.To create another Main View window, on the Control Panel, click Main View to create a Main View Tab. Select a layout and apply streams to the Display Window.
 .
.
 .
.
4.Drag the Main View tab out of the EverFocus CMS window, the 2nd Main View window has been created. You can also display the 2nd Main View window on another monitor.
5.Follow Step 3 and Step 4 to create more Main View windows. Up to 4 Main View windows can be created.
6.After creating the multiple Main View windows, you can apply the Sequence Mode to the created Main View windows. Please refer to 4.1.2.1 Sequence Mode.
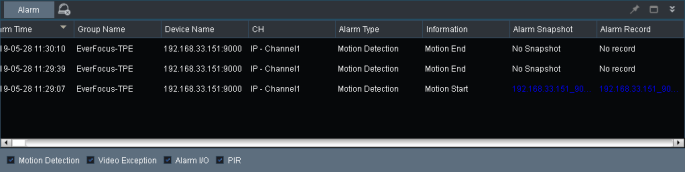
4.1.3Alarm Control Panel
 to clear the alarm info on this panel.
You can click on the Alarm Snapshot column to display the snapshot image or click on the Alarm Record
column to play back the alarm recording.
To set up Alarm configurations, please refer to 4.11 Alarm Config Management.
to clear the alarm info on this panel.
You can click on the Alarm Snapshot column to display the snapshot image or click on the Alarm Record
column to play back the alarm recording.
To set up Alarm configurations, please refer to 4.11 Alarm Config Management.
4.1.4Display Window
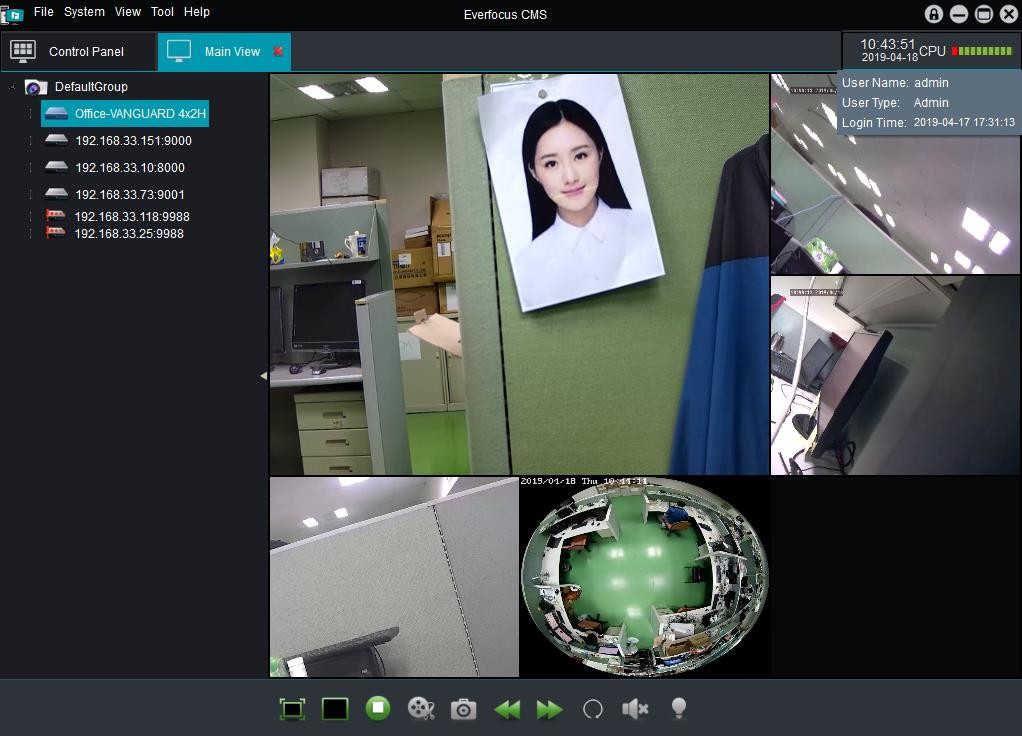



Displays live streams from the Device List.
Drag the Group, Devices or Channels from the Device List and drop it to the Display Window. Drag a Group: Displays all the streams of the devices in this Group.
Drag a Device: Displays all the streams of this Device. Drag a Camera: Displays the stream of this camera.
Full Screen: Double-click on a channel can display the channel in full screen.
Click on a channel to display the Live Channel Toolbar. Please refer to 4.1.4.1 Live Channel Toolbar.
Right-click on a channel to perform the live channel function. Please refer to 4.1.4.2 Live Channel Functions.
4.1.4.1Live Channel Toolbar
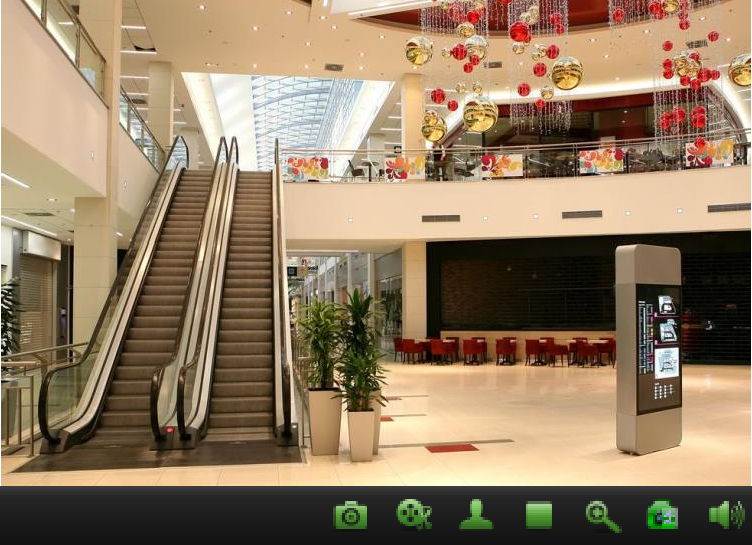
| No. | Name | Description |
| 1 | Snapshot | Click to take a snapshot of this channel. |
| 2 | Record | Click to manually record this channel. Click again to stop recording. |
| . 3 | . PTZ | Click to display the PTZ Control Panel. Please refer to 4.1.4.3 PTZ Control Panel for more details. |
| 4 | Stop Live View | Click to stop and close the stream. |
| . 5 | . Zoom | Click to use Digital Zoom function. Please refer to 4.1.4.4 Digital Zoom for more details. |
| . 6 | . Adjust Live Color | Click to display the image setting window and adjust the Color, Brightness, Contract and Saturation for this channel. |
| 7 | Sound | Click to turn on or turn off the sound. |
4.1.4.2Live Channel Functions

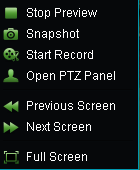 Stop Preview: Click to stop displaying the stream
Snapshot: Click to take a snapshot.
Start Record: Click to start manually recording. Click again to stop.
Open PTZ Panel: Click to display the PTZ Control Panel to perform the PTZ function.
Previous Screen: Click to display the previous channel.
Next Screen: Click to display the next channel.
Full Screen: Click to display the Display Window in full screen.
Stop Preview: Click to stop displaying the stream
Snapshot: Click to take a snapshot.
Start Record: Click to start manually recording. Click again to stop.
Open PTZ Panel: Click to display the PTZ Control Panel to perform the PTZ function.
Previous Screen: Click to display the previous channel.
Next Screen: Click to display the next channel.
Full Screen: Click to display the Display Window in full screen.
4.1.4.3PTZ Control Panel
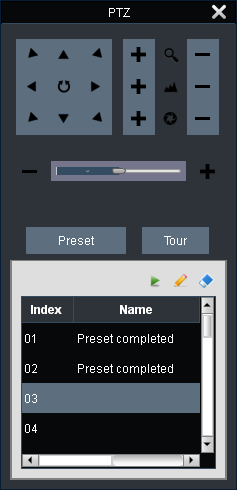 Adjust Focus Adjust IRIS
.
Adjust PTZ Speed
Preset / Tour Setup
Adjust Focus Adjust IRIS
.
Adjust PTZ Speed
Preset / Tour Setup
Performing the Preset Positions:
1.Click the Preset button to display the preset set up list.
2.Select a preset number by clicking on the index list, the selected number will be highlighted with a gray background. Up to 255 positions can be set up.
3.Select a viewing position by using the direction control keys and optionally adjust zoom, focus and iris.
4.Click the Set Preset button  to set up this preset position.
 to set up this preset position.
5.Follow Step1 to Step3 to set up multiple preset positions.
6.To delete a preset number, select a preset number on the index list and then click the Clear Preset
button  .
.
7.To move to a preset point, select a preset number on the index list and then click the Call Preset button
 .
.
Performing the Tour Function:
1.Set up the preset positions in advance.
2.Click the Tour button to display the Tour list.
3.Click the Start Tour button  to start the Tour function.
 to start the Tour function.
4.Click to Stop Tour button  to stop the Tour function.
 to stop the Tour function.
4.1.4.4Digital Zoom
1.Click on a channel to display the Live Channel Toolbar and then click the Zoom button.
2.On the stream, use your mouse to draw a square on a certain area where you want to have a close-up view.
3.You can follow Step 2 to zoom in the desired area.
4.To return to the original view on the channel, left-click the mouse.
5.To exit Digital Zoom, click the Zoom button again.
4.2Remote Playback
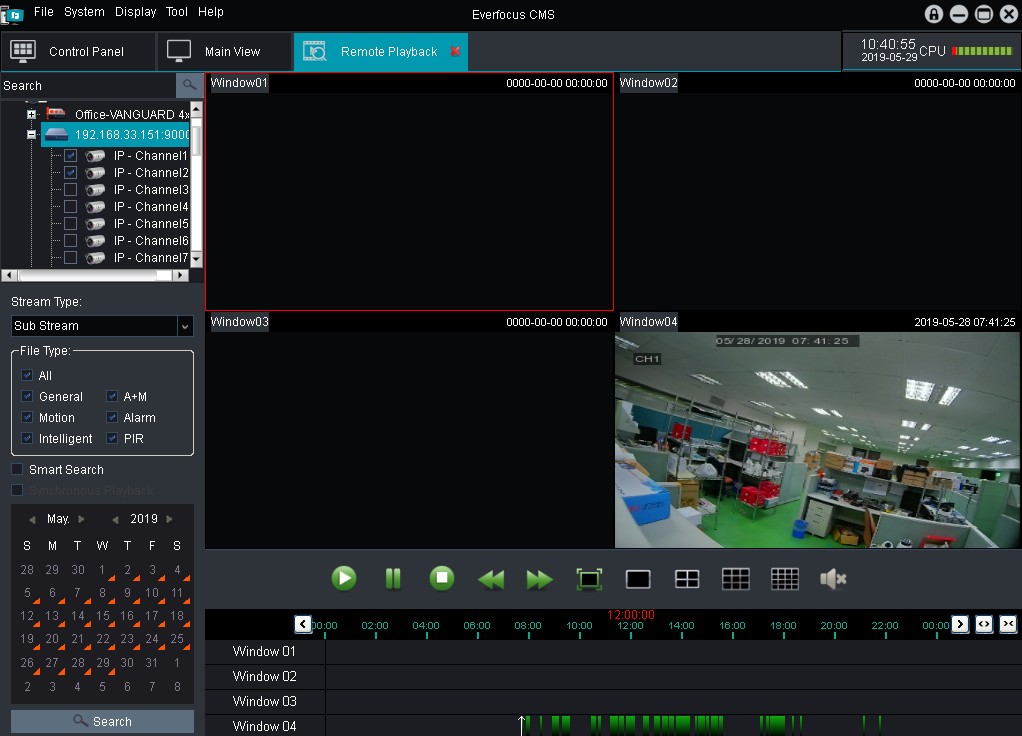


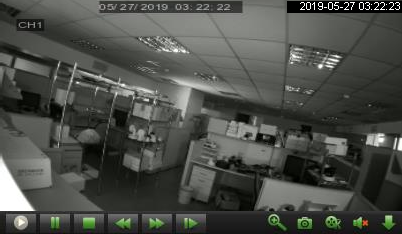
 To start playing back:
1.On the Device List, select channels by clicking the checkboxes.
2.Select a Stream Type and the desired Record Types. Note that the options can only be activated when the related functions have been configured on the DVR end.
3.If you want to synchronously play back the channels, check the Synchronous Playback checkbox.
4.Select a date. The date marked with an orange triangle indicates there are recordings during the date.
5.Click the Search button.
6.You can start playing back the recordings using the Playback Control Panel.
Playback Control Panel
.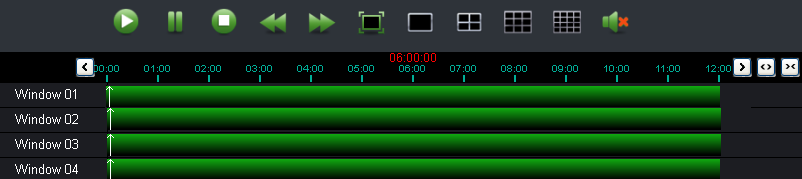 Previous Period
Play
Pause
Slow Full
Forward Screen
Quad
View 16-Division
Stop
Fast Forward
Single View
9-Division
Sound
Next Period
Time Span
Playback Channel Control Bar
On the Remote Playback window, click a channel to display the Playback Channel Control Bar, which is located at the bottom of the channel. Note that to control a single channel playback, disable the Synchronous Playback function.
Play
Pause Slow
Forward Step
Snapshot Sound
Forward Forward
Previous Period
Play
Pause
Slow Full
Forward Screen
Quad
View 16-Division
Stop
Fast Forward
Single View
9-Division
Sound
Next Period
Time Span
Playback Channel Control Bar
On the Remote Playback window, click a channel to display the Playback Channel Control Bar, which is located at the bottom of the channel. Note that to control a single channel playback, disable the Synchronous Playback function.
Play
Pause Slow
Forward Step
Snapshot Sound
Forward Forward
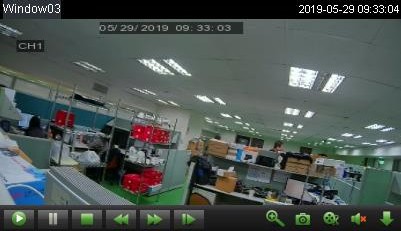
4.2.1Download Recording Files
1.On the Remote Playback window, click a channel to display the Playback Channel Control Bar. Click the
Download button.
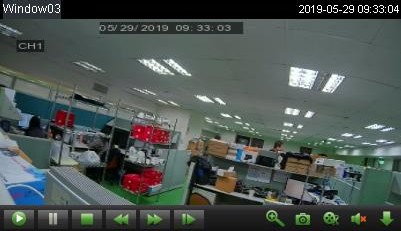 .
.
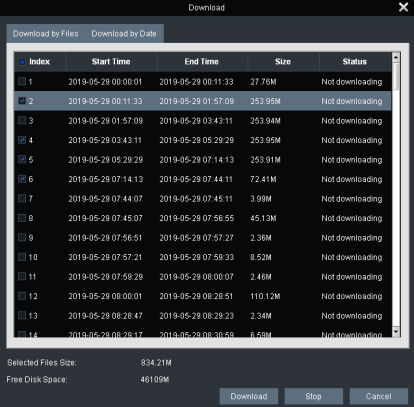
2.Click the Download by Files tab, select the desired recording files and then click the Download button to download the files to your computer.
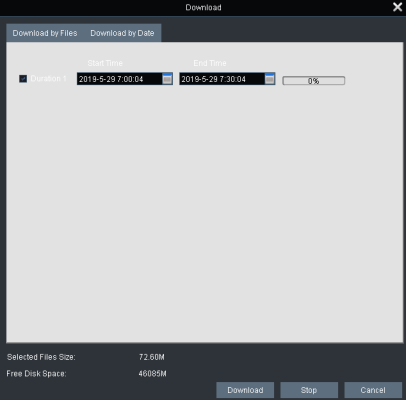
3.If you want to download files by the selected date, click the Download by Date tab, select the desired date and time range and then click the Download button.
4.3Group Device Management
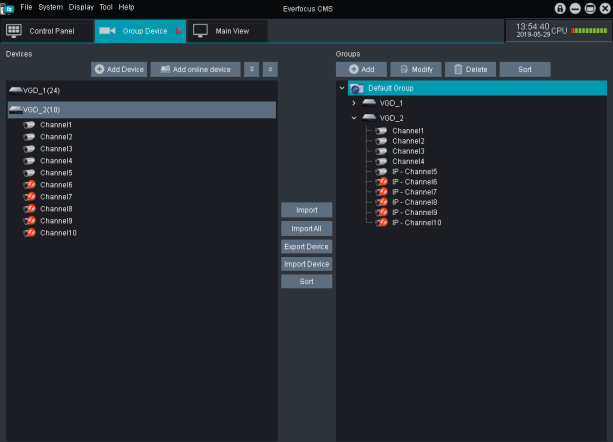 .
.
【Devices Panel】
You can use the left-side Devices panel to add, modify or delete devices; or remotely control the DVRs. To add devices, please refer to 3.3.2 Adding Devices and Grouping Devices. You can also use the device icons to modify devices. Modify: Click to modify the device info.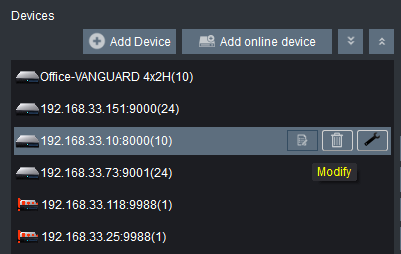 .
.
 Delete: Click to delete the device.
Remote Config: Click to enter the Remote Configuration page to configure the Device settings remotely. About the configurations, please refer to the User’s Manual of the device.
Delete: Click to delete the device.
Remote Config: Click to enter the Remote Configuration page to configure the Device settings remotely. About the configurations, please refer to the User’s Manual of the device.
Groups Panel
You can use the right-side Groups panel to group the added devices from the Devices panel. You can select different channels from different DVRs to a group. To group devices, please refer to 3.3.2 Adding Devices and Grouping Devices.4.4Local Log Search
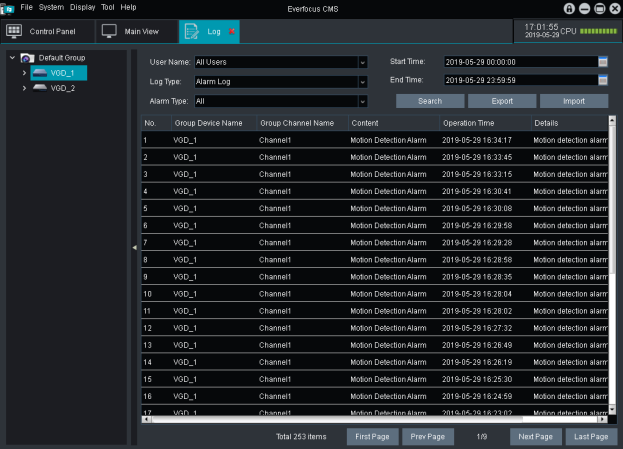 .
To search log information:
.
To search log information:
1.Select the filter items on the above field. User Name: Select the login user(s).
Log Type: Select a log type.
Alarm Type: Select the desired alarm type(s). Start / End Time: Select a time range.
2.Click the Search button, the search results will be displayed below.
3.You can click the Export button to export the searched log info. Or click the Import button to import the log info.
4.5Account Management
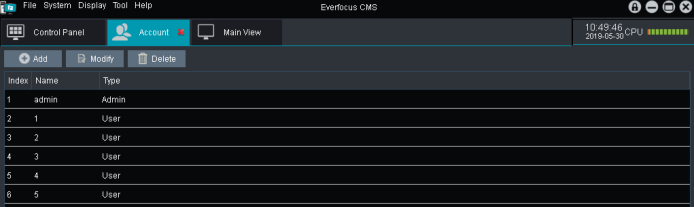 Admin: By default, the admin account has full privileges. The admin account cannot be deleted and only the password can be changed. By default, the password of the admin account is blank. To change the password, click the admin account on the list and then click the Modify button. Input the password and then click Save. Only the Admin account can add, edit or delete user accounts.
.
To add a user account:
Admin: By default, the admin account has full privileges. The admin account cannot be deleted and only the password can be changed. By default, the password of the admin account is blank. To change the password, click the admin account on the list and then click the Modify button. Input the password and then click Save. Only the Admin account can add, edit or delete user accounts.
.
To add a user account:
1.Click the Add button, the Add User window appears.
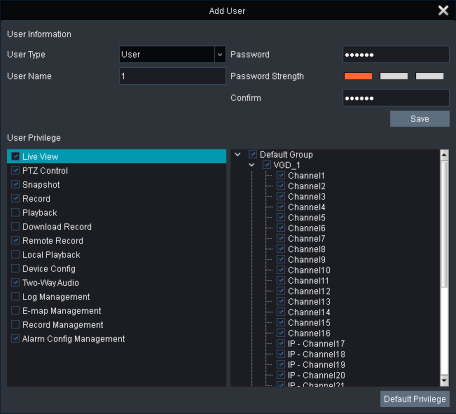
2.Input the User Name, Password and confirm password.
3.In the User Privilege field, check the functions for this user and then check the channels for each function.
4.Click the Save button to save the settings. This User account should be listed.
1.On the account list, select an account by clicking on it, the selected account will be highlighted with a gray background.
2.Click the Modify button, the Modify User window appears.
3.Modify the user info and privileges and then click the Save button.
1.On the account list, select an account by clicking on it, the selected account will be highlighted with a gray background.
2.Click the Delete button to delete the selected user account.
4.6File Management
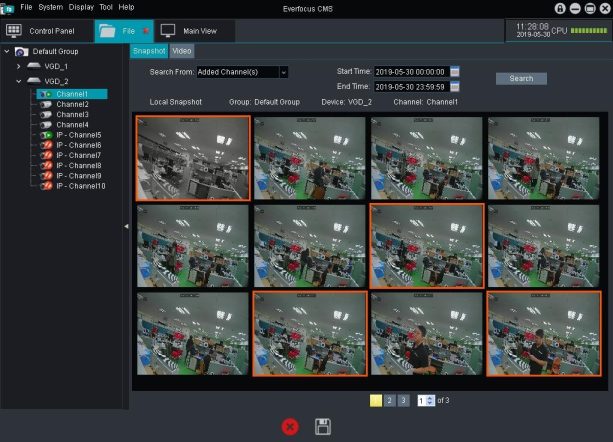
4.6.1Local Snapshot Search
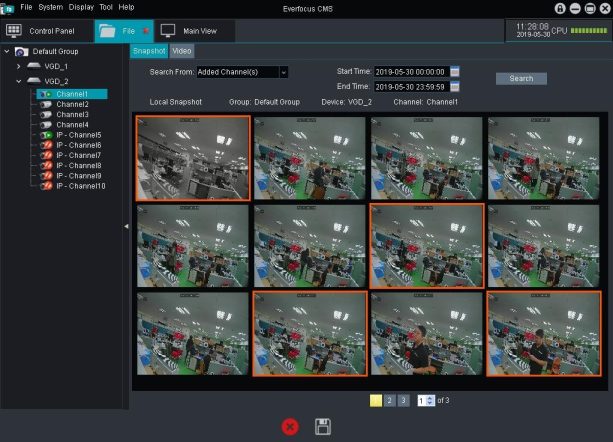 To search for local snapshot images:
1.Click the Snapshot tab.
2.Select the filter items on the above field.
Search From: Select a source. Select Added Channel(s) to search for snapshots from the channels on the Device List. Select Deleted Channel(s) to search for snapshots from the deleted channels.
Start / End Time: Select a time range.
3.If Added Channel(s) is selected from the Search From drop-down list, you can select the desired channel, device or group from the Device List by clicking on it, the selected item will be highlighted with a green background.
4.Click the Search button, the search results will be displayed.
5.You can double-click on the image to display the image.
6.To delete or download the images on the list, click to select multiple images using the Ctrl key. The selected images will be highlighted with an orange frame. Click the Delete button  to delete the selected images or click the Save button
  to download the selected images to your computer.
 to delete the selected images or click the Save button
  to download the selected images to your computer.
4.6.2Local Recording Search
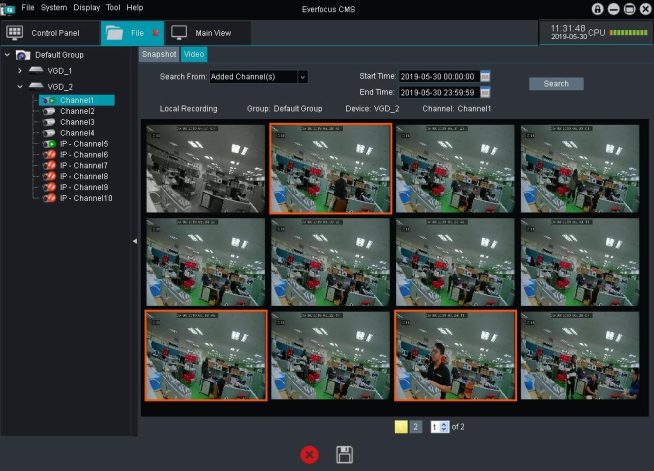 .
To search for local recordings:
.
To search for local recordings:
1.Click the Video tab.
2.Select the filter items on the above field.
Search From: Select a source. Select Added Channel(s) to search for recordings from the channels on the Device List. Select Deleted Channel(s) to search for recordings from the deleted channels.
Start / End Time: Select a time range.
3.If Added Channel(s) is selected from the Search From drop-down list, you can select the desired channel, device or group from the Device List by clicking on it, the selected item will be highlighted with a green background.
4.Click the Search button, the search results will be displayed.
5.You can double-click on the thumbnail image to play back the recording.
6.To delete or download the recordings on the list, click to select multiple recordings using the Ctrl key. The selected recordings will be highlighted with an orange frame. Click the Delete button  to delete the selected recordings or click the Save button
  to download the selected recordings to your computer.
 to delete the selected recordings or click the Save button
  to download the selected recordings to your computer.
4.7System Configuration
4.7.1General
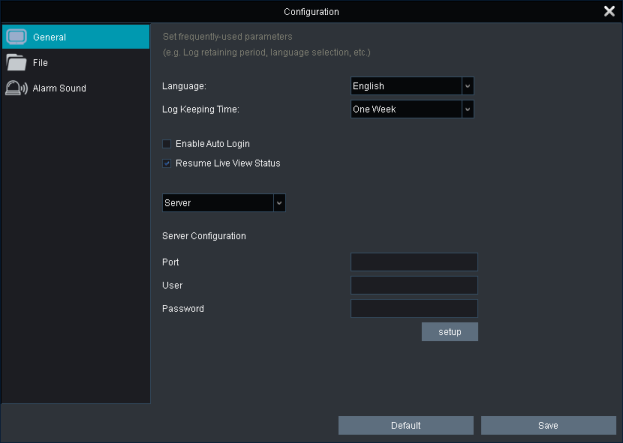 .
Language: Select a language.
Log Keeping Time: Select a keeping time range for log.
Enable Auto Login: Check the box to enable auto login. Users can login without inputting user name and password.
Resume Live View Status: When starting the system, the previous live view status/layout will be automatically resumed.
Server/Client: You can configure the system to be a server or client and then add devices from the client sites to your server site. Please refer to 3.3.1 Adding Devices from Other Servers (Client Servers).
.
Language: Select a language.
Log Keeping Time: Select a keeping time range for log.
Enable Auto Login: Check the box to enable auto login. Users can login without inputting user name and password.
Resume Live View Status: When starting the system, the previous live view status/layout will be automatically resumed.
Server/Client: You can configure the system to be a server or client and then add devices from the client sites to your server site. Please refer to 3.3.1 Adding Devices from Other Servers (Client Servers).
4.7.2File
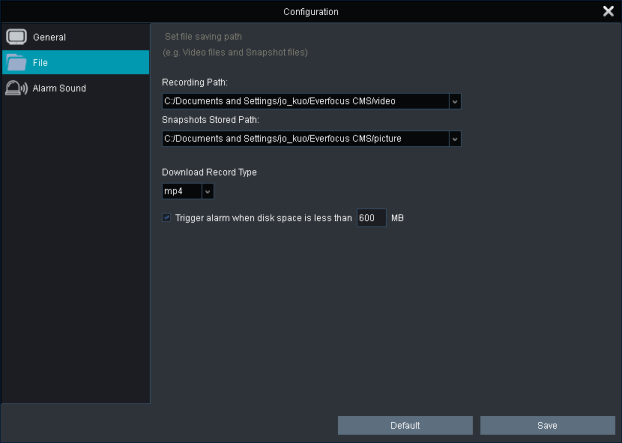 .
Recording Path: Select a storage path for the recordings.
Snapshots Stored Path: Select a storage path for the snapshot images.
Download Record Type: Select a video format for the downloaded recordings. MP4 or AVI.
Trigger alarm when disk space is less than xxx MB: Input a number in the input box. When the available disk space is less than then setup capacity, the alarm message will appear. The default setting is 600MB. The minimum value is 500MB.
.
Recording Path: Select a storage path for the recordings.
Snapshots Stored Path: Select a storage path for the snapshot images.
Download Record Type: Select a video format for the downloaded recordings. MP4 or AVI.
Trigger alarm when disk space is less than xxx MB: Input a number in the input box. When the available disk space is less than then setup capacity, the alarm message will appear. The default setting is 600MB. The minimum value is 500MB.
4.7.3Alarm Sound
 .
.
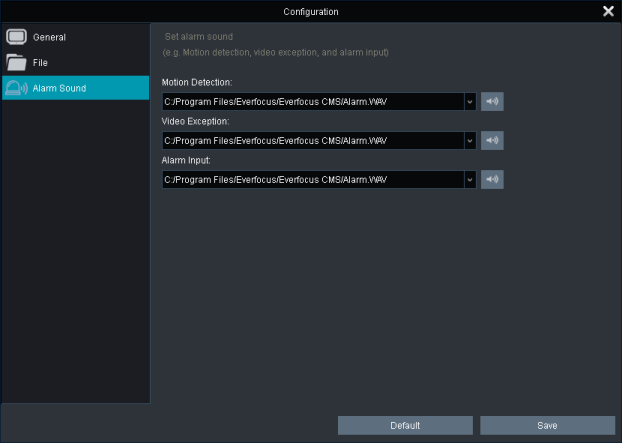
1.Click the  button to select an audio file (wav).
button to select an audio file (wav).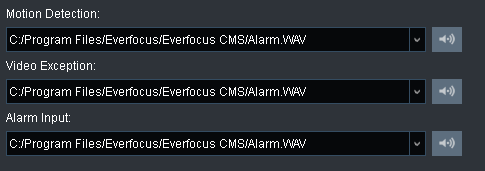 .
.
.
.
2. You can click the button to play the audio file.
 You can click the button to play the audio file.
3.Click Save to save the settings.
4.8E-Map Management
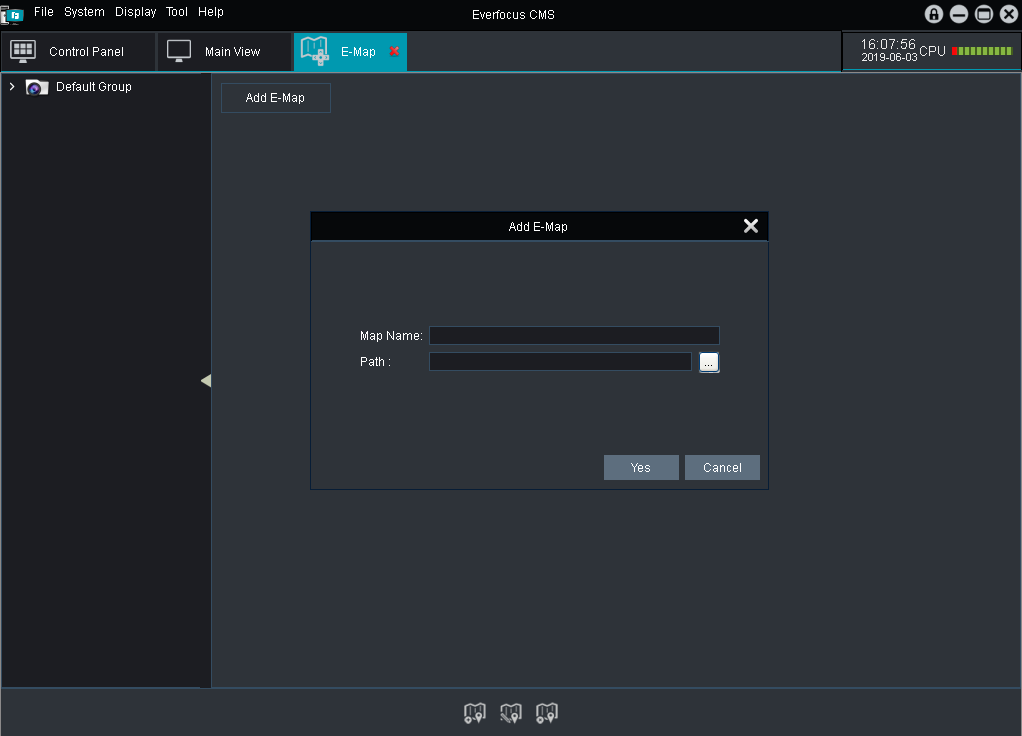
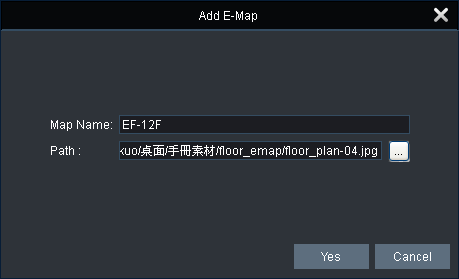
1.To add an E-Map, click the Add E-Map button (either one), an Add E-Map window appears. Input a name and select an image, and then click the Yes button.
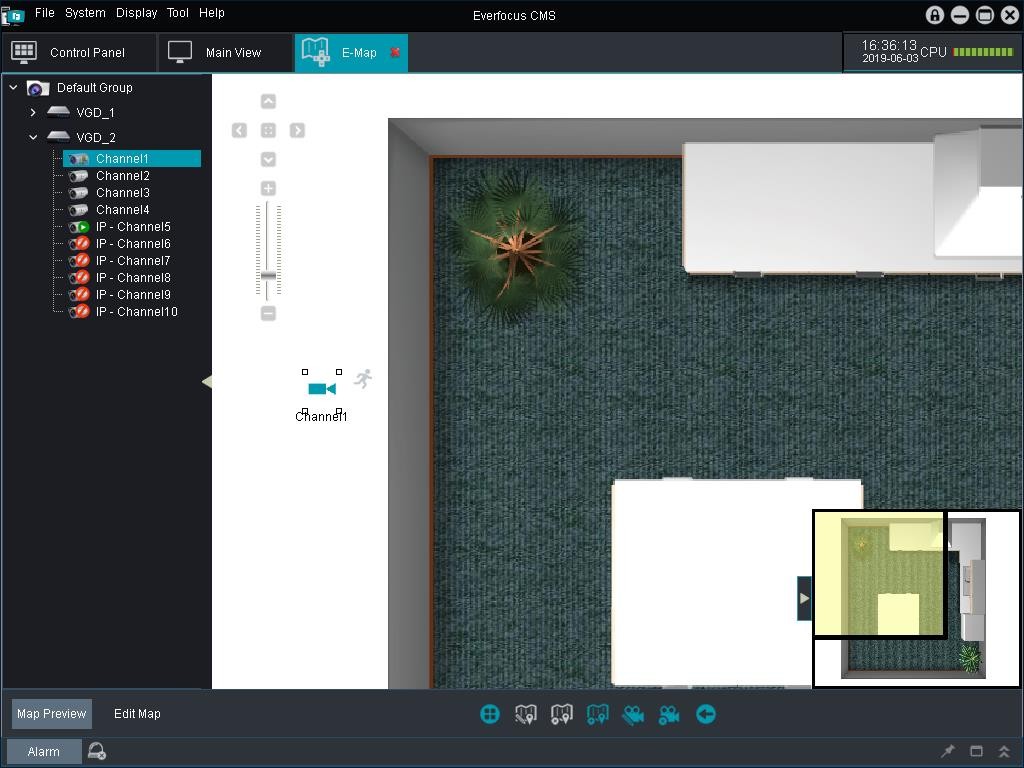
2.Drag and drop the IP cameras from the Device List to the map. When there is an event occurs, an alarm icon will be displayed beside the camera icon.
 .
.
.
.
3.You can use the buttons at the lower side of the screen to preview or edit the E-Map.

Map Preview: Click the Map Preview button and then you can use the function icons on the right-side to preview E-Maps, clear alarms, or turn to the previous or next pages.
| Icons | Description | |
.
 |
E-Map Preview | Click to view the added E-Maps. |
.
 |
Clear Alarm | Click to clear the alarms. |
.
 |
Previous | Click to turn to the previous page. |
.
 |
Next | Click to turn to the next page. |
Edit Map: Click the Edit Map button and then you can edit the e-map or hot spot (location) using the function icons on the right-side.

 Click the E-Map Click the camera icon on the E-Map
| Icons | Description | |
.
 |
E-Map Preview | Click to view the added E-Maps. |
.
 |
Modify E-Map | Click to modify the current E-Map. |
.
 |
Delete E-Map | Click to delete the current E-Map. |
.
 |
Add Hot Region | Click to add a hot region of the E-Map. |
.
 |
Modify Hot Spot | Click to modify the hot spot (location of the camera). |
.
 |
Delete Hot Spot | Click to delete the hot spot. |
.
 |
Next | Click to turn to the next page. |
4.9Local Playback
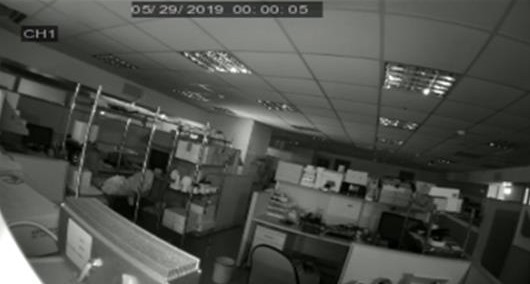
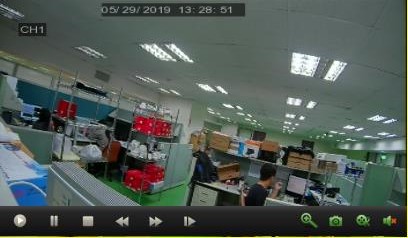 To start playing back:
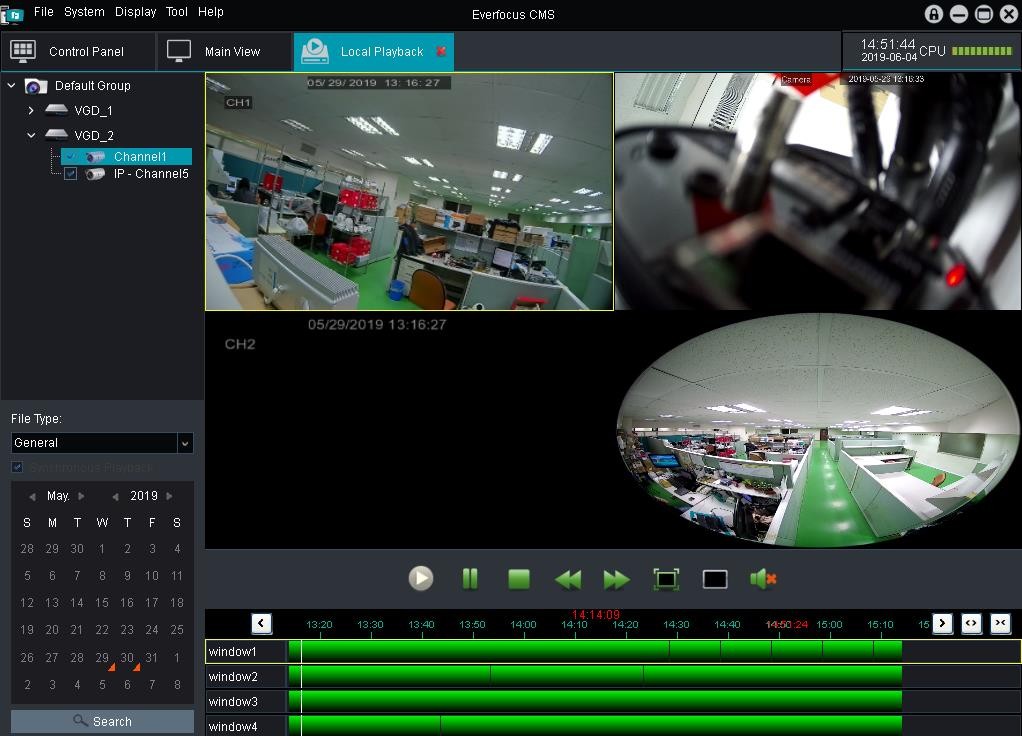
1.On the Device List, select channels by clicking the checkboxes.
2.If you want to synchronously play back the channels, check the Synchronous Playback checkbox.
3.Select a date. The date marked with an orange triangle indicates there are recordings during the date.
4.Click the Search button.
5.You can start playing back the recordings using the Playback Control Panel.
Playback Control Panel
.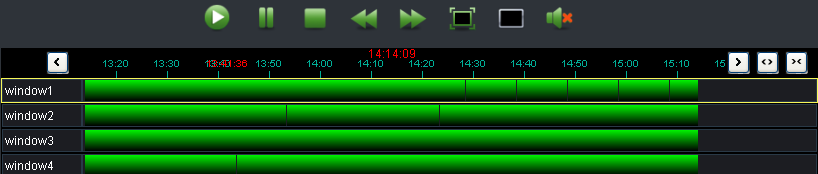 Previous Period
Pause
Slow Forward
Full Screen
Sound
Fast
Switch
Play
Stop
Forward Layout
Next Period
Time Span
Playback Channel Control Bar
On the Playback window, click a channel to display the Playback Channel Control Bar, which is located at the bottom of the channel. Note that to control a single channel playback, disable the Synchronous Playback function.
4.10Local Record Management
On the Control Panel, click the Local Record Management button to display the Local Record Management window. You can configure multiple record schedules to record the streams in your computer.
.
Previous Period
Pause
Slow Forward
Full Screen
Sound
Fast
Switch
Play
Stop
Forward Layout
Next Period
Time Span
Playback Channel Control Bar
On the Playback window, click a channel to display the Playback Channel Control Bar, which is located at the bottom of the channel. Note that to control a single channel playback, disable the Synchronous Playback function.
4.10Local Record Management
On the Control Panel, click the Local Record Management button to display the Local Record Management window. You can configure multiple record schedules to record the streams in your computer.
.
4.10.1Record Management
 .
.
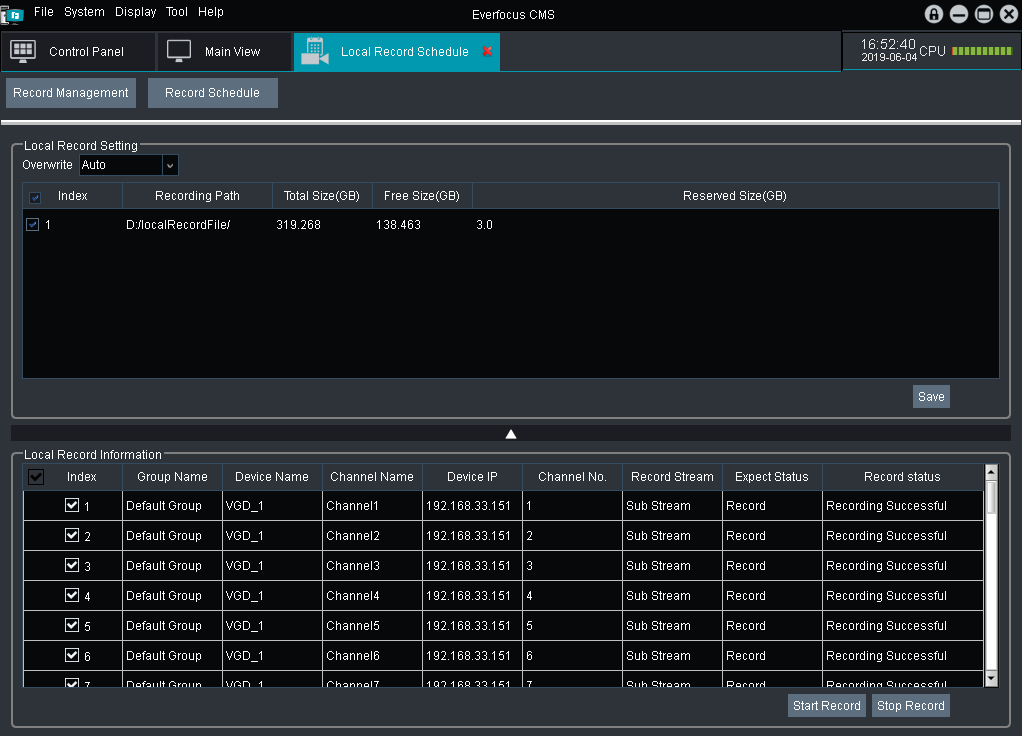
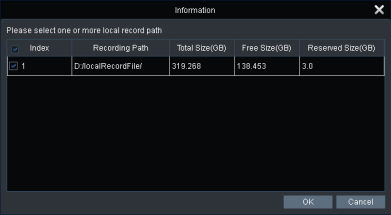
1.For the first time set-up, after clicking the Local Record Management icon on the Control Panel, the below window appears. Select the desired storage path(s) for the Schedule Record and then click OK. Note that after clicking OK, the storage path(s) cannot be changed.
2.Configure the Record Schedule in advance (please refer to 4.10.2 Record Schedule). After configuring the Record Schedule, the selected cameras for Record Schedule will be displayed in the Local Record Information field.
3.In the Local Record Setting field, select an overwrite type and recording path, and then click the Save
button.
Overwrite: Select an overwrite type.
Recording Path: Select the desired recording path by checking the checkboxes.
4.In the Local Record Information field, select the desired cameras for schedule recording by checking the checkboxes.
5.Click the Start Record button to activate the Record Schedule function.
6.If you want to de-activate the Record Schedule, click the Stop Record button.
4.10.2Record Schedule
 .
.
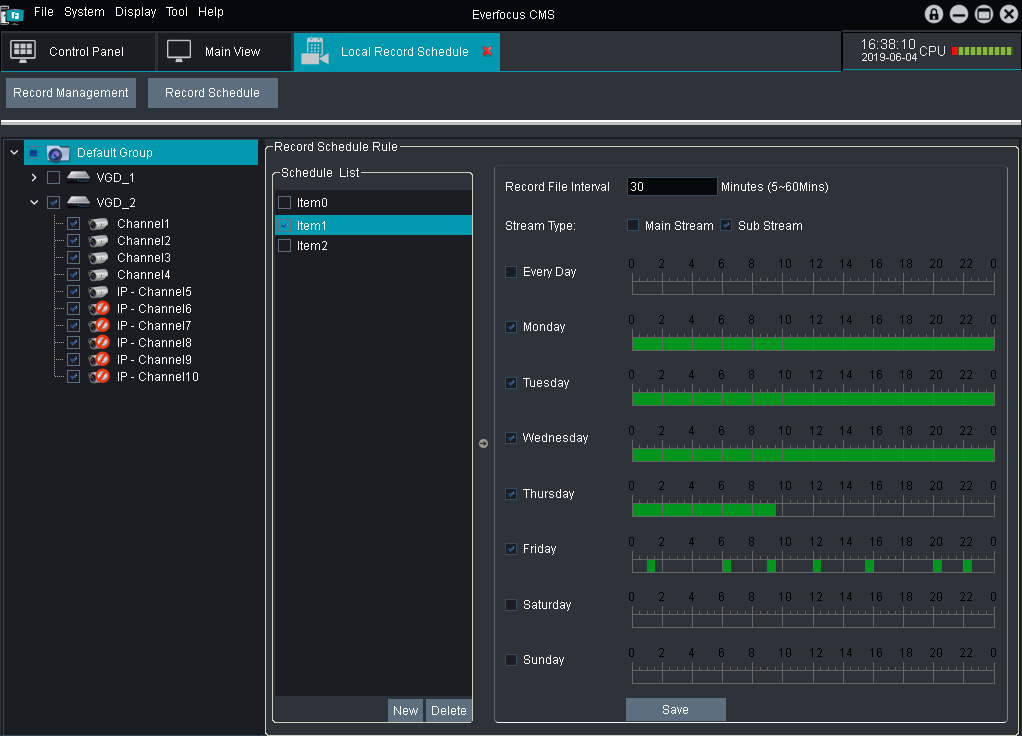
1.In the Schedule List field, check Item0 to define a schedule profile for Item0.
Note that by default, Item0 is created on the list. You can click the New button to add multiple items and then define the schedule profile for each item.
2.Input a time interval (recording length) In the Record File Interval input box.
3.Select a recording stream type. Main Stream or Sub Stream.
4.Configure the time schedule.
a.Check the day checkboxes and then use your mouse to drag on the time blocks. The selected time blocks will be applied with a green background, which means the blocks have been applied with the recording schedule function.
b.If you want to apply the recording schedule to everyday, check the Every Day checkbox and then select the desired time blocks.
5.On the Device List, select the desired cameras to be applied with this recording schedule.
6.Click the Save button to save the settings.
7.After setting up the recording schedule, go to Record Management (refer to 4.10.1 Record Management) to select a storage path for activating the recording schedule.
4.11Alarm Config Management
 For the Alarm function to work, you will have to configure the below settings in advance.
• Configure the alarm settings on the DVR end, including the Motion, Video Loss or I/O.
• Configure the local recording settings. Please refer to 4.10 Local Record Management.
• Configure the alarm settings. Please refer to the below instruction.
1.Ensure the alarm settings have been configured on the DVR end.
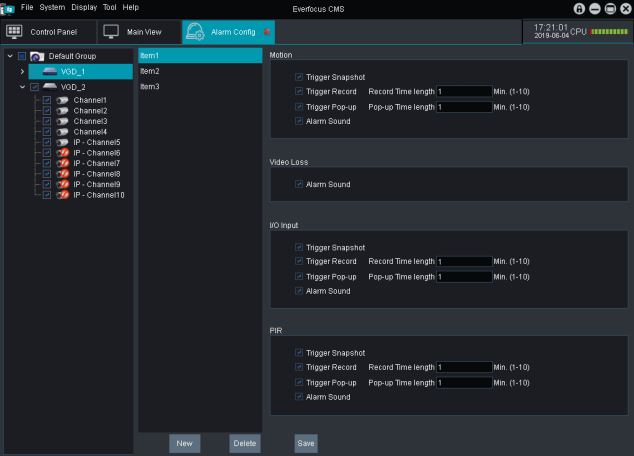
2.On the Alarm Config Management page, click on Item1 to configure the alarm settings for Item1.
Note that by default, Item1 is created on the list. You can click the New button to add multiple items and then configure the alarm settings for each item.
3.Select the alarm actions of each alarm type.
• Trigger Snapshot: When an alarm occurs, the system will take a snapshot of the alarm channel(s).
• Trigger Record: When an alarm occurs, the system will start recording of the alarm channel(s). You can input a recording time length for the alarm recording. Note for the system to record the alarm recordings, you will have to configure the local record settings. Please refer to 4.10 Local Record Management.
• Trigger Pop-up: When an alarm occurs, the system will pop-up a live view window of the alarm channel(s). You can input a pop-up window display time. The window will close when the time’s up.
• Alarm Sound: When an alarm occurs, the system will play the alarm sound. You can configure the alarm sound. Please refer to 4.7.3 Alarm Sound.
4.On the Device List, select the desired cameras to be applied with this alarm setting.
5.Click the Save button to save the settings.
5.Top Navigation Bar
 5.1File
5.1.1Open Captured Snapshots
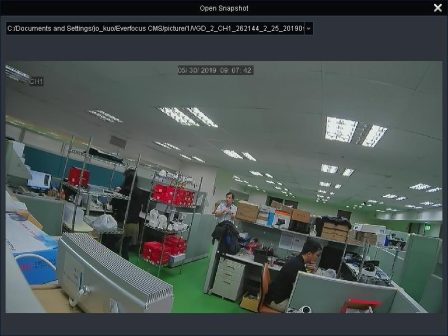 .
.
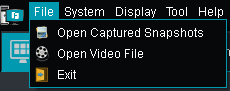
1.Click Open Captured Snapshots and then select an image file, the file will be displayed.
2.To display another snapshot image, click the drop-down button  to select another image file.
to select another image file.5.1.2Open Video File
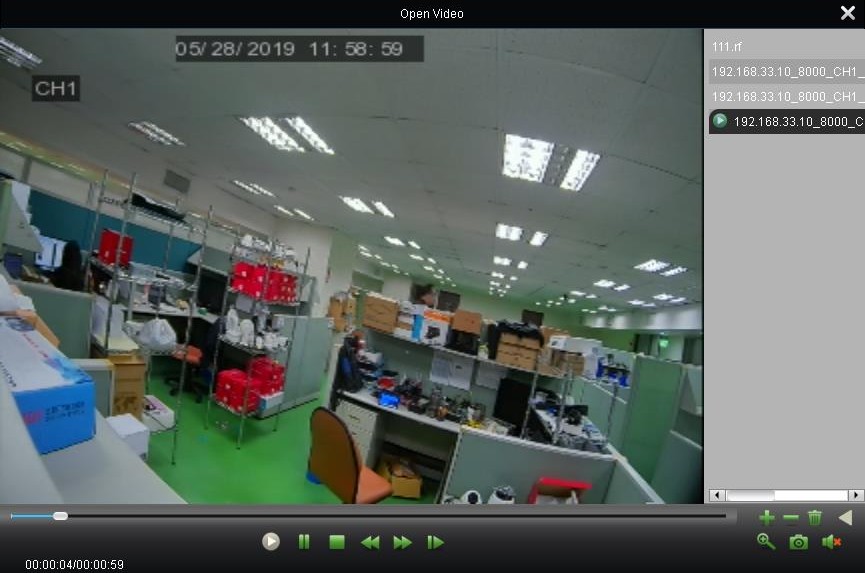
1.Click Open Video File to display the Open Video window.
 .
.
2.Click the Open recording file button to select a recording. You can click this button to select multiple recording files. The selected files will be displayed on the list.
3.After selecting a recording file, the system will start playing back the recording.
4.You can use the playback control buttons to perform some functions.
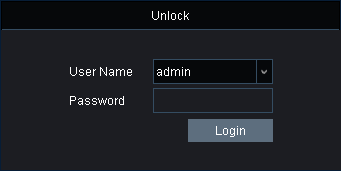
5.2.2Switch User
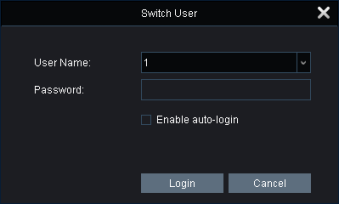
5.2.3System Configuration
5.3Display
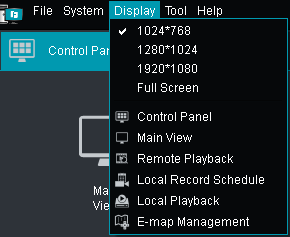
5.3.1Display Resolution
5.3.2Control Panel
5.3.3Main View
5.3.4Remote Playback
5.3.5Local Record Schedule
5.3.6Local Playback
5.3.7E-Map Management
5.4Tool
 .
.
5.4.1Account Management
5.4.2Group Device Management
5.5Help
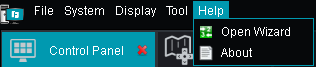 .
.
5.5.1Open Wizard
5.5.2About
Advertisement

Topics:
#Everfocus Cms Camera Setup
#Everfocus Cms Cms Lite Setup
#Everfocus Cms Configuration
#Everfocus Cms Connection Failed
#Everfocus Cms Device Management
#EverFocus CMS firewall settings
#EverFocus CMS installation
#EverFocus CMS login setup
#EverFocus CMS manual
#EverFocus CMS multi-site monitoring
#EverFocus CMS network settings
#EverFocus CMS playback guide
#EverFocus CMS recording setup
#EverFocus CMS remote viewing
#EverFocus CMS setup
#EverFocus CMS software download
#EverFocus CMS system requirements
#EverFocus CMS troubleshooting
#EverFocus CMS user guide
#EverFocus DVR CMS setup
#EverFocus NVR CMS integration
Did this security guide help you?
Rate this article to help fellow engineers find the best guides.

Written by
Alex Vance
Senior Security Systems Architect & IoT Consultant with over 15 years in digital surveillance design.

Discussion (0)
No comments yet. Be the first to share your thoughts!
Leave a Comment