
DAHUA AI Setup Guide
DAHUA AI Setup Guide, Zhejiang Dahua Technology Co., Ltd., headquartered in Binjiang District, Hangzhou, is a security equipment manufacturer and supplier with a global brand reputation. With over 18,000 employees worldwide, Dahua is a recognized and used brand in 180 countries.
The features of different devices varies and the Smart Search options available depends which feature the device supports.
Prerequisites
Video Examples
Smart Search of Tripwire with Object Filter enabled (Person and Vehicle):
[embed]https://youtu.be/zZb7B-l4zME[/embed]
Smart Search of Face Detection using Facial Attributes to search:
[embed]https://youtu.be/eKWDt5Z9lAE[/embed]
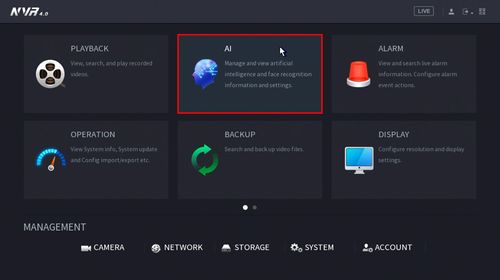 2. Click Smart Search > Face Detection
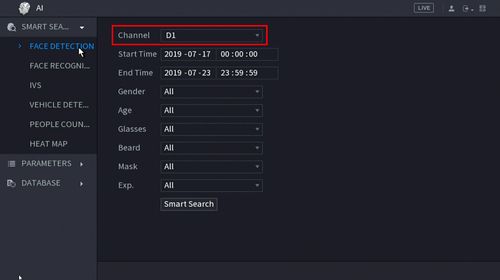
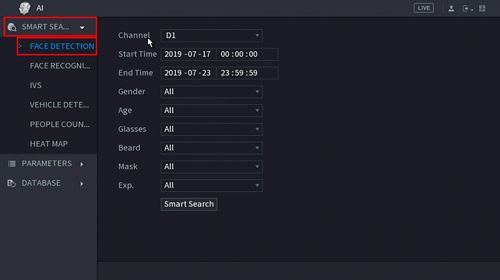 3. Use the drop-down box to select the Channel to search
 4. Use the Start Time / End Time fields to enter a date range for the search
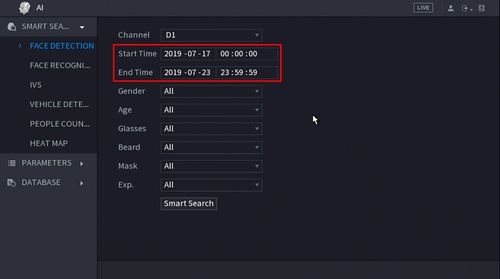 5. Click 'Smart Search' once parameters have been set
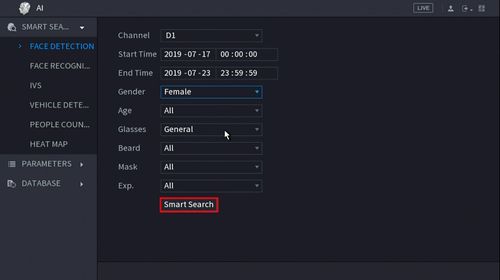 6. The search results will be displayed
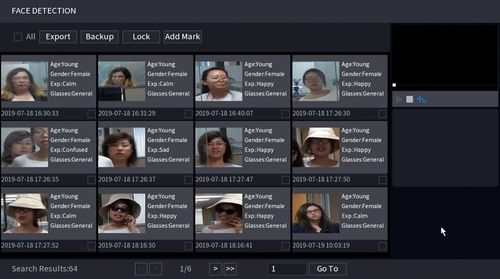 7. Double click any entry to begin playback
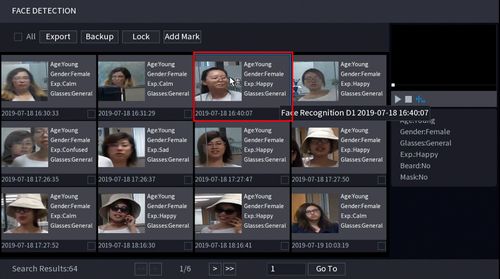
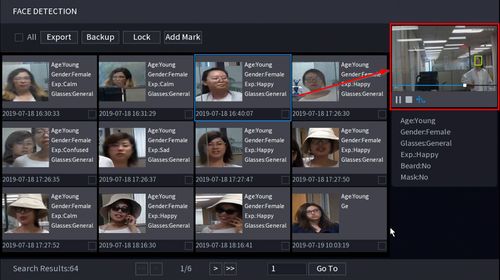 8. Use the buttons above the search result to Export and Backup any entries
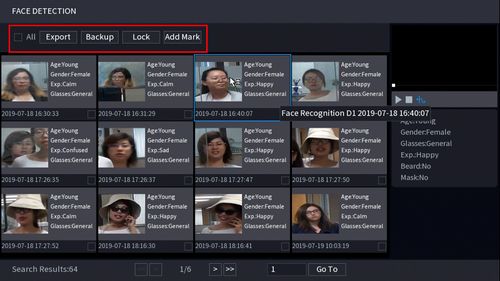 Click to highlight/select a single entry
Use the checkbox to select multiple entries at once
Click to highlight/select a single entry
Use the checkbox to select multiple entries at once
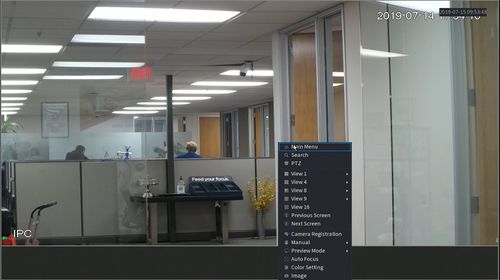 2. Click Smart Detection
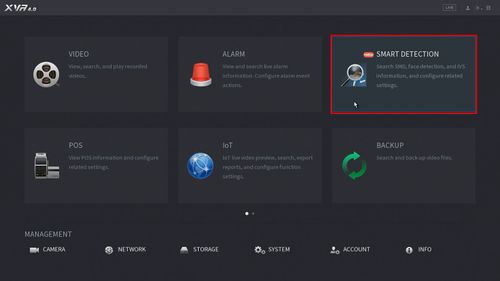 3. Click Smart Search - on the left side of the screen
You can search recorded SMD, Human Face, and IVS data.
This guide will use IVS but the procedure is similar.
3. Click Smart Search - on the left side of the screen
You can search recorded SMD, Human Face, and IVS data.
This guide will use IVS but the procedure is similar.
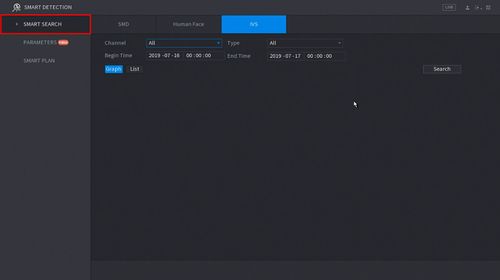 4. Use the drop-down menu to select the Channel # to search and the Type of IVS rule to search for
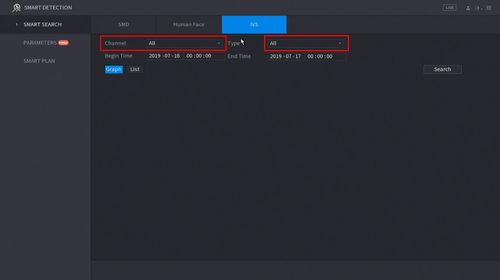 5. Click the Begin and End time to enter a time range for the search
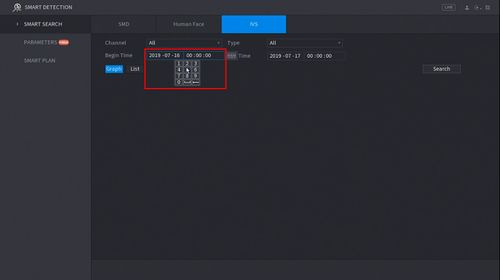 6. Click Search
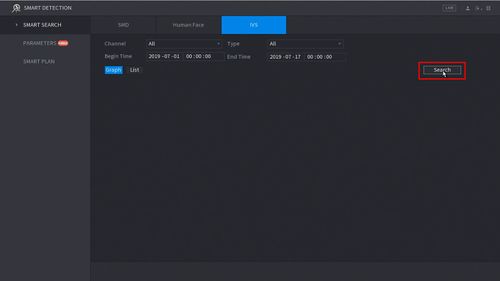 7. The Search results will appear in the center of the screen
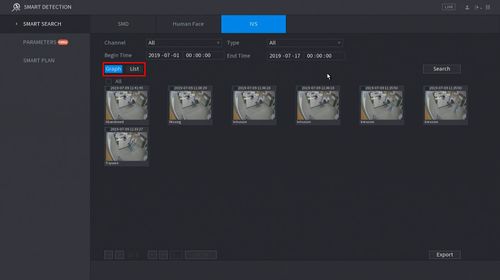 The results can be displayed in Graph or List (shown below)
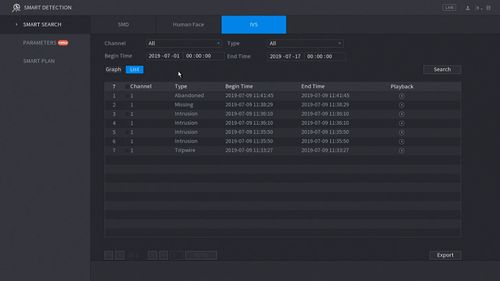 Both will show the Event Type, Time and include a snapshot (if enabled)
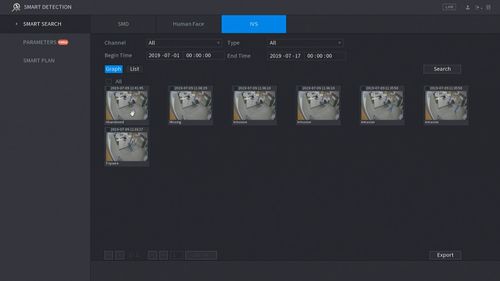
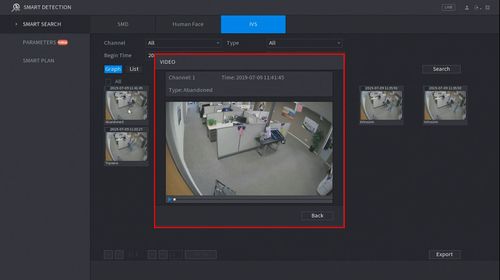
8. You can quickly playback the Event by
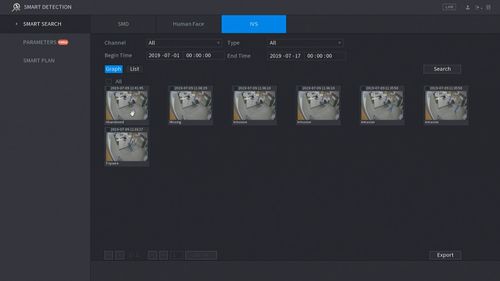
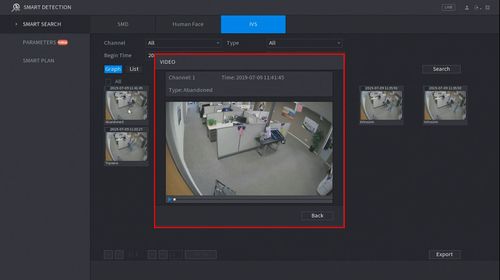
Graph View: Double click the Event
Both will show the Event Type, Time and include a snapshot (if enabled)
8. You can quickly playback the Event by
Graph View: Double click the Event
 List View: Click the icon under "Playback"
9. To Export an event use the checkbox to select the Events you wish to Export then click Export int he bottom right of the screen. A USB drive must be inserted in the unit to Export the files to.
List View: Click the icon under "Playback"
9. To Export an event use the checkbox to select the Events you wish to Export then click Export int he bottom right of the screen. A USB drive must be inserted in the unit to Export the files to.
 2. Click Parameters > Smart Plan
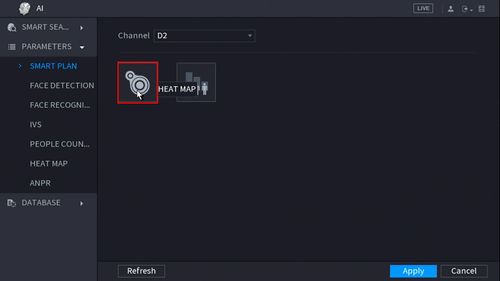
 3. Click the Heat Map icon to enable
 4. The icon will turn blue when selected
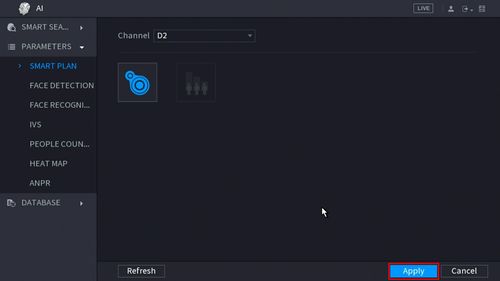
 5. Click Apply to Save
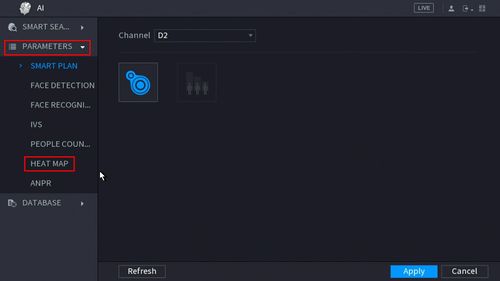
 6. Click Parameters > Heat Map
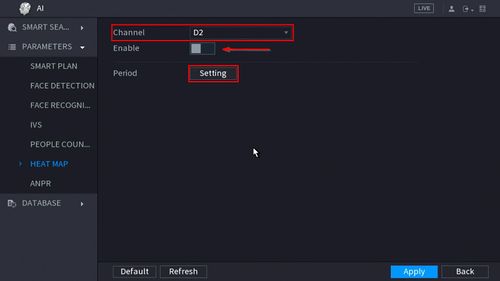
 7. Use the drop-down box to select the channel
Click the toggle button to Enable
Click the Setting button to create a Schedule for the Heat Map
7. Use the drop-down box to select the channel
Click the toggle button to Enable
Click the Setting button to create a Schedule for the Heat Map
 8. Click Apply to Save
 Heat Map is enabled
 2. Click Parameters > Smart Plan
 3. Use the drop down box to select the Channel
 4. Click the IVS icon to enable.
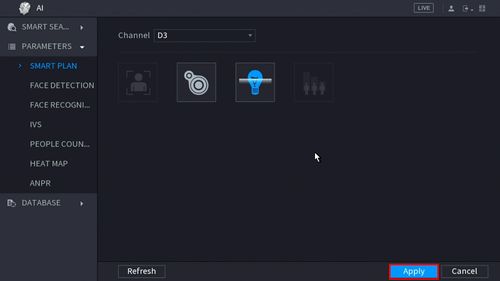
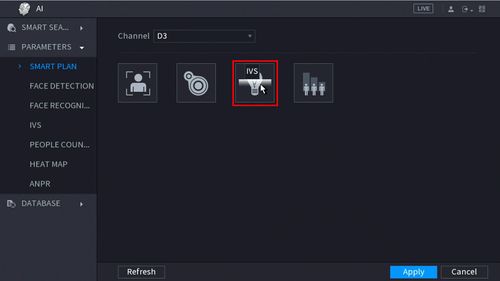 The icon will highlight when selected.
Click Apply
The icon will highlight when selected.
Click Apply
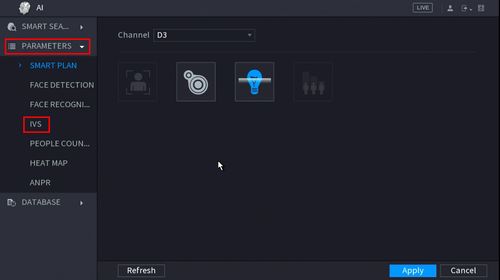
 5. Click Parameters > IVS
 6. Use the drop-down box to select the Channel
Then click Add in the lower right side of the screen to Add an IVS rule
6. Use the drop-down box to select the Channel
Then click Add in the lower right side of the screen to Add an IVS rule
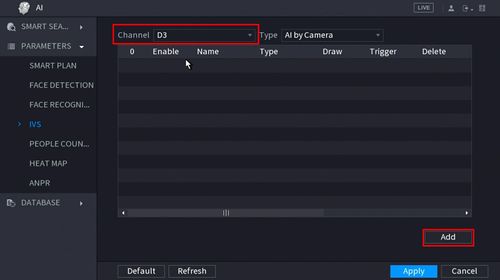 7. The created rule will appear in the list
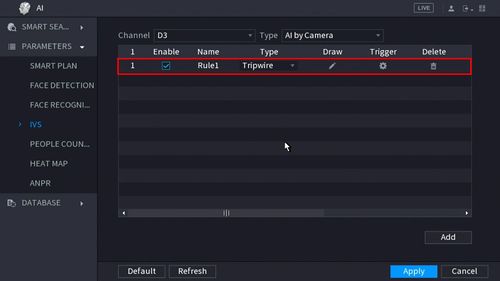 .
9. Click the Pencil icon to draw the Tripwire rule
.
9. Click the Pencil icon to draw the Tripwire rule
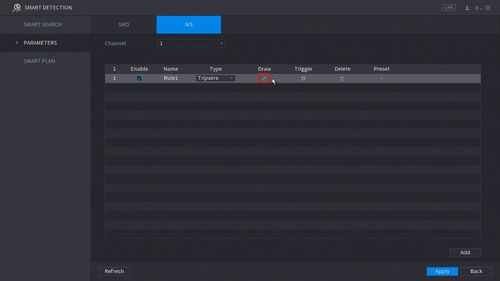 10. The Channel will fullscreen.
Left click anywhere inside the video frame to begin drawing the Trip line, then use the mouse to draw the trip line.
Right click to end drawing
10. The Channel will fullscreen.
Left click anywhere inside the video frame to begin drawing the Trip line, then use the mouse to draw the trip line.
Right click to end drawing
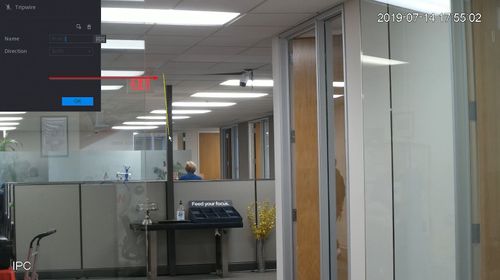
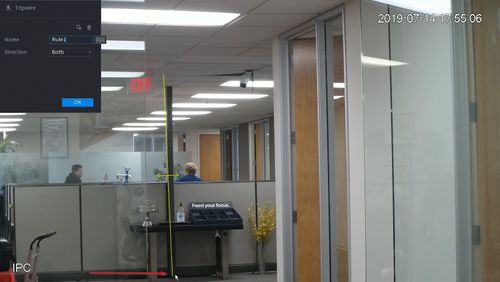 11. The Tripwire menu will appear
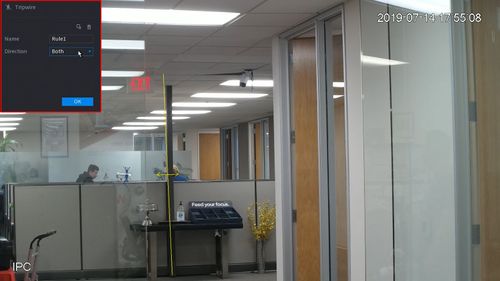 Click
Click  icon to set the Target Filter (maximum and minimum size size for Objects to follow rule)
Click
icon to set the Target Filter (maximum and minimum size size for Objects to follow rule)
Click  icon to clear the current rule
Once the tripwire rule settings have been created click OK
12. Click the
icon to clear the current rule
Once the tripwire rule settings have been created click OK
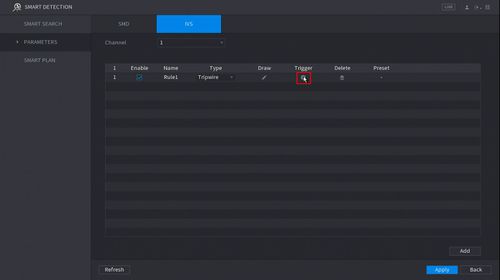
12. Click the  icon to set the Trigger settings when the IVS Tripwire rule is engaged.
 13. The Trigger menu will appear
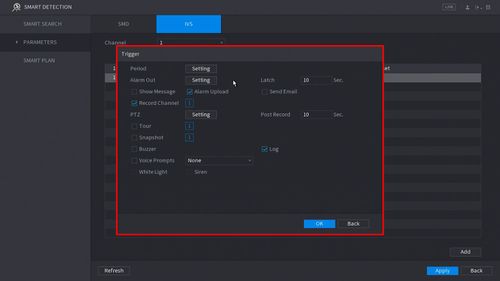 Once the trigger rule settings have been created click OK
14. Once all Tripwire settings have been configured, Click Apply in the lower right of the screen to save all changes
Once the trigger rule settings have been created click OK
14. Once all Tripwire settings have been configured, Click Apply in the lower right of the screen to save all changes
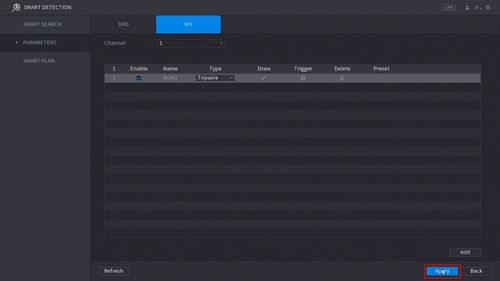 15. The created Tripwire is now programmed
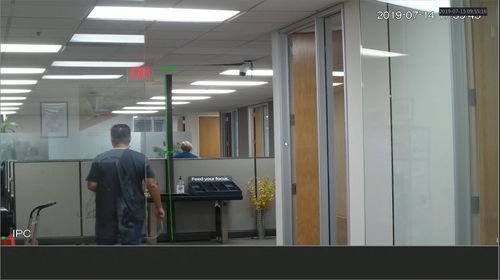
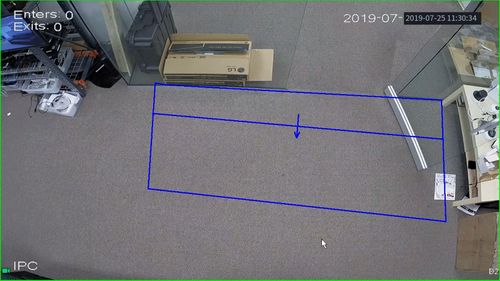 .
.
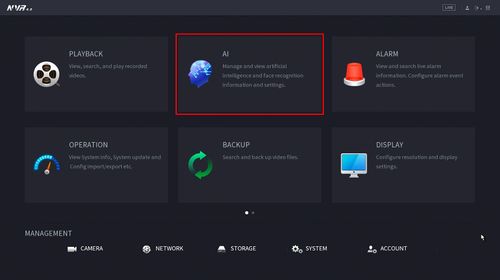 2. Click Parameters > Smart Plan
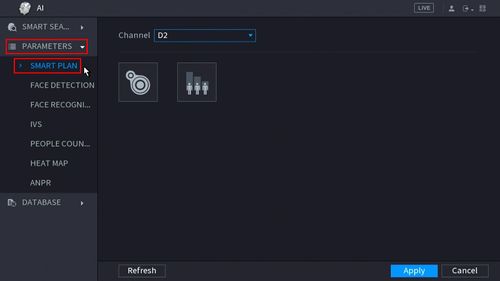 3. Click the People Counting icon to enable.
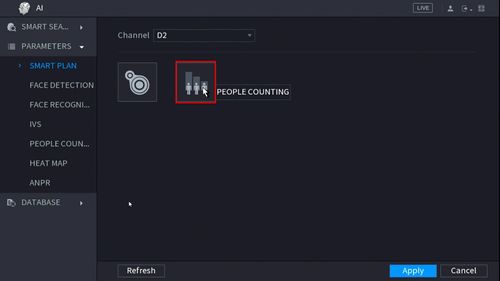 4. The icon will turn blue when selected.
Click Apply to save
4. The icon will turn blue when selected.
Click Apply to save
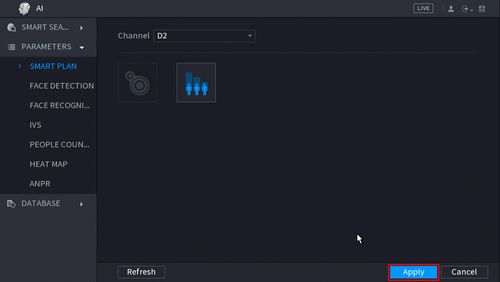 5. Click Parameters > People Counting
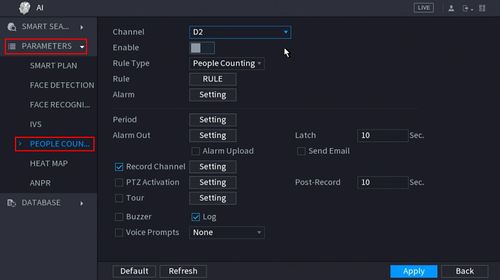 6. Use the drop-down box to select the channel.
Click the toggle button to enable
6. Use the drop-down box to select the channel.
Click the toggle button to enable
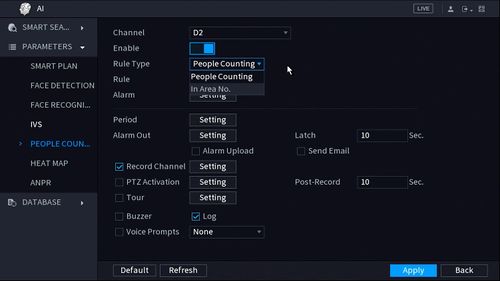
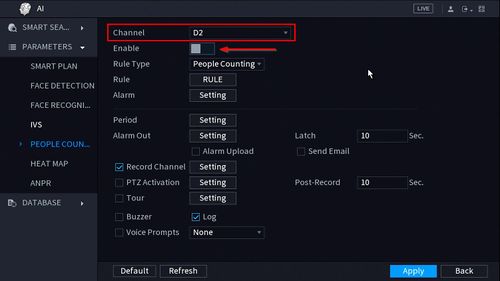 7. Use the drop-down box next to Rule Type to select from the People Counting feature options. There are two options:
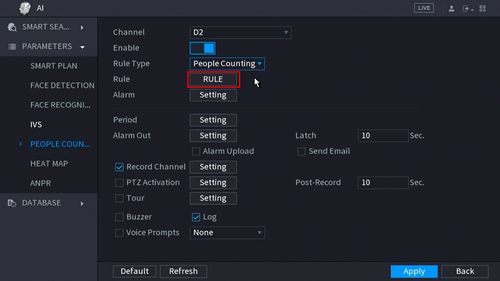
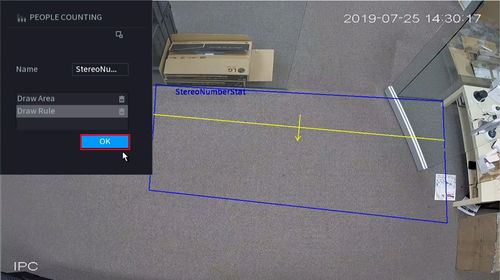
 8. Click the RULE button to create the area and rule for the People Counting
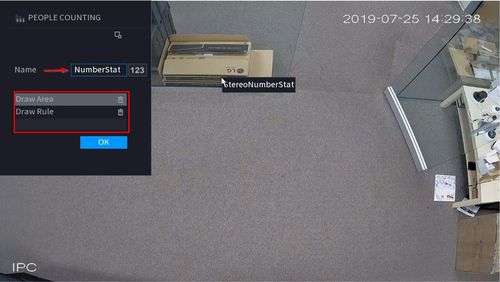
 9. You can enter a name for the rule in the Name field
Click Draw Area or Draw Rule to create/edit the current rules.
Click the
9. You can enter a name for the rule in the Name field
Click Draw Area or Draw Rule to create/edit the current rules.
Click the  icon to delete the rule.
 10. To create the detection area start by clicking 'Draw Area' then left click and drag in the video frame to draw the area.
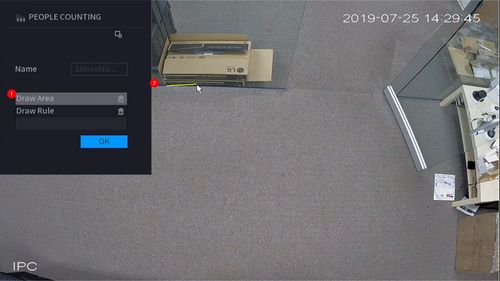
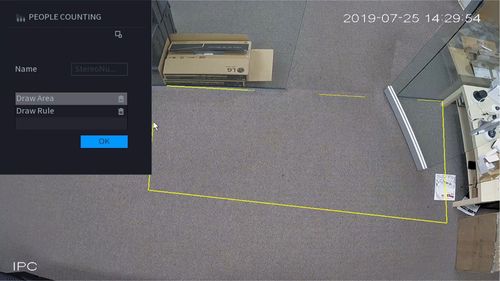 Right click to complete the drawing
11. To create the detection line start by clicking 'Draw Rule' then left click and drag in the video frame to draw the line.
Right click to complete the drawing
11. To create the detection line start by clicking 'Draw Rule' then left click and drag in the video frame to draw the line.
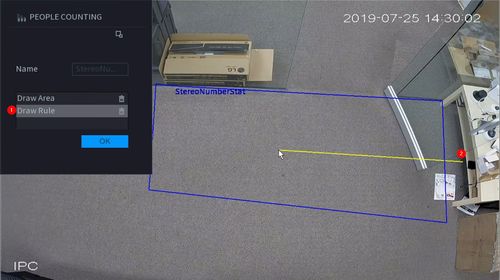 The arrow in the line will denote which direction will count as a 'Enter' or 'Exit'
Draw the arrow from Left to Right
To create a Downward facing arrow
The arrow in the line will denote which direction will count as a 'Enter' or 'Exit'
Draw the arrow from Left to Right
To create a Downward facing arrow
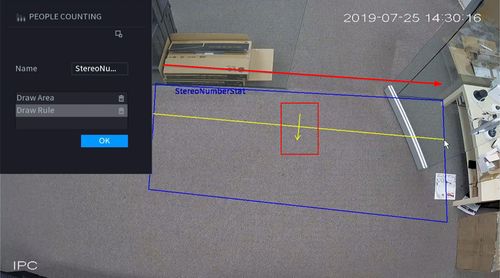 Draw the arrow from Right to Left
To create an upward facing arrow
Draw the arrow from Right to Left
To create an upward facing arrow
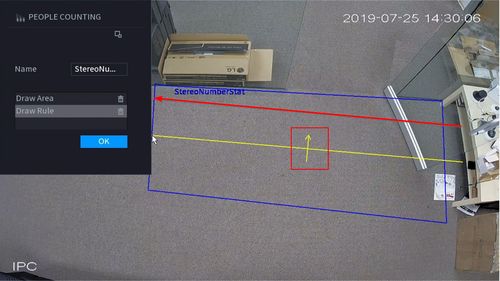 12. Click OK to save the Area and Rule Drawings
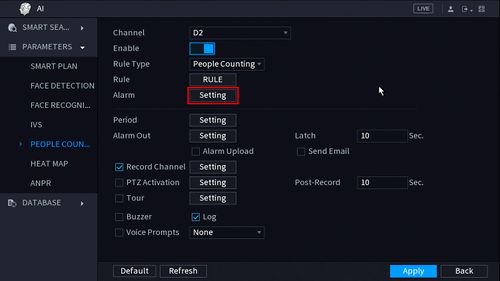
 13. Click 'Setting' next to Alarm to configure additional settings for People Counting
 14. Use the top part of the menu to configure the settings for the On Screen Display Overlay for People Counting
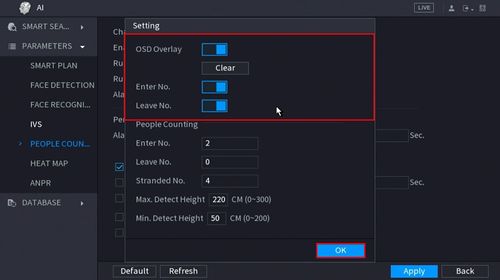 OSD Overlay: Toggle to enable or disable overlay. Press the 'Clear' button to clear the current People Counting values
Enter No.: Toggle to enable or disable the overlay for counting people who Enter
Leave No.: Toggle to enable or disable the overlay for counting people who Leave
15. Use the lower part of the menu to configure the parameters for the People Counting alerts and installation configuration
OSD Overlay: Toggle to enable or disable overlay. Press the 'Clear' button to clear the current People Counting values
Enter No.: Toggle to enable or disable the overlay for counting people who Enter
Leave No.: Toggle to enable or disable the overlay for counting people who Leave
15. Use the lower part of the menu to configure the parameters for the People Counting alerts and installation configuration
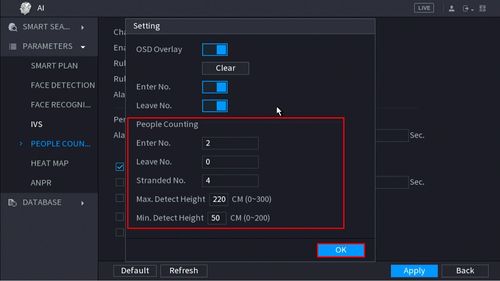 Enter No. - Alarm will trigger when this # of people are counted who Enter
Leave No. - Alarm will trigger when this # of people are counted who Leave
Stranded No.
Max Detect Height (in cm)
Min. Detect Height (in cm)
Click OK once all parameters have been set
16. To create a schedule for People Counting click the 'Setting' button next to Period
Enter No. - Alarm will trigger when this # of people are counted who Enter
Leave No. - Alarm will trigger when this # of people are counted who Leave
Stranded No.
Max Detect Height (in cm)
Min. Detect Height (in cm)
Click OK once all parameters have been set
16. To create a schedule for People Counting click the 'Setting' button next to Period
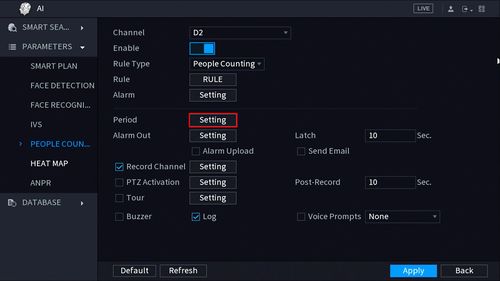 17. Use the interface to create a schedule for People Counting
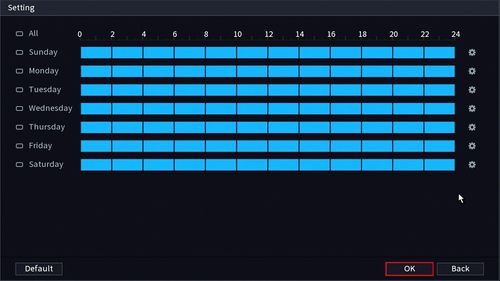 Click OK once the schedule has been completed
By default it will count 7 days a week, 24 hours a day
18. Configure the alarm output for when the People Counting alarms are met (Enter/Exit Number, Stranded)
Click OK once the schedule has been completed
By default it will count 7 days a week, 24 hours a day
18. Configure the alarm output for when the People Counting alarms are met (Enter/Exit Number, Stranded)
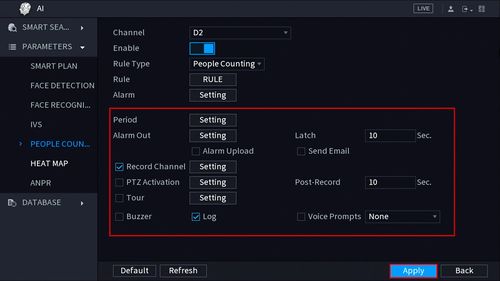 Click Apply once parameters have been set
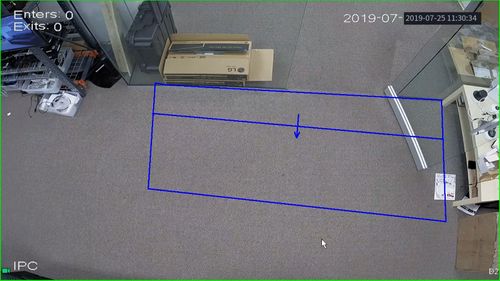
Completed People Counting setup with On Screen Display enabled at Live View
Click Apply once parameters have been set
Completed People Counting setup with On Screen Display enabled at Live View
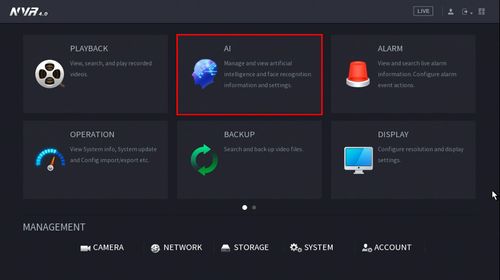 2. Click Parameters > Smart Plan
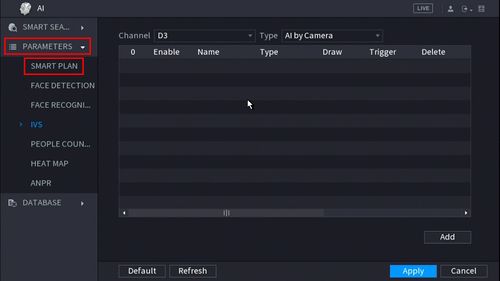 3. Use the drop down box to select the Channel
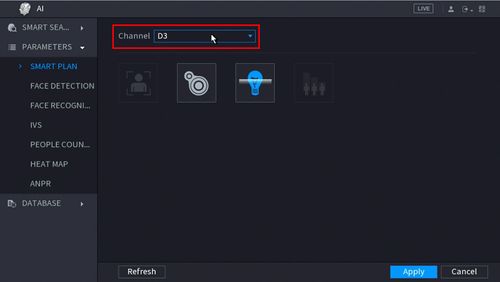 4. Click the IVS icon to enable.
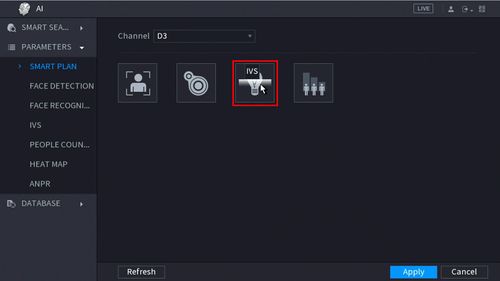 The icon will highlight when selected.
Click Apply
The icon will highlight when selected.
Click Apply
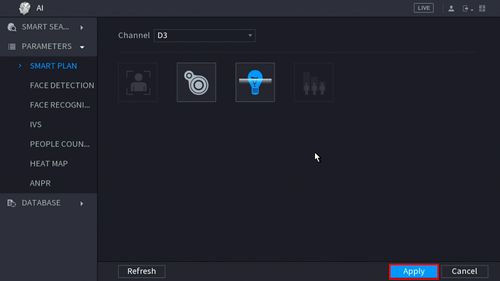 5. Click Parameters > IVS
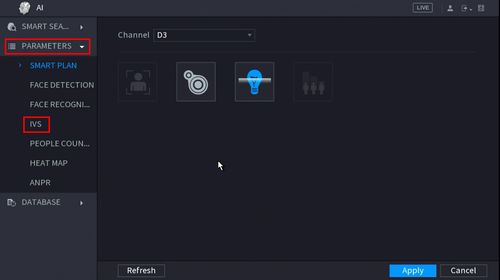 6. Use the drop-down box to select the Channel
Then click Add in the lower right side of the screen to Add an IVS rule
6. Use the drop-down box to select the Channel
Then click Add in the lower right side of the screen to Add an IVS rule
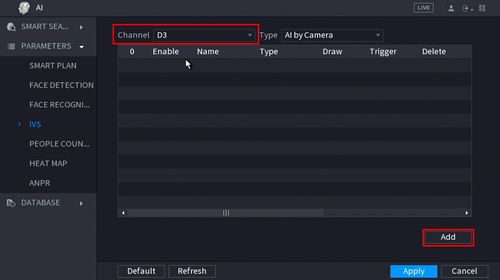 7. The created rule will appear in the list
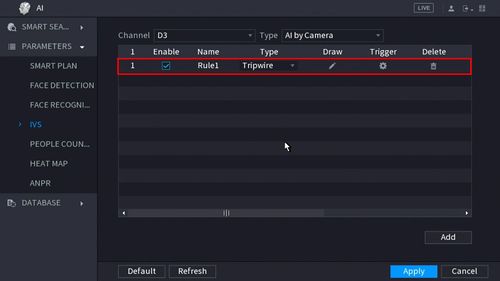 9. Use the dropdown box to change the Rule Type to "Abandoned"
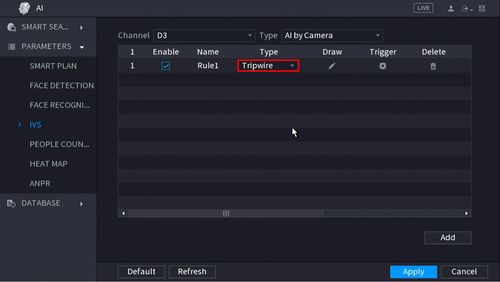
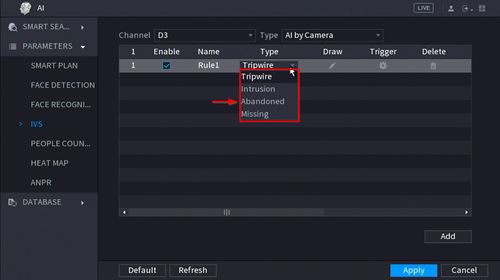 10. Click the Pencil icon to draw the Missing Object rule
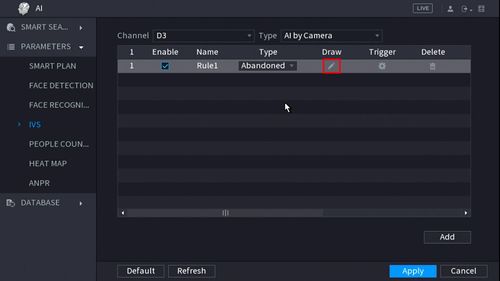 11. The Channel will fullscreen.
Left click anywhere inside the video frame to begin drawing the detection area for the object.
11. The Channel will fullscreen.
Left click anywhere inside the video frame to begin drawing the detection area for the object.
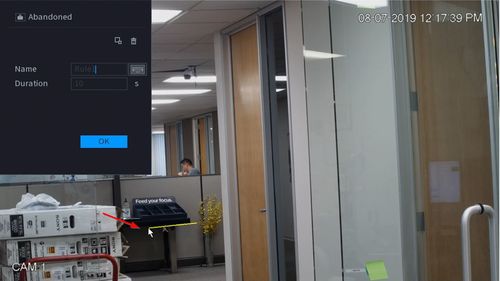 Right click to end drawing
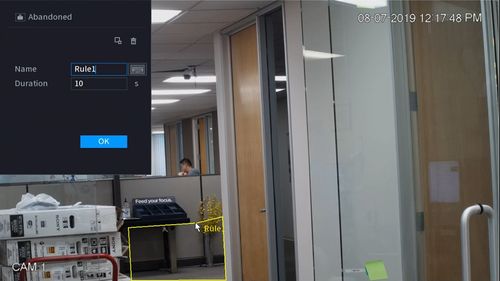 12. You can use the Missing menu that appears for additional rule settings:
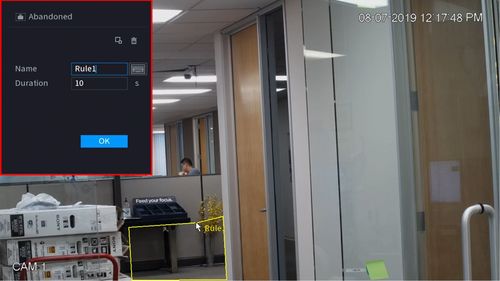 Click
Click  icon to set the Target Filter (maximum and minimum size size for Objects to follow rule)
Click
icon to set the Target Filter (maximum and minimum size size for Objects to follow rule)
Click  icon to clear the current rule
Once the Abandoned Object rule settings have been created click OK
13. Click the
icon to clear the current rule
Once the Abandoned Object rule settings have been created click OK
13. Click the  icon to set the Trigger settings when the IVS Abandoned Object rule is engaged.
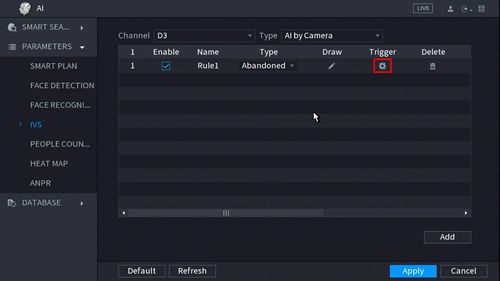 14. The Trigger menu will appear
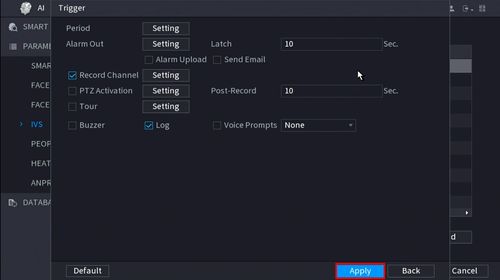 Once the trigger rule settings have been created click OK
Once all Abandoned settings have been configured, Click Apply in the lower right of the screen to save all changes
15. The created Abandoned rule is now programmed
Once the trigger rule settings have been created click OK
Once all Abandoned settings have been configured, Click Apply in the lower right of the screen to save all changes
15. The created Abandoned rule is now programmed
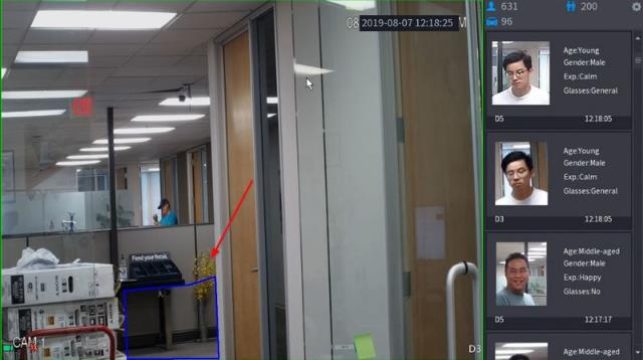 2. Click Parameters > Smart Plan
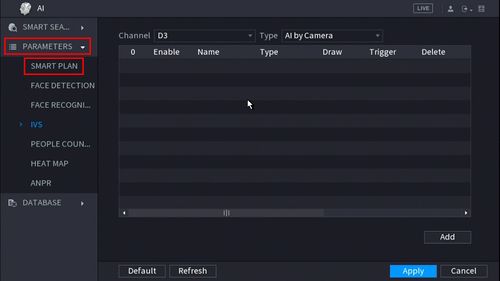 3. Use the drop down box to select the Channel
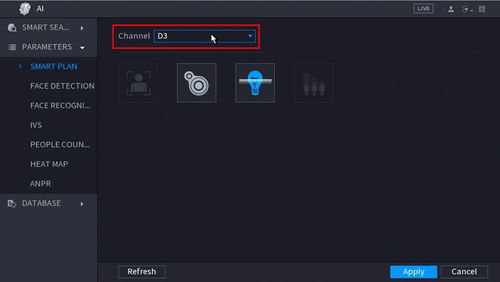 4. Click the IVS icon to enable.
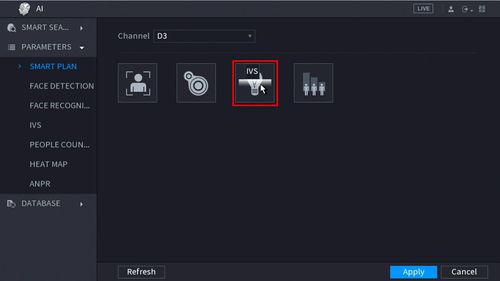 The icon will highlight when selected.
Click Apply
The icon will highlight when selected.
Click Apply
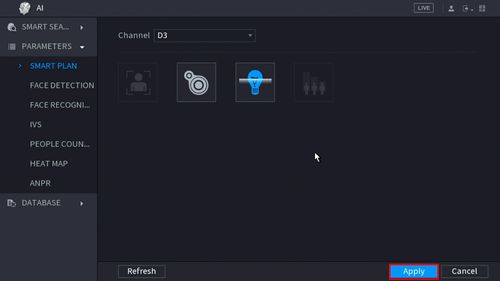 5. Click Parameters > IVS
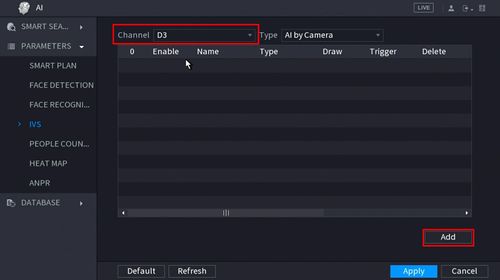
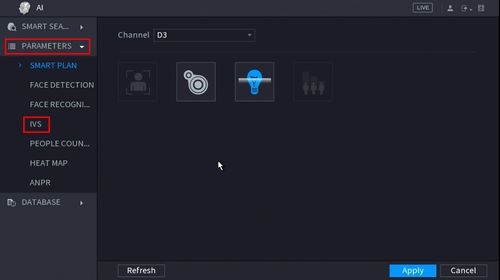 6. Use the drop-down box to select the Channel
Then click Add in the lower right side of the screen to Add an IVS rule
6. Use the drop-down box to select the Channel
Then click Add in the lower right side of the screen to Add an IVS rule
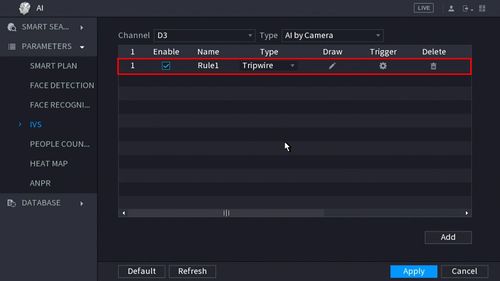
 7. The created rule will appear in the list
 8. Use the dropdown box to change the Rule Type to "Missing"
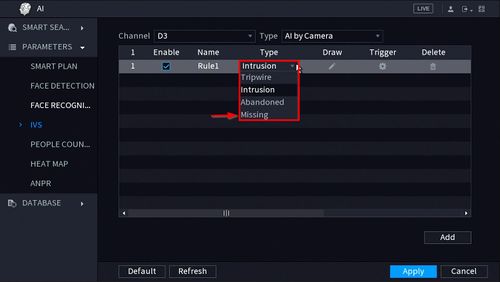 10. Click the Pencil icon to draw the Missing Object rule
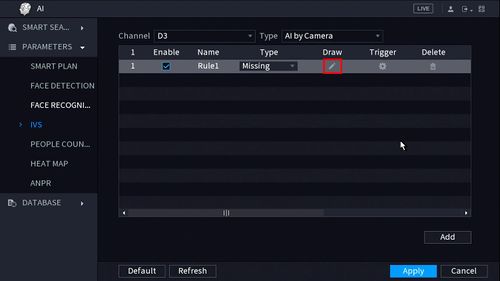 11. The Channel will fullscreen.
Left click anywhere inside the video frame to begin drawing the detection area for the object.
11. The Channel will fullscreen.
Left click anywhere inside the video frame to begin drawing the detection area for the object.
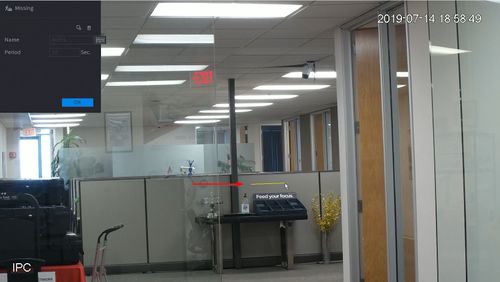 Right click to end drawing
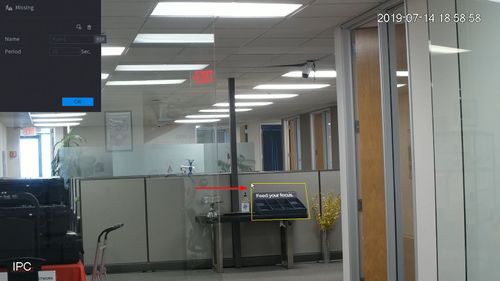 12. You can use the Missing menu that appears for additional rule settings:
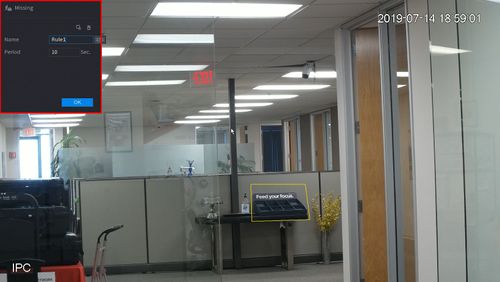 Click
Click  icon to set the Target Filter (maximum and minimum size size for Objects to follow rule)
Click
icon to set the Target Filter (maximum and minimum size size for Objects to follow rule)
Click  icon to clear the current rule
Once the Missing Object rule settings have been created click OK
13. Click the
icon to clear the current rule
Once the Missing Object rule settings have been created click OK
13. Click the  icon to set the Trigger settings when the IVS Missing Object rule is engaged.
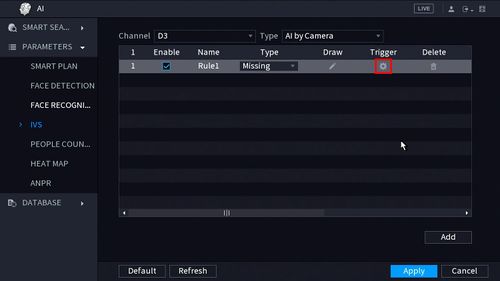 14. The Trigger menu will appear
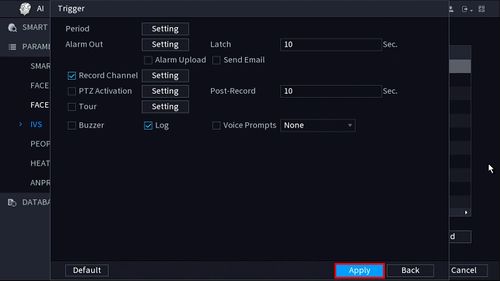 Once the trigger rule settings have been created click OK
15. Once all Missing Object settings have been configured, Click Apply in the lower right of the screen to save all changes
Once the trigger rule settings have been created click OK
15. Once all Missing Object settings have been configured, Click Apply in the lower right of the screen to save all changes
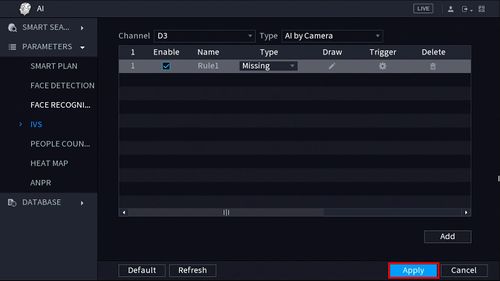 16. The created Missing rule is now programmed
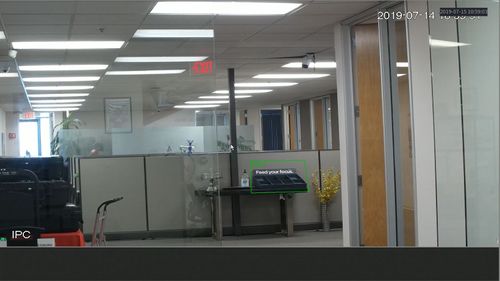
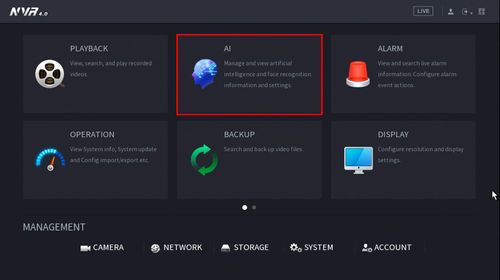 2. Click Parameters > Smart Plan
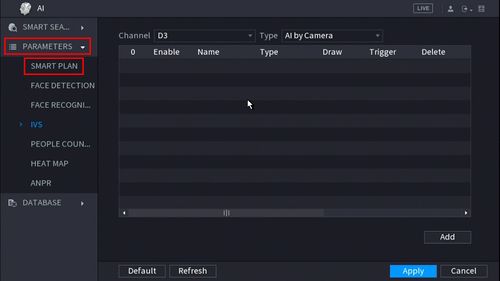 3. Use the drop down box to select the Channel
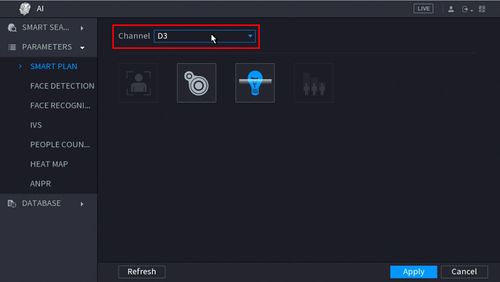 4. Click the IVS icon to enable.
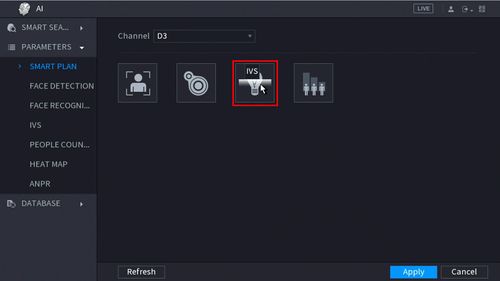 The icon will highlight when selected.
Click Apply
The icon will highlight when selected.
Click Apply
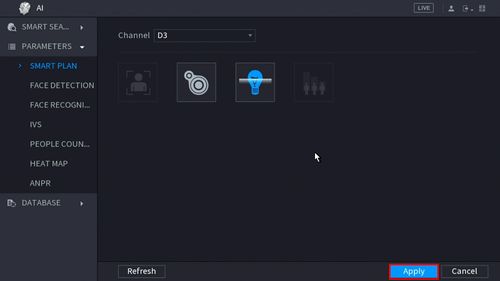 5. Click Parameters > IVS
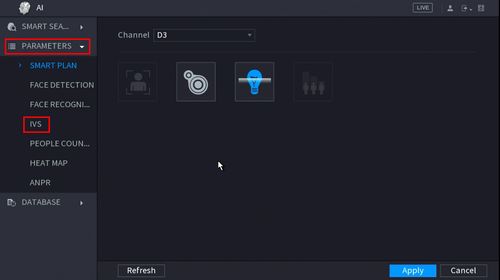 6. Use the drop-down box to select the Channel
Then click Add in the lower right side of the screen to Add an IVS rule
6. Use the drop-down box to select the Channel
Then click Add in the lower right side of the screen to Add an IVS rule
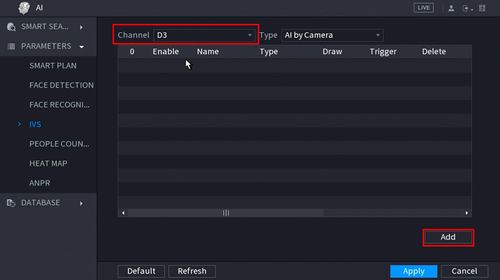 8. The created rule will appear in the list
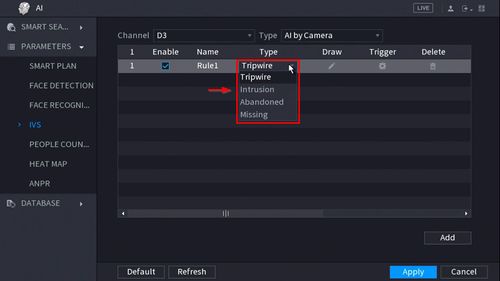
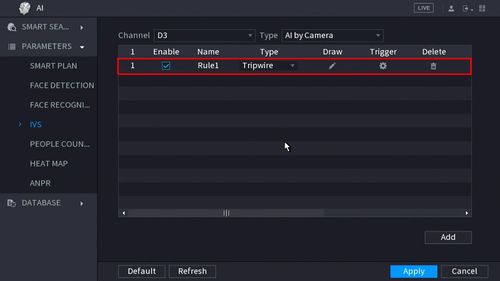 9. Use the dropdown box to change the Rule Type to "Intrusion"
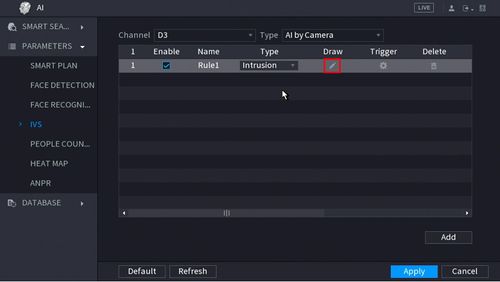
 10. Click the Pencil icon to draw the Intrusion rule
 11. The Channel will fullscreen.
Left click anywhere inside the video frame to begin drawing the detection area for the Intrusion.
11. The Channel will fullscreen.
Left click anywhere inside the video frame to begin drawing the detection area for the Intrusion.
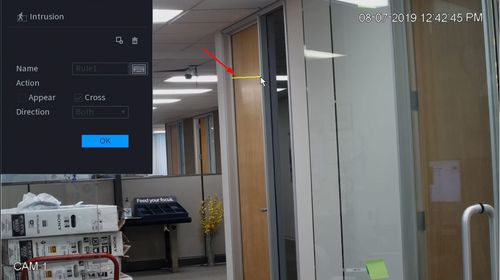 Right click to end drawing.
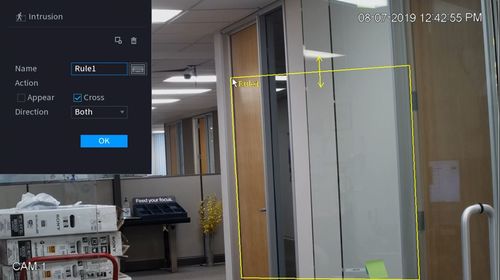 12. You can use the Intrusion menu that appears for additional rule settings:
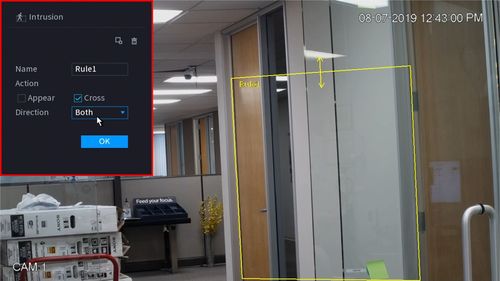 Click
Click  icon to set the Target Filter (maximum and minimum size size for Objects to follow rule)
Click
icon to set the Target Filter (maximum and minimum size size for Objects to follow rule)
Click  icon to clear the current rule
Once the Intrusion rule settings have been created click OK
13. Click the
icon to clear the current rule
Once the Intrusion rule settings have been created click OK
13. Click the  icon to set the Trigger settings when the IVS Missing Object rule is engaged.
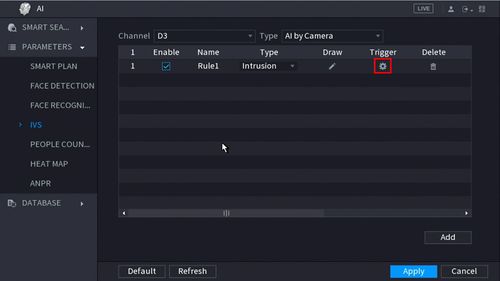 14. The Trigger menu will appear
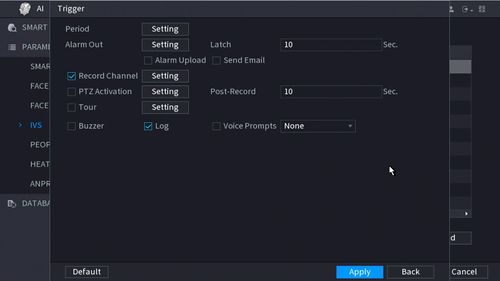 Once the trigger rule settings have been created click Apply, then click Back to return to the previous menu
15. Once all Missing Object settings have been configured, Click Apply in the lower right of the screen to save all changes
Once the trigger rule settings have been created click Apply, then click Back to return to the previous menu
15. Once all Missing Object settings have been configured, Click Apply in the lower right of the screen to save all changes
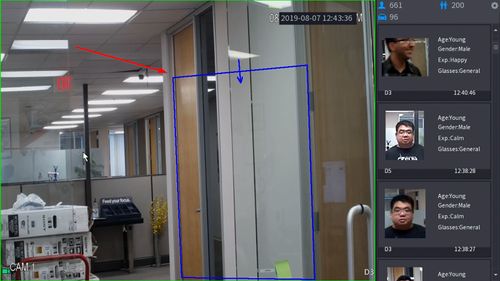
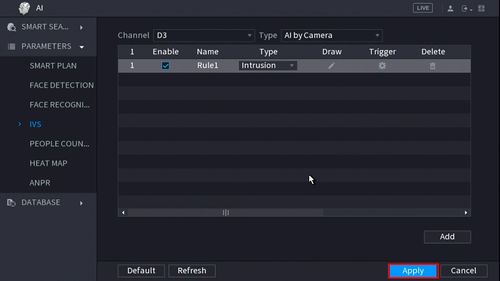 16. The created Intrusion rule is now programmed
 Dahua AI setup guide, Configure Dahua AI, Dahua AI features setup, Dahua IVS setup, Dahua Smart Plan configuration, Dahua WizSense setup, Dahua WizMind setup, Dahua AI camera setup, Dahua NVR AI configuration, Dahua AI analytics guide, Set up Dahua Face Detection, Dahua Face Recognition setup, Dahua Perimeter Protection guide, Dahua SMD (Smart Motion Detection) setup,
Dahua People Counting configuration, Dahua Heat Map setup, Dahua ANPR (Automatic Number Plate Recognition) setup, Dahua Tripwire setup, Dahua Intrusion Detection setup, Dahua AI coding setup, Dahua AI NVR analytics, Dahua AI camera analytics,
Dahua AI rules configuration, Dahua Smart Search setup, Dahua AI recording setup, Dahua AI alarm setup, Dahua AI event configuration, Dahua AI deep learning setup, Dahua AI system integration, Dahua AcuPick setup, Dahua AI troubleshooting guide
Dahua AI setup guide, Configure Dahua AI, Dahua AI features setup, Dahua IVS setup, Dahua Smart Plan configuration, Dahua WizSense setup, Dahua WizMind setup, Dahua AI camera setup, Dahua NVR AI configuration, Dahua AI analytics guide, Set up Dahua Face Detection, Dahua Face Recognition setup, Dahua Perimeter Protection guide, Dahua SMD (Smart Motion Detection) setup,
Dahua People Counting configuration, Dahua Heat Map setup, Dahua ANPR (Automatic Number Plate Recognition) setup, Dahua Tripwire setup, Dahua Intrusion Detection setup, Dahua AI coding setup, Dahua AI NVR analytics, Dahua AI camera analytics,
Dahua AI rules configuration, Dahua Smart Search setup, Dahua AI recording setup, Dahua AI alarm setup, Dahua AI event configuration, Dahua AI deep learning setup, Dahua AI system integration, Dahua AcuPick setup, Dahua AI troubleshooting guide
DAHUA AI Setup Guide
How To Use Smart Search
Description
This article will show you how to use the Smart Search feature to review recorded events with added analytics. Smart Features include:• Face Detection
• IVS
• People Counting
• Heat Map
• Supported device with Smart Search feature
• Recorded footage with Smart Detection Data (SMD, Face, IVS)
Video Instructions
[embed]https://youtu.be/uUyAnsokvyA[/embed]Step by Step Instructions
Smart Search by Face Detection
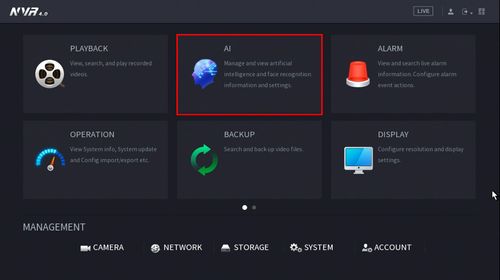
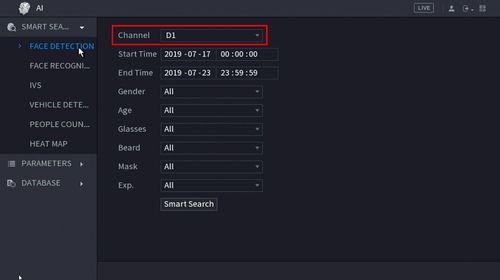
1. From the Main Menu click AI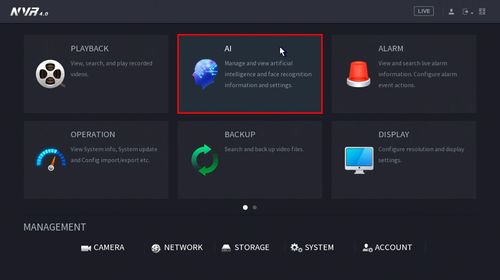 2. Click Smart Search > Face Detection
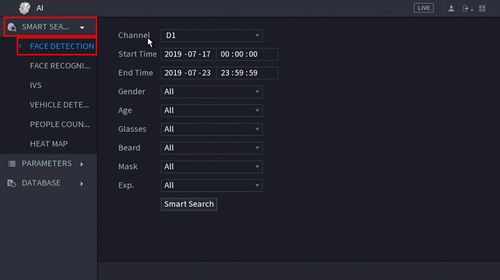 3. Use the drop-down box to select the Channel to search
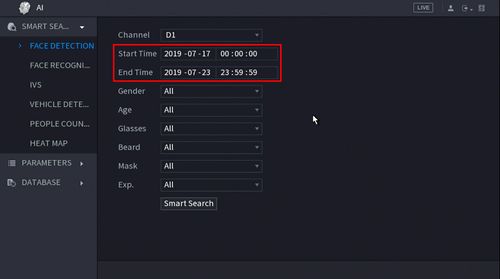
 4. Use the Start Time / End Time fields to enter a date range for the search
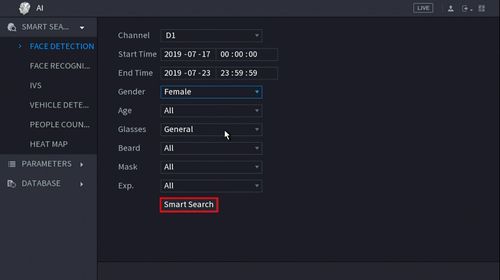
 5. Click 'Smart Search' once parameters have been set
 6. The search results will be displayed
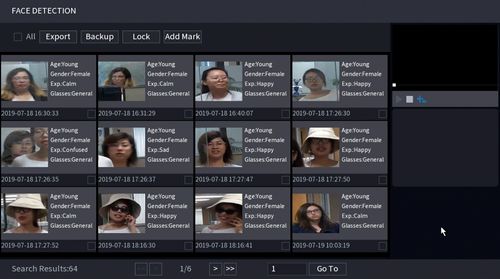 7. Double click any entry to begin playback
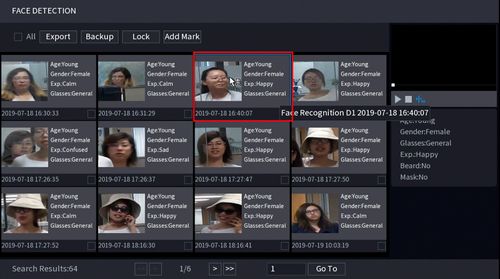
 8. Use the buttons above the search result to Export and Backup any entries
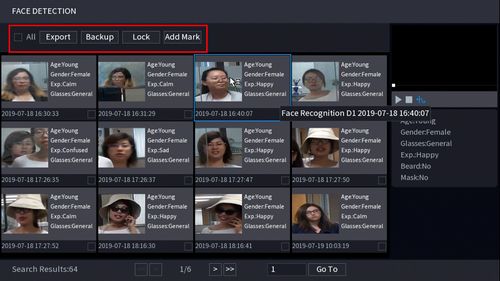 Click to highlight/select a single entry
Use the checkbox to select multiple entries at once
Click to highlight/select a single entry
Use the checkbox to select multiple entries at once
Smart Search by IVS
1. Enter the Main Menu• Right click at live view then select "Main Menu"
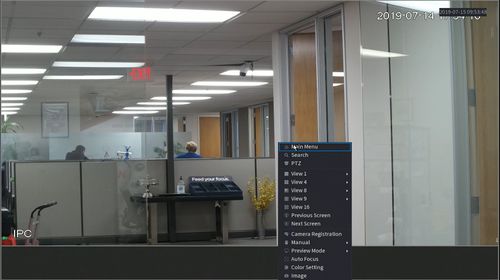 2. Click Smart Detection
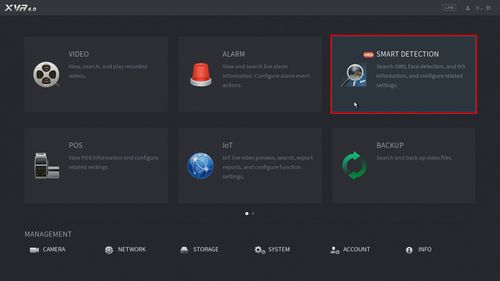 3. Click Smart Search - on the left side of the screen
You can search recorded SMD, Human Face, and IVS data.
This guide will use IVS but the procedure is similar.
3. Click Smart Search - on the left side of the screen
You can search recorded SMD, Human Face, and IVS data.
This guide will use IVS but the procedure is similar.
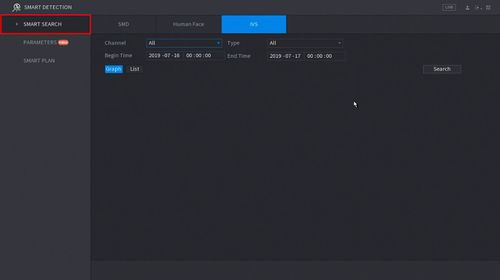 4. Use the drop-down menu to select the Channel # to search and the Type of IVS rule to search for
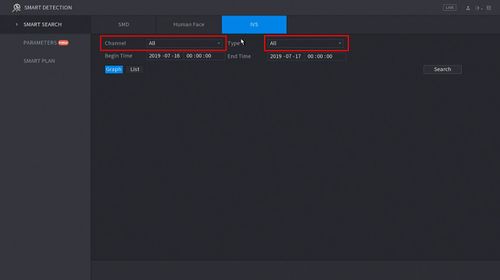 5. Click the Begin and End time to enter a time range for the search
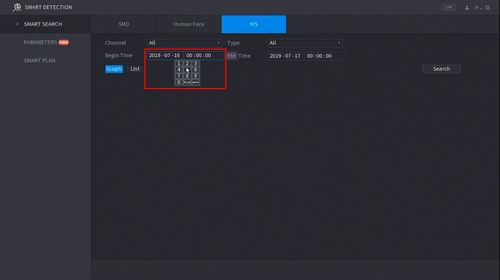 6. Click Search
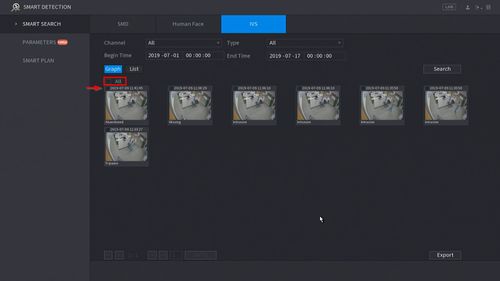
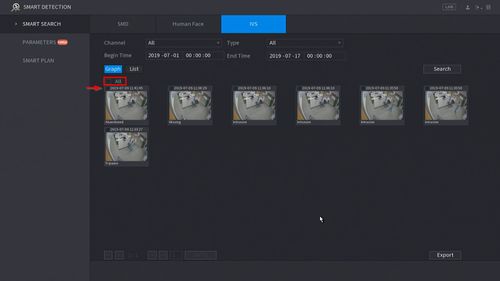
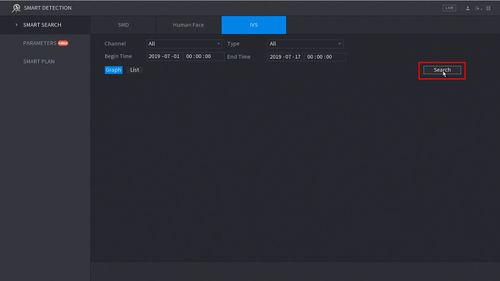 7. The Search results will appear in the center of the screen
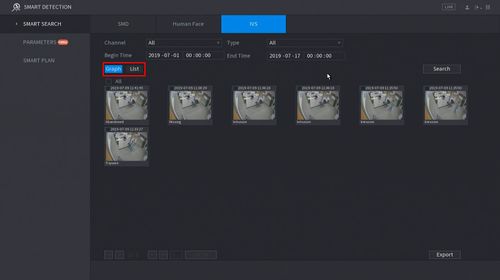 The results can be displayed in Graph or List (shown below)
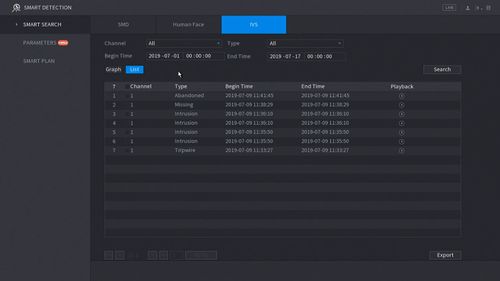 Both will show the Event Type, Time and include a snapshot (if enabled)
8. You can quickly playback the Event by
Graph View: Double click the Event
Both will show the Event Type, Time and include a snapshot (if enabled)
8. You can quickly playback the Event by
Graph View: Double click the Event
 List View: Click the icon under "Playback"
9. To Export an event use the checkbox to select the Events you wish to Export then click Export int he bottom right of the screen. A USB drive must be inserted in the unit to Export the files to.
List View: Click the icon under "Playback"
9. To Export an event use the checkbox to select the Events you wish to Export then click Export int he bottom right of the screen. A USB drive must be inserted in the unit to Export the files to.
How To Setup Heatmap
Description
This article will cover how to setup Heatmap in a Dahua recorderPrerequisites
• A Dahua AI Recorder:
Video Instructions
[embed]https://youtu.be/iKnxe4iz9wo[/embed]Step by Step Instructions
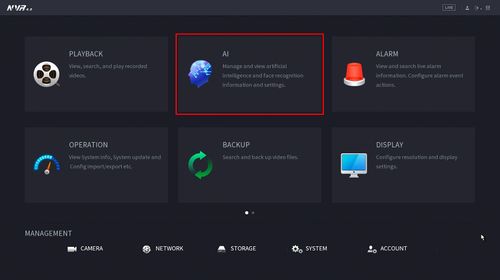
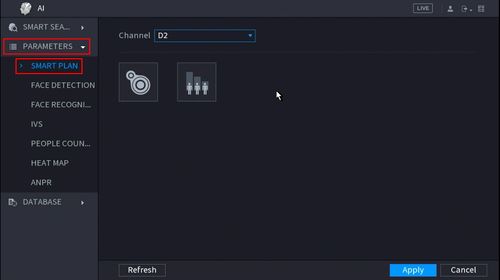
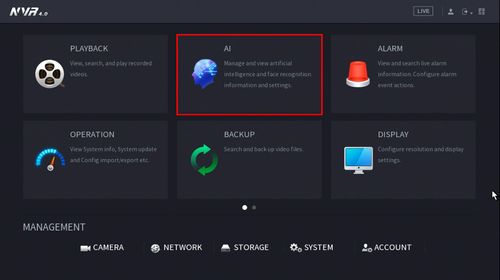
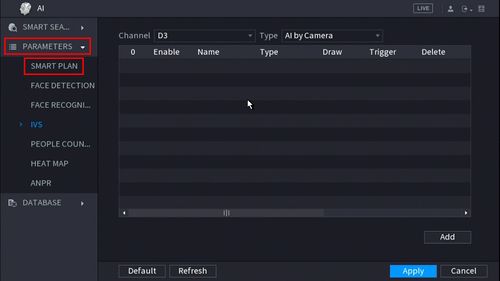
1. From the Main Menu click AI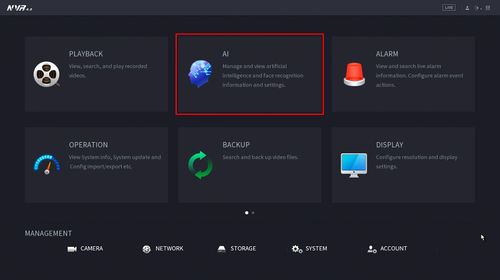 2. Click Parameters > Smart Plan
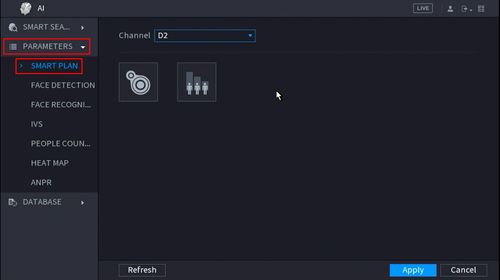 3. Click the Heat Map icon to enable
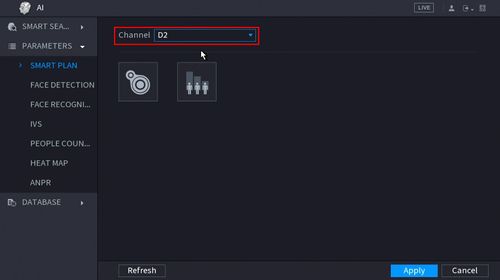
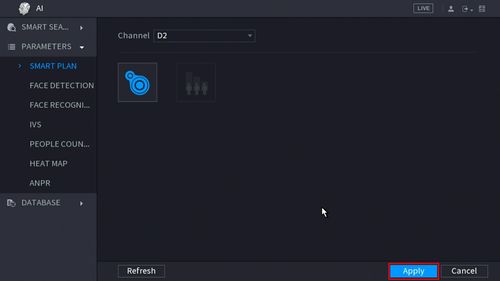
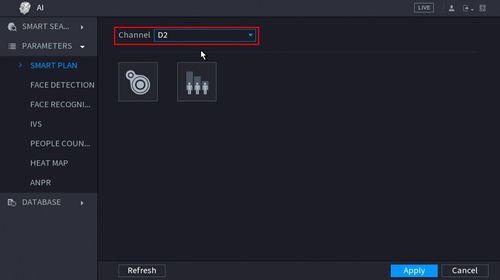 4. The icon will turn blue when selected
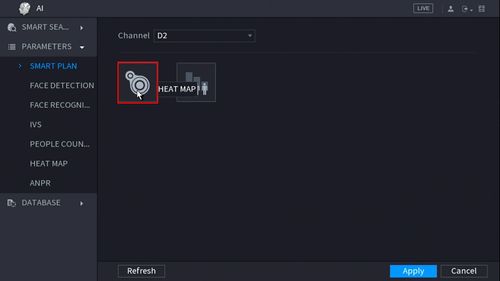 5. Click Apply to Save
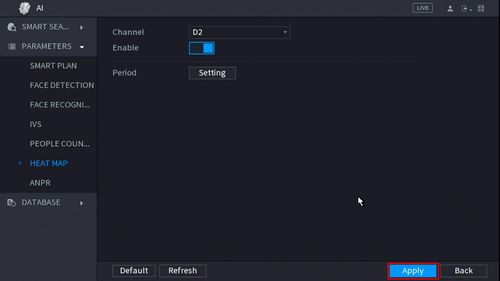
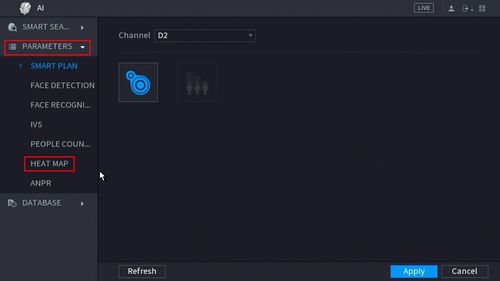
 6. Click Parameters > Heat Map
 7. Use the drop-down box to select the channel
Click the toggle button to Enable
Click the Setting button to create a Schedule for the Heat Map
7. Use the drop-down box to select the channel
Click the toggle button to Enable
Click the Setting button to create a Schedule for the Heat Map
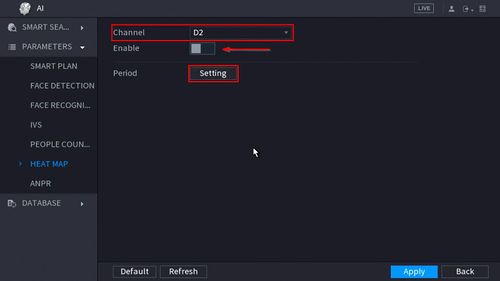 8. Click Apply to Save
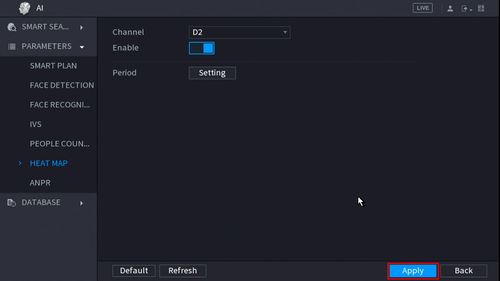 Heat Map is enabled
How To Setup Tripwire
Description
This article will show you how to setup the tripwire IVS feature on a supported devicePrerequisites
• Supported device with tripwire feature
Video Instructions
[embed]https://youtu.be/CVA6JhgxA6U[/embed]Step by Step Instructions
1. From the Main Menu click AI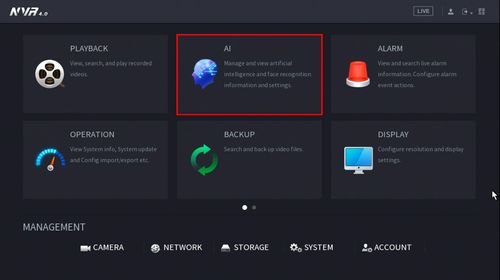 2. Click Parameters > Smart Plan
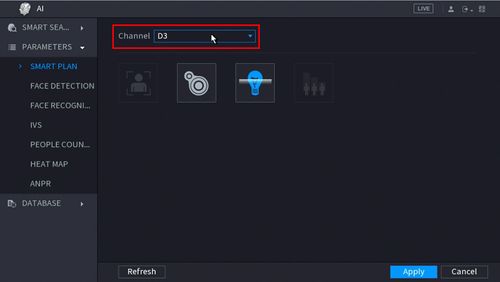
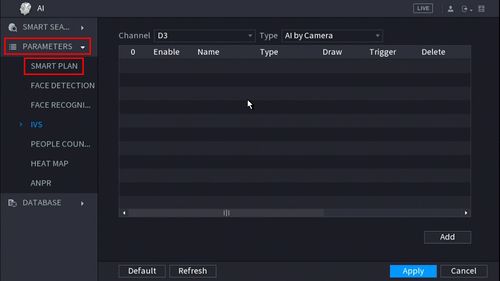 3. Use the drop down box to select the Channel
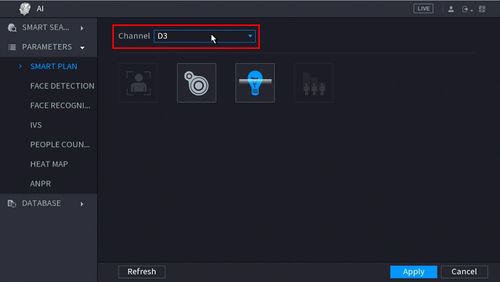 4. Click the IVS icon to enable.
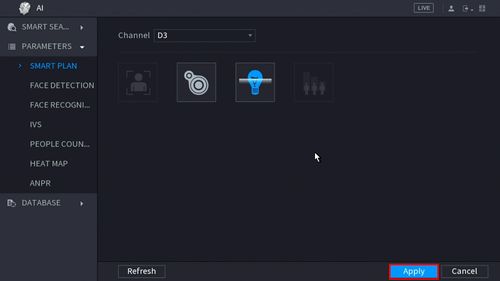
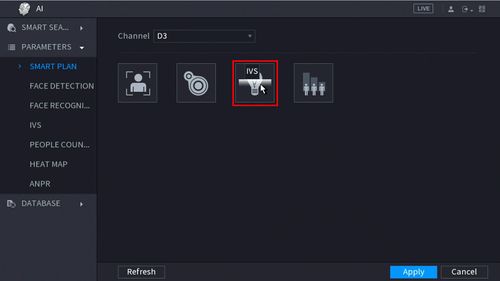 The icon will highlight when selected.
Click Apply
The icon will highlight when selected.
Click Apply
 5. Click Parameters > IVS
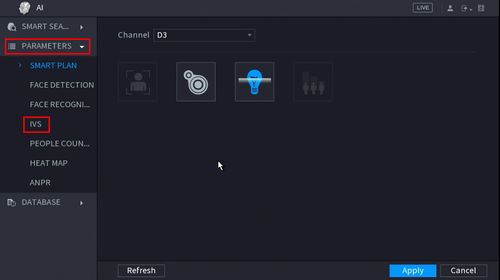 6. Use the drop-down box to select the Channel
Then click Add in the lower right side of the screen to Add an IVS rule
6. Use the drop-down box to select the Channel
Then click Add in the lower right side of the screen to Add an IVS rule
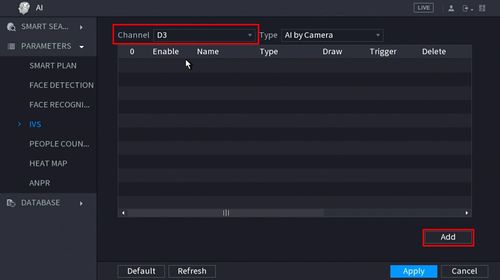 7. The created rule will appear in the list
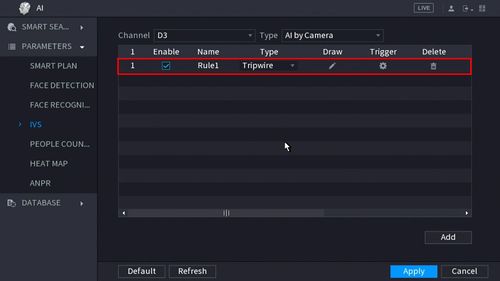 .
9. Click the Pencil icon to draw the Tripwire rule
.
9. Click the Pencil icon to draw the Tripwire rule
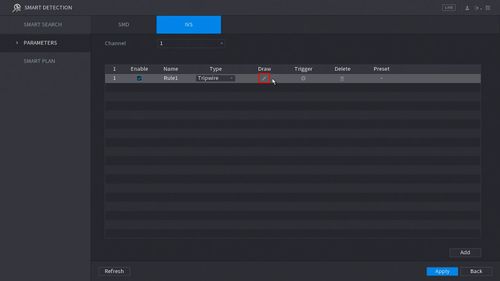 10. The Channel will fullscreen.
Left click anywhere inside the video frame to begin drawing the Trip line, then use the mouse to draw the trip line.
Right click to end drawing
10. The Channel will fullscreen.
Left click anywhere inside the video frame to begin drawing the Trip line, then use the mouse to draw the trip line.
Right click to end drawing
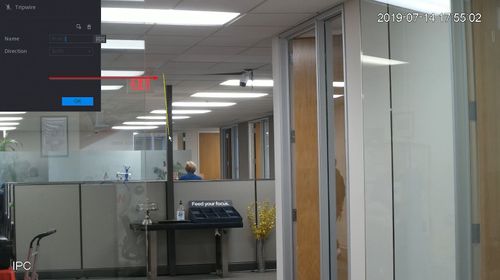
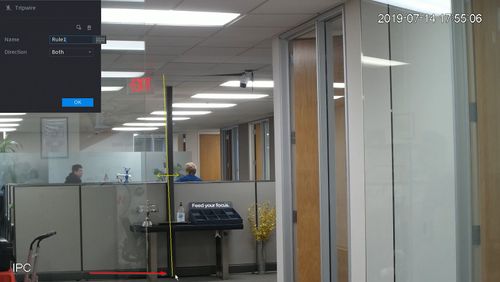 11. The Tripwire menu will appear
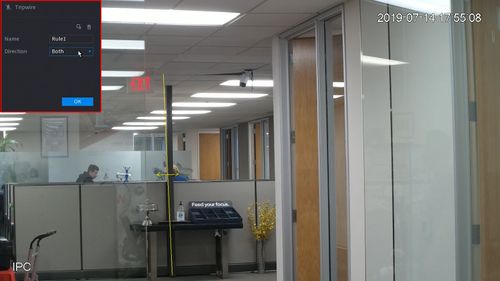
• Name: A name can be applied to the rule
• Direction: Both, A To B, B To A
 icon to set the Target Filter (maximum and minimum size size for Objects to follow rule)
Click
icon to set the Target Filter (maximum and minimum size size for Objects to follow rule)
Click  icon to clear the current rule
Once the tripwire rule settings have been created click OK
12. Click the
icon to clear the current rule
Once the tripwire rule settings have been created click OK
12. Click the  icon to set the Trigger settings when the IVS Tripwire rule is engaged.
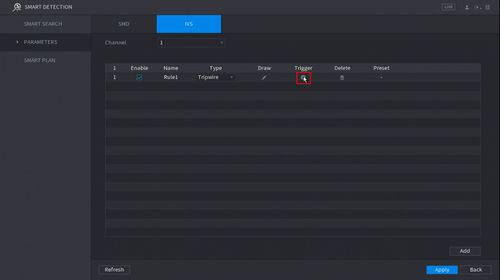 13. The Trigger menu will appear
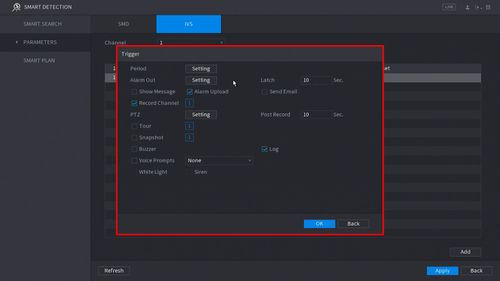 Once the trigger rule settings have been created click OK
14. Once all Tripwire settings have been configured, Click Apply in the lower right of the screen to save all changes
Once the trigger rule settings have been created click OK
14. Once all Tripwire settings have been configured, Click Apply in the lower right of the screen to save all changes
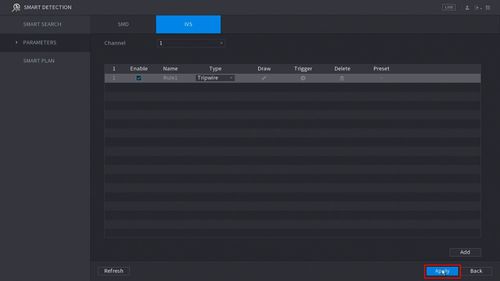 15. The created Tripwire is now programmed
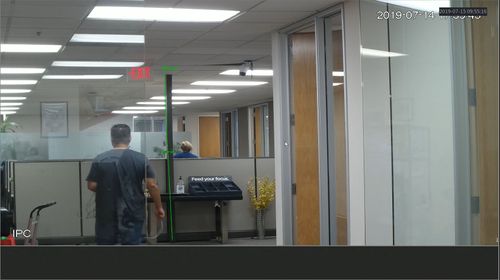
People Counting
Description
This article will show you how to use the People Counting feature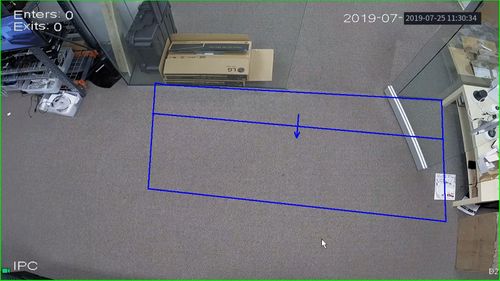 .
.
Prerequisites
• Supported device with People Counting feature
Video Instructions
[embed]https://youtu.be/OtYJGIQ30EQ[/embed]Step by Step Instructions
1. From the Main Menu click AI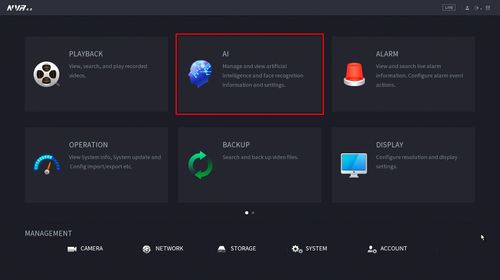 2. Click Parameters > Smart Plan
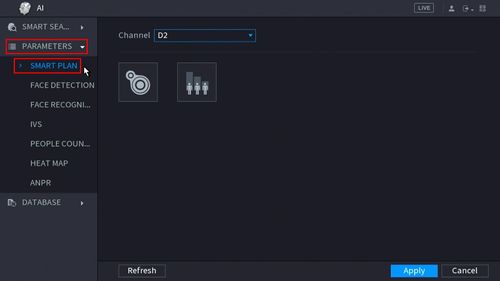 3. Click the People Counting icon to enable.
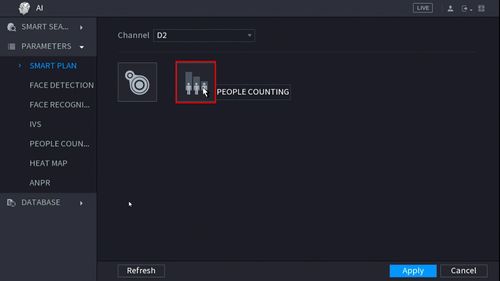 4. The icon will turn blue when selected.
Click Apply to save
4. The icon will turn blue when selected.
Click Apply to save
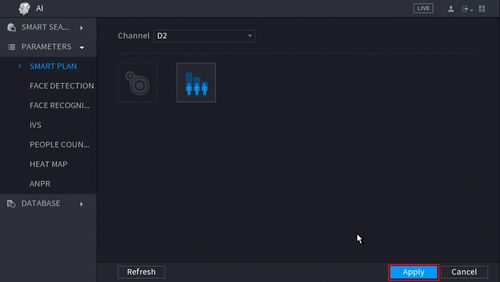 5. Click Parameters > People Counting
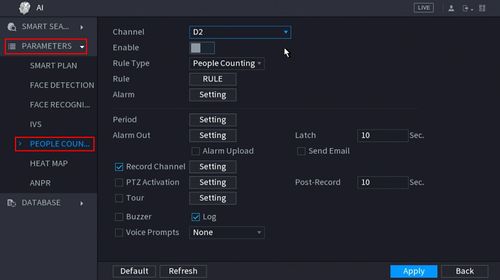 6. Use the drop-down box to select the channel.
Click the toggle button to enable
6. Use the drop-down box to select the channel.
Click the toggle button to enable
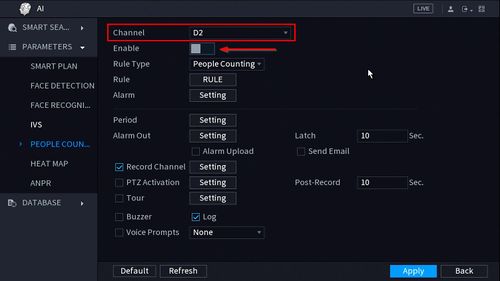 7. Use the drop-down box next to Rule Type to select from the People Counting feature options. There are two options:
• People Counting
• In Area No.
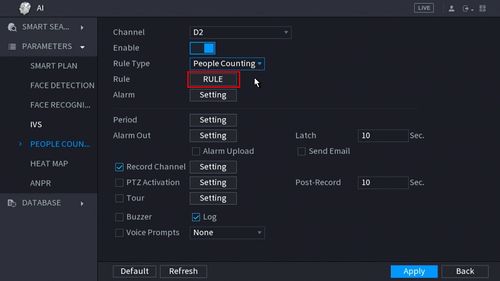
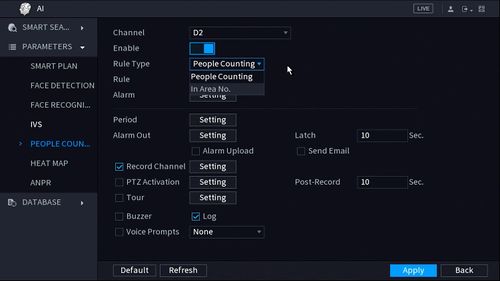 8. Click the RULE button to create the area and rule for the People Counting
 9. You can enter a name for the rule in the Name field
Click Draw Area or Draw Rule to create/edit the current rules.
Click the
9. You can enter a name for the rule in the Name field
Click Draw Area or Draw Rule to create/edit the current rules.
Click the  icon to delete the rule.
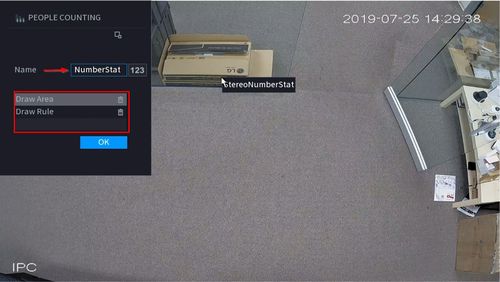 10. To create the detection area start by clicking 'Draw Area' then left click and drag in the video frame to draw the area.
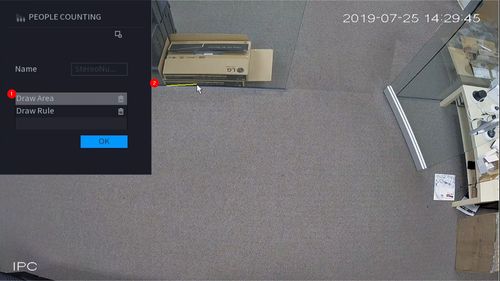
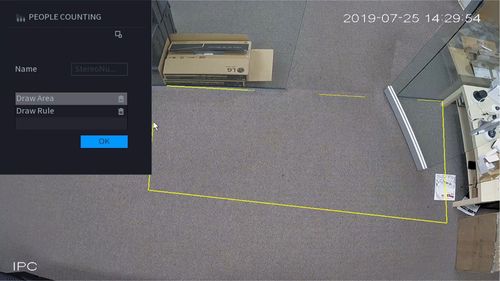 Right click to complete the drawing
11. To create the detection line start by clicking 'Draw Rule' then left click and drag in the video frame to draw the line.
Right click to complete the drawing
11. To create the detection line start by clicking 'Draw Rule' then left click and drag in the video frame to draw the line.
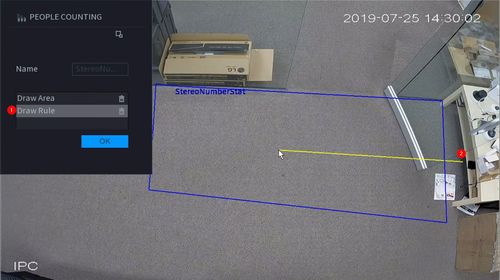 The arrow in the line will denote which direction will count as a 'Enter' or 'Exit'
Draw the arrow from Left to Right
To create a Downward facing arrow
The arrow in the line will denote which direction will count as a 'Enter' or 'Exit'
Draw the arrow from Left to Right
To create a Downward facing arrow
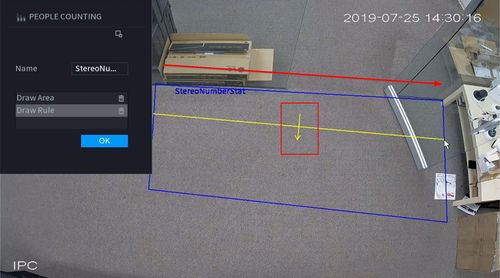 Draw the arrow from Right to Left
To create an upward facing arrow
Draw the arrow from Right to Left
To create an upward facing arrow
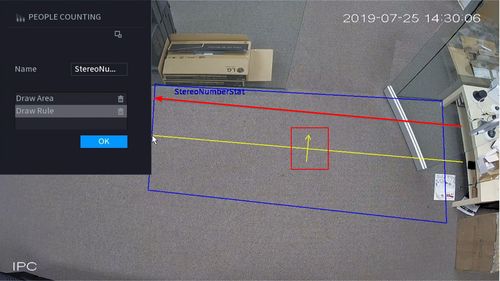 12. Click OK to save the Area and Rule Drawings
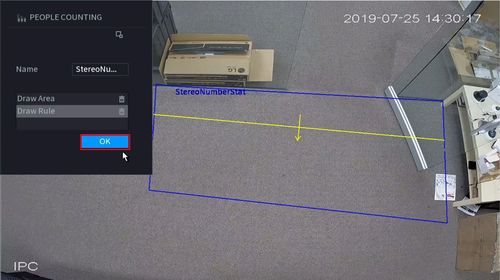 13. Click 'Setting' next to Alarm to configure additional settings for People Counting
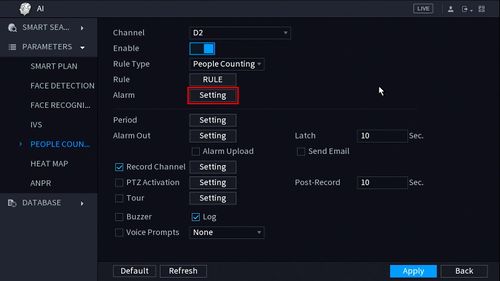 14. Use the top part of the menu to configure the settings for the On Screen Display Overlay for People Counting
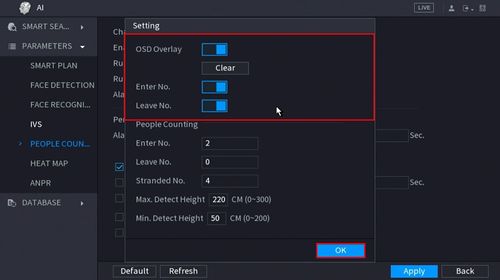 OSD Overlay: Toggle to enable or disable overlay. Press the 'Clear' button to clear the current People Counting values
Enter No.: Toggle to enable or disable the overlay for counting people who Enter
Leave No.: Toggle to enable or disable the overlay for counting people who Leave
15. Use the lower part of the menu to configure the parameters for the People Counting alerts and installation configuration
OSD Overlay: Toggle to enable or disable overlay. Press the 'Clear' button to clear the current People Counting values
Enter No.: Toggle to enable or disable the overlay for counting people who Enter
Leave No.: Toggle to enable or disable the overlay for counting people who Leave
15. Use the lower part of the menu to configure the parameters for the People Counting alerts and installation configuration
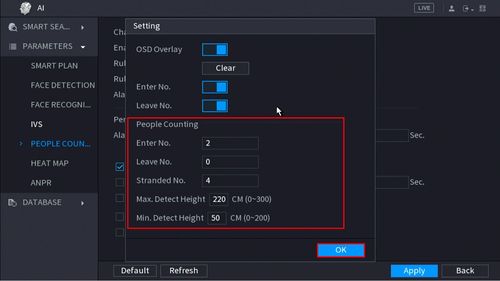 Enter No. - Alarm will trigger when this # of people are counted who Enter
Leave No. - Alarm will trigger when this # of people are counted who Leave
Stranded No.
Max Detect Height (in cm)
Min. Detect Height (in cm)
Click OK once all parameters have been set
16. To create a schedule for People Counting click the 'Setting' button next to Period
Enter No. - Alarm will trigger when this # of people are counted who Enter
Leave No. - Alarm will trigger when this # of people are counted who Leave
Stranded No.
Max Detect Height (in cm)
Min. Detect Height (in cm)
Click OK once all parameters have been set
16. To create a schedule for People Counting click the 'Setting' button next to Period
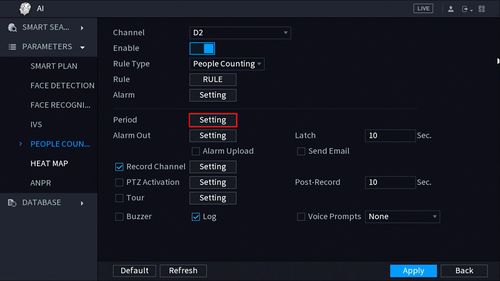 17. Use the interface to create a schedule for People Counting
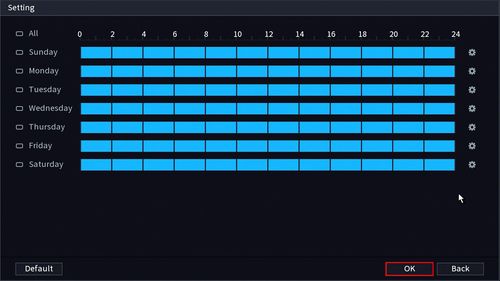 Click OK once the schedule has been completed
By default it will count 7 days a week, 24 hours a day
18. Configure the alarm output for when the People Counting alarms are met (Enter/Exit Number, Stranded)
Click OK once the schedule has been completed
By default it will count 7 days a week, 24 hours a day
18. Configure the alarm output for when the People Counting alarms are met (Enter/Exit Number, Stranded)
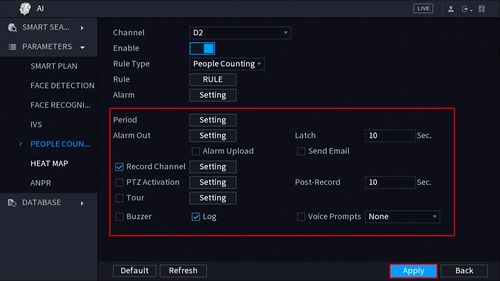 Click Apply once parameters have been set
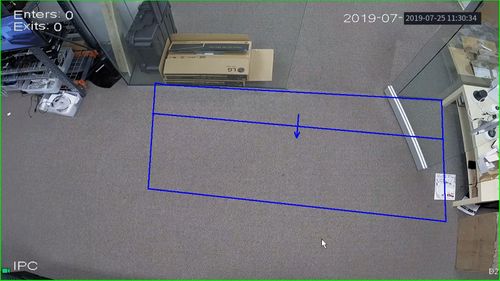
Completed People Counting setup with On Screen Display enabled at Live View
Click Apply once parameters have been set
Completed People Counting setup with On Screen Display enabled at Live View
How To Setup Abandoned Object
Description
This article will show you how to setup the Abandoned Object IVS feature on a supported devicePrerequisites
• Supported device with Abandoned Object feature
Video Instructions
[embed]https://youtu.be/PZlvxEwt_Kw[/embed]Step by Step Instructions
1. From the Main Menu click AI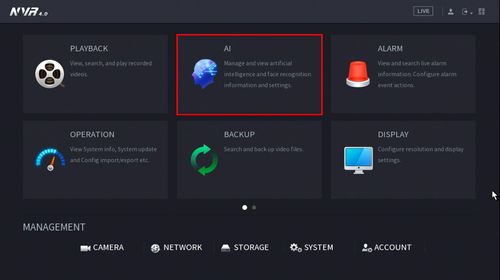 2. Click Parameters > Smart Plan
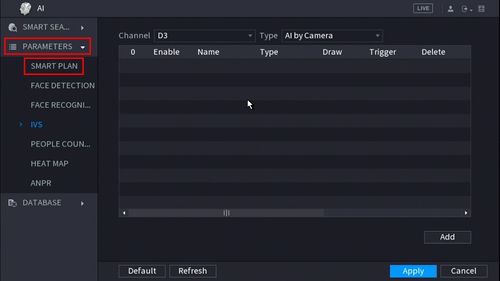 3. Use the drop down box to select the Channel
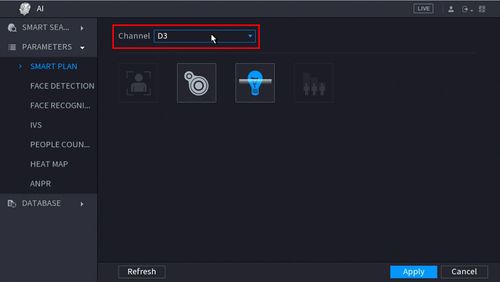 4. Click the IVS icon to enable.
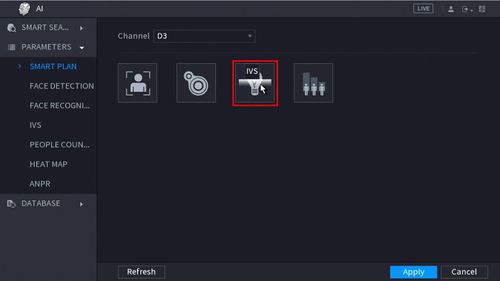 The icon will highlight when selected.
Click Apply
The icon will highlight when selected.
Click Apply
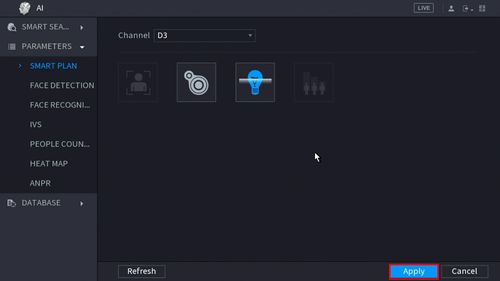 5. Click Parameters > IVS
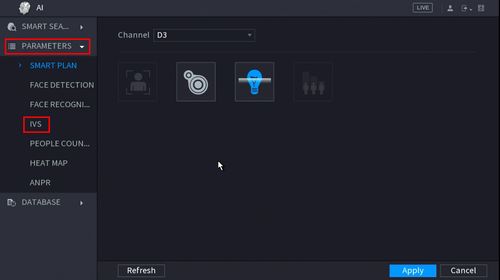 6. Use the drop-down box to select the Channel
Then click Add in the lower right side of the screen to Add an IVS rule
6. Use the drop-down box to select the Channel
Then click Add in the lower right side of the screen to Add an IVS rule
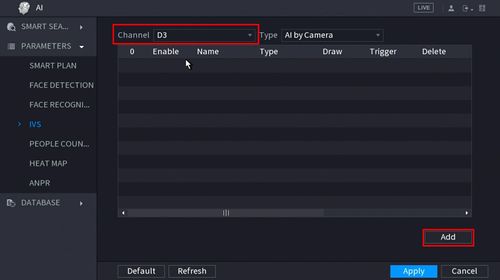 7. The created rule will appear in the list
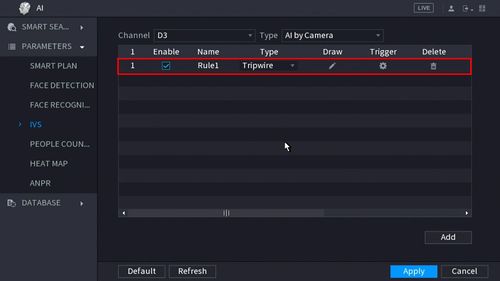 9. Use the dropdown box to change the Rule Type to "Abandoned"
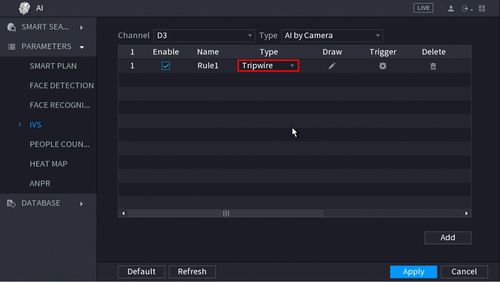
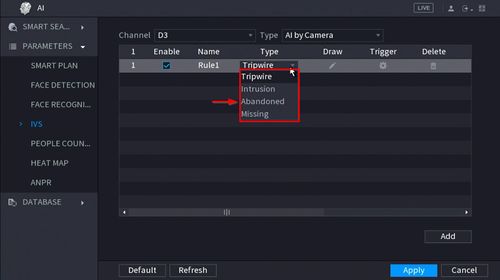 10. Click the Pencil icon to draw the Missing Object rule
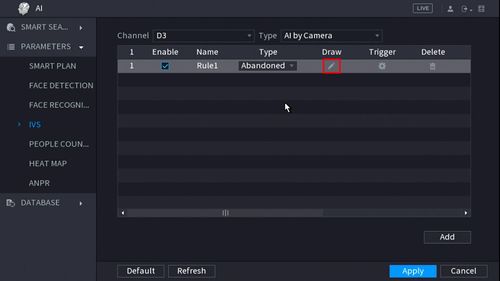 11. The Channel will fullscreen.
Left click anywhere inside the video frame to begin drawing the detection area for the object.
11. The Channel will fullscreen.
Left click anywhere inside the video frame to begin drawing the detection area for the object.
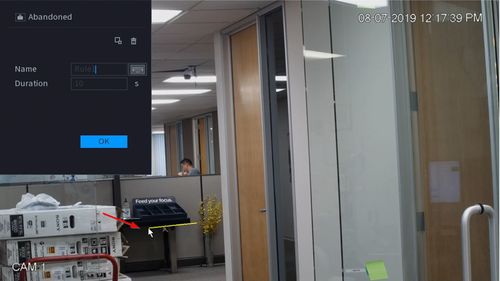 Right click to end drawing
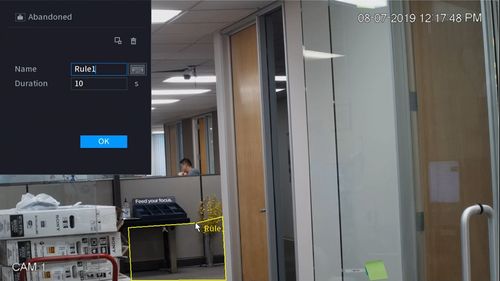 12. You can use the Missing menu that appears for additional rule settings:
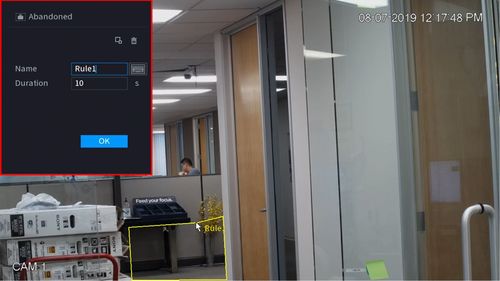
• Name: A name can be applied to the rule
• Period: Set a time (in seconds) for the Missing object rule to trigger
 icon to set the Target Filter (maximum and minimum size size for Objects to follow rule)
Click
icon to set the Target Filter (maximum and minimum size size for Objects to follow rule)
Click  icon to clear the current rule
Once the Abandoned Object rule settings have been created click OK
13. Click the
icon to clear the current rule
Once the Abandoned Object rule settings have been created click OK
13. Click the  icon to set the Trigger settings when the IVS Abandoned Object rule is engaged.
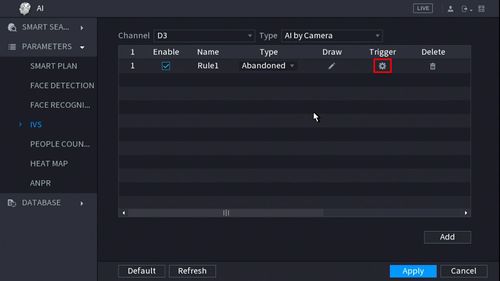 14. The Trigger menu will appear
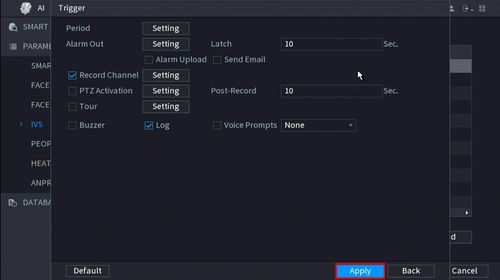
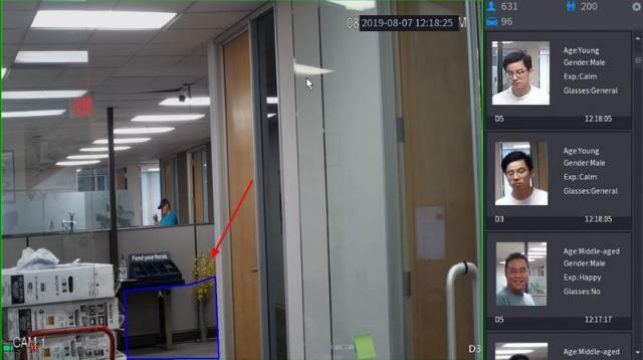
• Period
• Alarm Out
• Snapshot
How To Setup Missing Object
Description
This article will show you how to setup the Missing Object IVS feature on a supported devicePrerequisites
• Supported device with Missing Object feature
Video Instructions
[embed]https://youtu.be/Tfb7BzMm2Dw[/embed]Step by Step Instructions
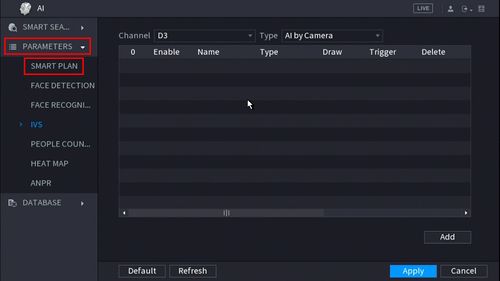
1. From the Main Menu click AI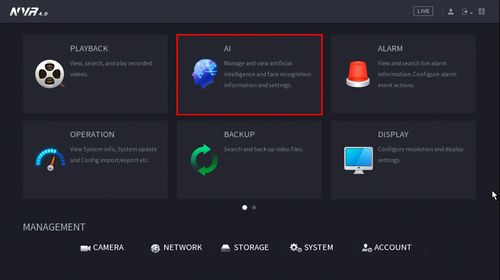 2. Click Parameters > Smart Plan
 3. Use the drop down box to select the Channel
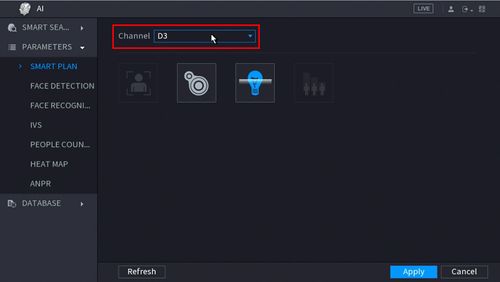 4. Click the IVS icon to enable.
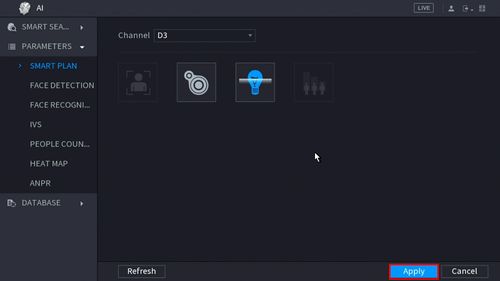
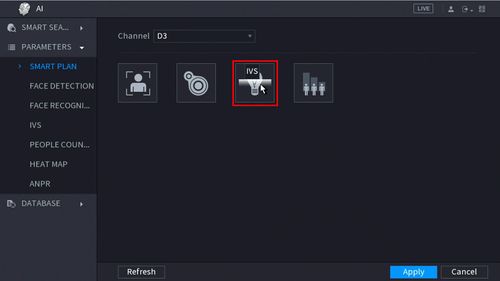 The icon will highlight when selected.
Click Apply
The icon will highlight when selected.
Click Apply
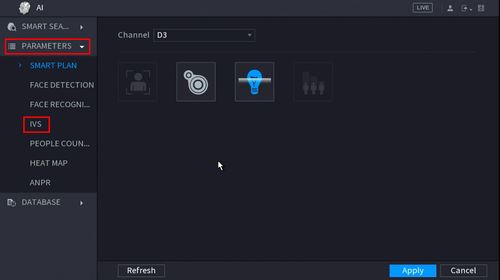
 5. Click Parameters > IVS
 6. Use the drop-down box to select the Channel
Then click Add in the lower right side of the screen to Add an IVS rule
6. Use the drop-down box to select the Channel
Then click Add in the lower right side of the screen to Add an IVS rule
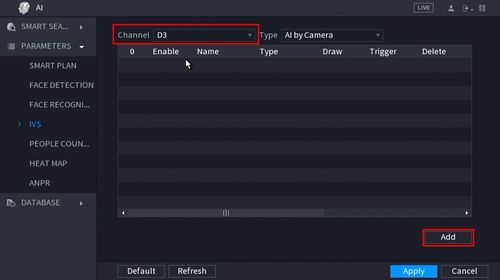 7. The created rule will appear in the list
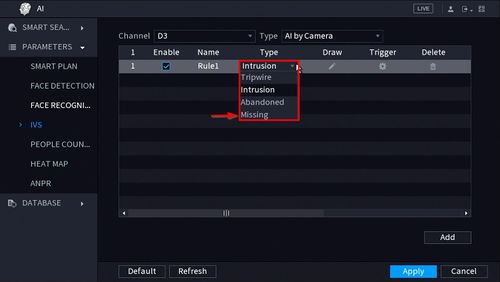
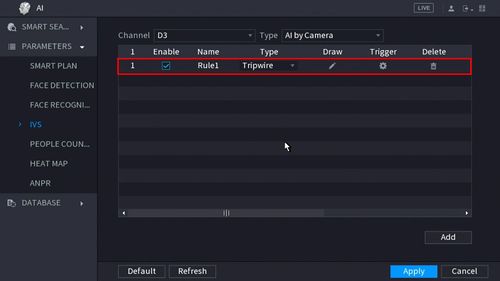 8. Use the dropdown box to change the Rule Type to "Missing"
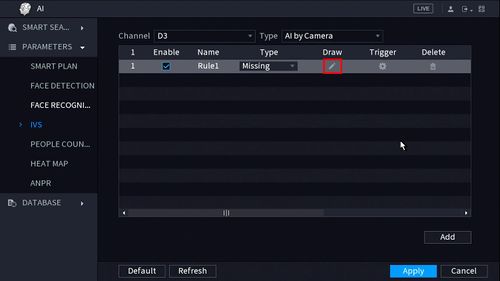
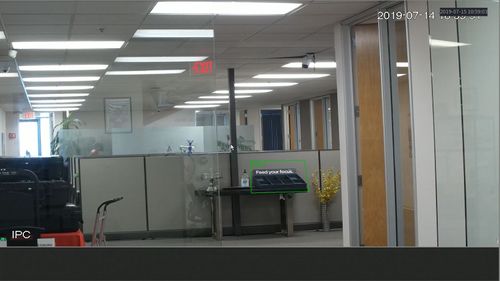
 10. Click the Pencil icon to draw the Missing Object rule
 11. The Channel will fullscreen.
Left click anywhere inside the video frame to begin drawing the detection area for the object.
11. The Channel will fullscreen.
Left click anywhere inside the video frame to begin drawing the detection area for the object.
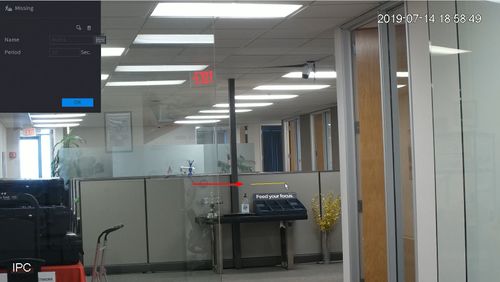 Right click to end drawing
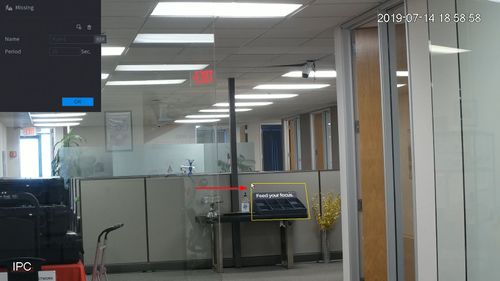 12. You can use the Missing menu that appears for additional rule settings:
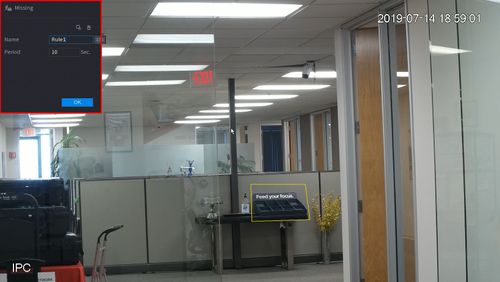
• Name: A name can be applied to the rule
• Period: Set a time (in seconds) for the Missing object rule to trigger
 icon to set the Target Filter (maximum and minimum size size for Objects to follow rule)
Click
icon to set the Target Filter (maximum and minimum size size for Objects to follow rule)
Click  icon to clear the current rule
Once the Missing Object rule settings have been created click OK
13. Click the
icon to clear the current rule
Once the Missing Object rule settings have been created click OK
13. Click the  icon to set the Trigger settings when the IVS Missing Object rule is engaged.
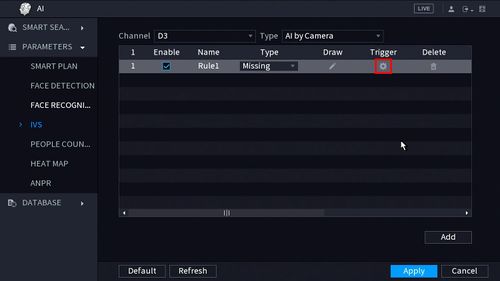 14. The Trigger menu will appear
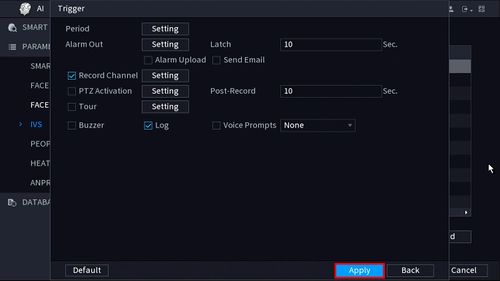 Once the trigger rule settings have been created click OK
15. Once all Missing Object settings have been configured, Click Apply in the lower right of the screen to save all changes
Once the trigger rule settings have been created click OK
15. Once all Missing Object settings have been configured, Click Apply in the lower right of the screen to save all changes
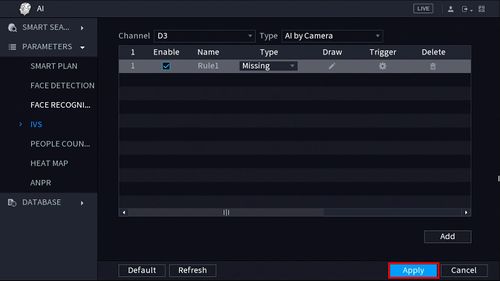 16. The created Missing rule is now programmed
How To Setup Intrusion Detection
Description
This article will show you how to setup the Intrusion IVS feature on a supported devicePrerequisites
• Supported device with Intrusion feature
Video Instructions
[embed]https://youtu.be/-VgM8l-wTkU[/embed]Step by Step Instructions
1. From the Main Menu click AI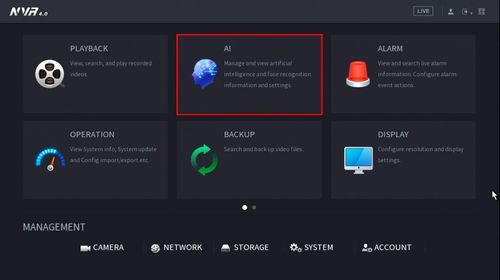 2. Click Parameters > Smart Plan
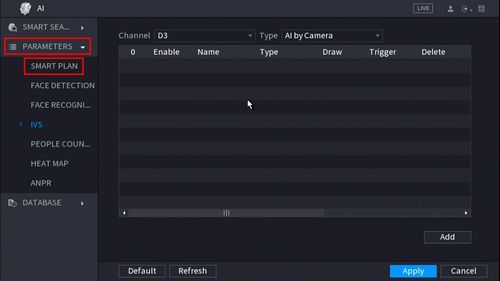 3. Use the drop down box to select the Channel
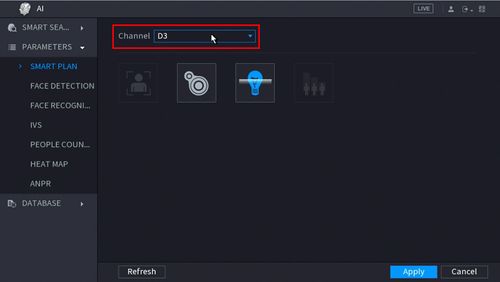 4. Click the IVS icon to enable.
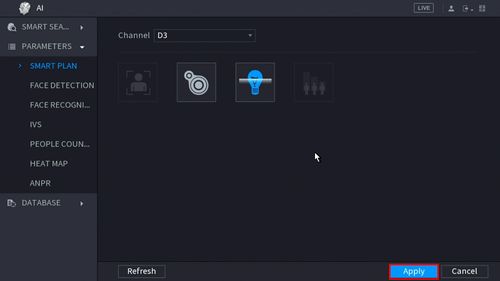
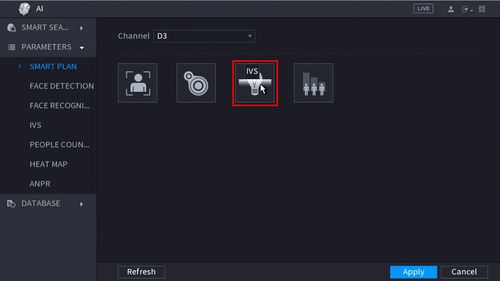 The icon will highlight when selected.
Click Apply
The icon will highlight when selected.
Click Apply
 5. Click Parameters > IVS
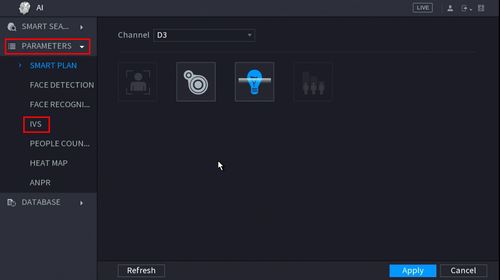 6. Use the drop-down box to select the Channel
Then click Add in the lower right side of the screen to Add an IVS rule
6. Use the drop-down box to select the Channel
Then click Add in the lower right side of the screen to Add an IVS rule
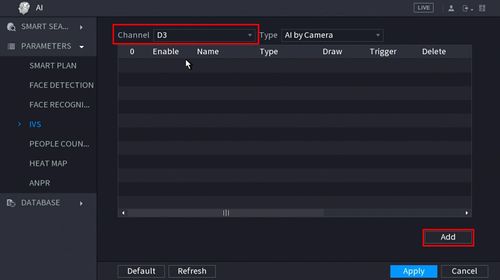 8. The created rule will appear in the list
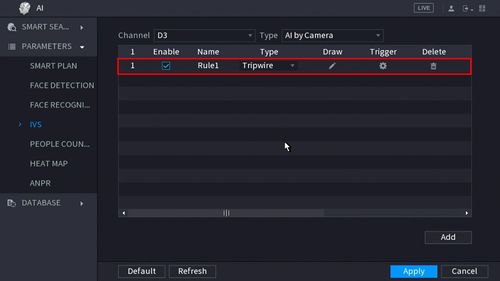 9. Use the dropdown box to change the Rule Type to "Intrusion"
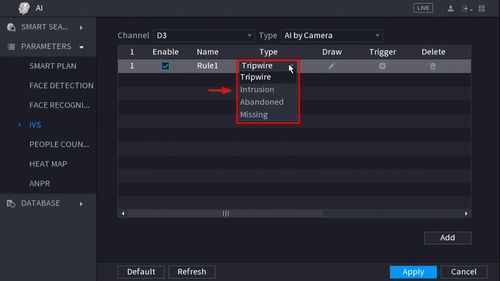 10. Click the Pencil icon to draw the Intrusion rule
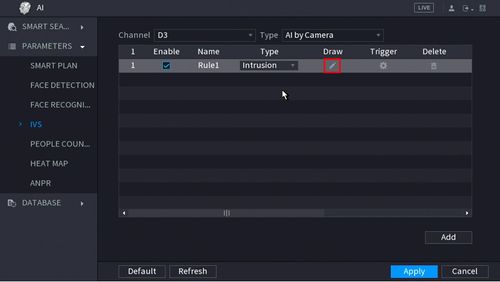 11. The Channel will fullscreen.
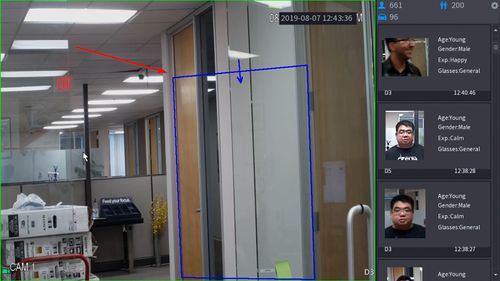
Left click anywhere inside the video frame to begin drawing the detection area for the Intrusion.
11. The Channel will fullscreen.
Left click anywhere inside the video frame to begin drawing the detection area for the Intrusion.
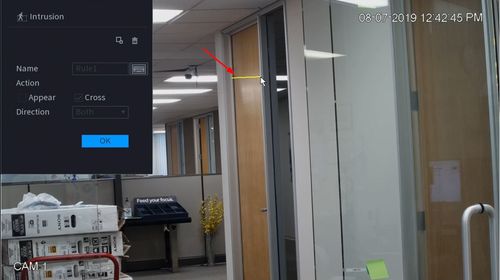 Right click to end drawing.
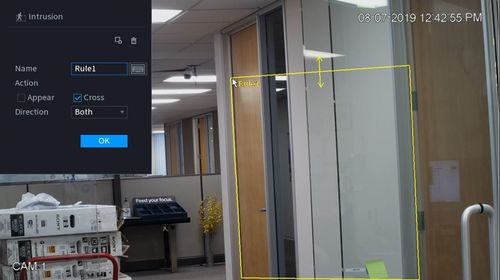 12. You can use the Intrusion menu that appears for additional rule settings:
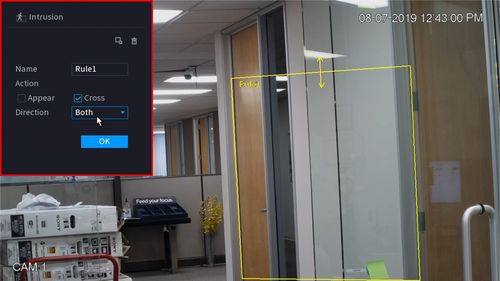
• Name: A name can be applied to the rule
• Action
◦ Appear
◦ Cross
• Direction
 icon to set the Target Filter (maximum and minimum size size for Objects to follow rule)
Click
icon to set the Target Filter (maximum and minimum size size for Objects to follow rule)
Click  icon to clear the current rule
Once the Intrusion rule settings have been created click OK
13. Click the
icon to clear the current rule
Once the Intrusion rule settings have been created click OK
13. Click the  icon to set the Trigger settings when the IVS Missing Object rule is engaged.
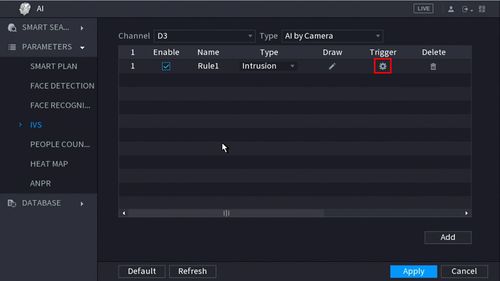 14. The Trigger menu will appear
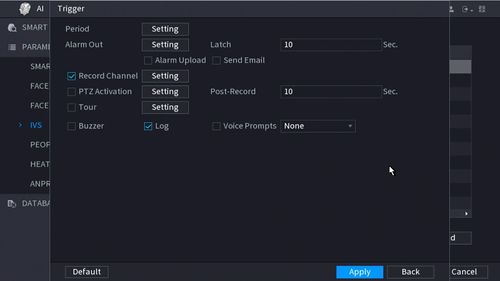 Once the trigger rule settings have been created click Apply, then click Back to return to the previous menu
15. Once all Missing Object settings have been configured, Click Apply in the lower right of the screen to save all changes
Once the trigger rule settings have been created click Apply, then click Back to return to the previous menu
15. Once all Missing Object settings have been configured, Click Apply in the lower right of the screen to save all changes
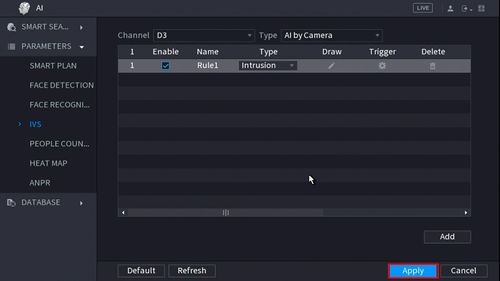 16. The created Intrusion rule is now programmed
 Dahua AI setup guide, Configure Dahua AI, Dahua AI features setup, Dahua IVS setup, Dahua Smart Plan configuration, Dahua WizSense setup, Dahua WizMind setup, Dahua AI camera setup, Dahua NVR AI configuration, Dahua AI analytics guide, Set up Dahua Face Detection, Dahua Face Recognition setup, Dahua Perimeter Protection guide, Dahua SMD (Smart Motion Detection) setup,
Dahua People Counting configuration, Dahua Heat Map setup, Dahua ANPR (Automatic Number Plate Recognition) setup, Dahua Tripwire setup, Dahua Intrusion Detection setup, Dahua AI coding setup, Dahua AI NVR analytics, Dahua AI camera analytics,
Dahua AI rules configuration, Dahua Smart Search setup, Dahua AI recording setup, Dahua AI alarm setup, Dahua AI event configuration, Dahua AI deep learning setup, Dahua AI system integration, Dahua AcuPick setup, Dahua AI troubleshooting guide
Dahua AI setup guide, Configure Dahua AI, Dahua AI features setup, Dahua IVS setup, Dahua Smart Plan configuration, Dahua WizSense setup, Dahua WizMind setup, Dahua AI camera setup, Dahua NVR AI configuration, Dahua AI analytics guide, Set up Dahua Face Detection, Dahua Face Recognition setup, Dahua Perimeter Protection guide, Dahua SMD (Smart Motion Detection) setup,
Dahua People Counting configuration, Dahua Heat Map setup, Dahua ANPR (Automatic Number Plate Recognition) setup, Dahua Tripwire setup, Dahua Intrusion Detection setup, Dahua AI coding setup, Dahua AI NVR analytics, Dahua AI camera analytics,
Dahua AI rules configuration, Dahua Smart Search setup, Dahua AI recording setup, Dahua AI alarm setup, Dahua AI event configuration, Dahua AI deep learning setup, Dahua AI system integration, Dahua AcuPick setup, Dahua AI troubleshooting guide
Advertisement

Topics:
#Configure Dahua Ai
#Dahua Acupick Setup
#Dahua Ai Alarm Setup
#Dahua Ai Analytics Guide
#Dahua Ai Camera Analytics
#Dahua AI camera setup
#Dahua AI coding setup
#Dahua AI deep learning setup
#Dahua AI event configuration
#Dahua AI features setup
#Dahua AI NVR analytics
#Dahua AI recording setup
#Dahua AI rules configuration
#Dahua AI setup guide
#Dahua AI system integration
#Dahua AI troubleshooting guide
#Dahua ANPR (Automatic Number Plate Recognition) setup
#Dahua Face Recognition setup
#Dahua Heat Map setup
#Dahua Intrusion Detection setup
#Dahua IVS setup
#Dahua NVR AI configuration
#Dahua People Counting configuration
#Dahua Perimeter Protection guide
#Dahua Smart Plan configuration
#Dahua Smart Search setup
#Dahua SMD (Smart Motion Detection) setup
#Dahua Tripwire setup
#Dahua WizMind setup
#Dahua WizSense setup
#Set up Dahua Face Detection
Did this security guide help you?
Rate this article to help fellow engineers find the best guides.

Written by
Alex Vance
Senior Security Systems Architect & IoT Consultant with over 15 years in digital surveillance design.
Discussion (0)
No comments yet. Be the first to share your thoughts!
Leave a Comment