
Akuvox PC Manager Administrator Guide
Akuvox PC Manager Administrator Guide, Thank you for reading this manual. This manual is intended for administrators who need to properly manage the PC Manager, a tool incorporating configuration management, LAN-based device AutoP provisioning, upgrade, etc. This manual applies to PC Manager with the software version 2.0.0.2. Please consult our technical support for any new information or the latest software version.
What’s New:
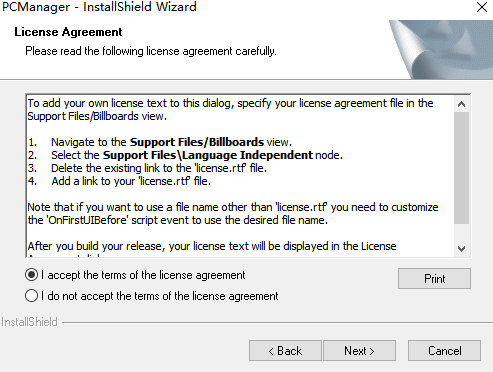
 4. Accept the terms and click Next.
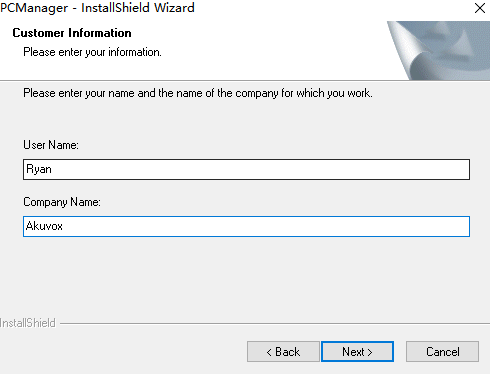
 5. Enter your user name and company name. Click Next.
 6. Select the Complete or Custom installation to your liking and click Next.
 7. Click Finish to finish the installation.
 if you want to check the software version, then click Return to go back to the login interface.
 Note
Currently, login user name and password cannot be changed.
Note
Currently, login user name and password cannot be changed.
 Manual Input Mode:

 The synchronization status will be displayed on the Result window.

 You can check on the device to see whether the resetting is successful.
 You can check the upgrade status and result on the pop-up window.
 Note
Currently, the user name and password cannot be changed.
Note
Currently, the user name and password cannot be changed.
 Dashboard Description:
 On the Group Setting interface, you can:
 On the Editing interface, you can:
 Note
Make sure that you have installed Microsoft Excel in your computer. Otherwise, the file import and export may fail.
.
Note
Make sure that you have installed Microsoft Excel in your computer. Otherwise, the file import and export may fail.
.
• Support filtering devices via model;
• Support copying MAC addresses;
• Support sending feedback on issuing configurations.
Akuvox PC Manager Administrator Guide
PC Manager Overview
PC Manager, a LAN-based on-premise platform, is designed for the one-stop configurations and auto-provisioning of devices deployed on LAN. PC Manager will help you to:• Create, delete, and edit the configuration items;
• Synchronize the configurations individually or in batches to the devices;
• Upgrade the devices;
• Customize the node and group-based configuration on the offstage to better suit your applications.
PC Manager Installation
Installation Requirements
Prior to the installation of the PC Manager, please make sure that the following installation requirements are met:• Windows 7 operating system (64 bits) or higher;
• Only one PC Manager is allowed in the same LAN (local area network);
• No SDMC, ACMS, and Facepro software turned on on your personal computer or on other personal computers in the same network;
• The Firewall on your computer should be turned off unless the 8503-UDP port is added to your firewall inbound and outbound;
• Anti-virus software should be turned off unless the 8503-UDP port is added to your firewall inbound and outbound;
• Only one network adapter can be enabled on your PC.
Install PC Manager
Steps to install PC Manager:1.Decompress the PC Manager zip file.
2.Click the setup.exe file.
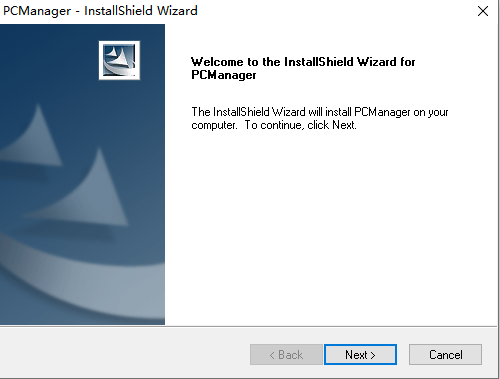
3.Click Next in the pop-out window to continue the installation.
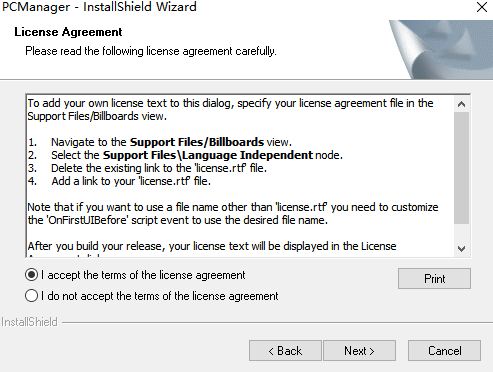
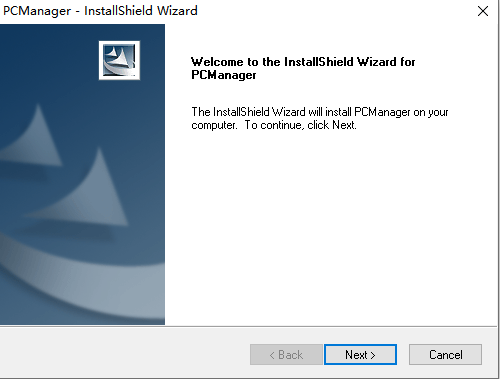 4. Accept the terms and click Next.
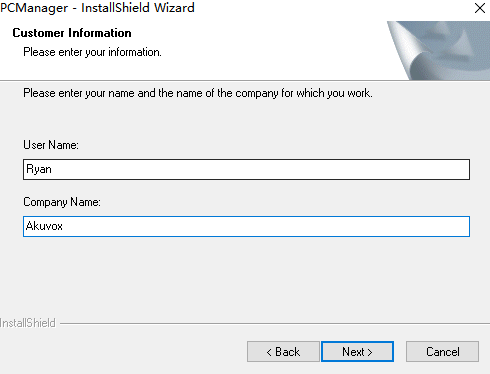
 5. Enter your user name and company name. Click Next.
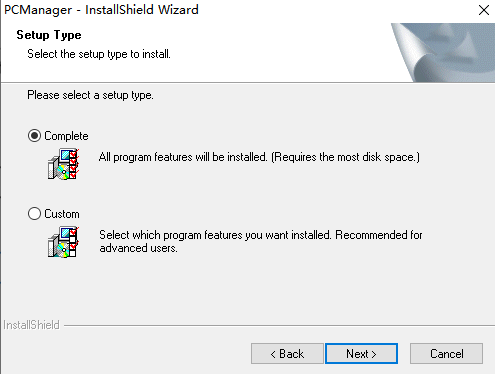
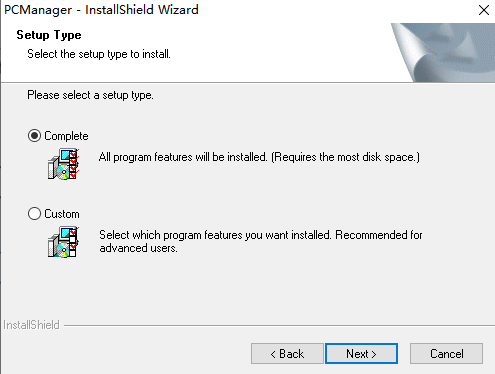
 6. Select the Complete or Custom installation to your liking and click Next.
• Select "Complete" if you want to install the software to the default path on your PC.
• Select "Custom" if you want to install the software to the desired path on your PC.
Note
The PC Manager installation path should not contain any Chinese characters.
 7. Click Finish to finish the installation.
Login
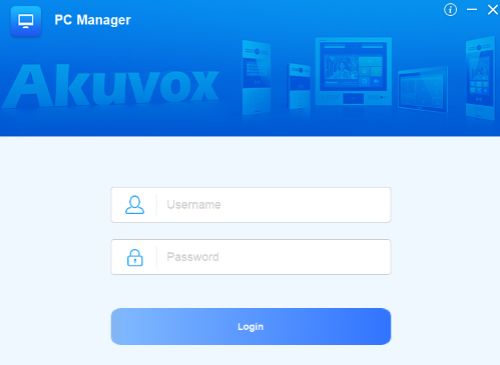
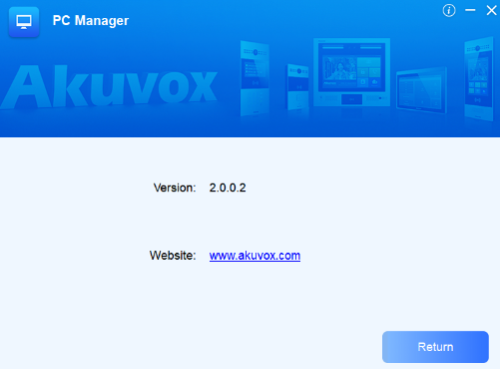
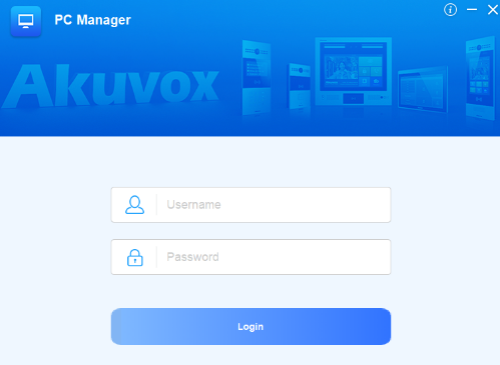
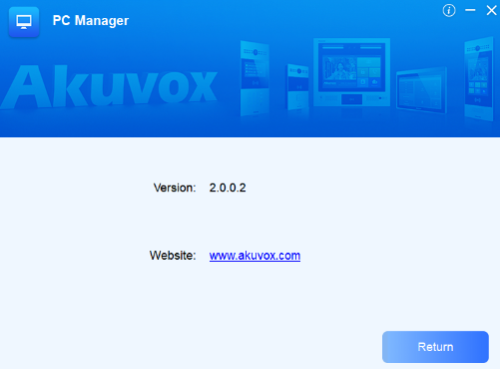
Enter the username and password, which are both "admin" by default. On the upper right corner of the login interface, click if you want to check the software version, then click Return to go back to the login interface.
 Note
Currently, login user name and password cannot be changed.
Note
Currently, login user name and password cannot be changed.
Device Configuration
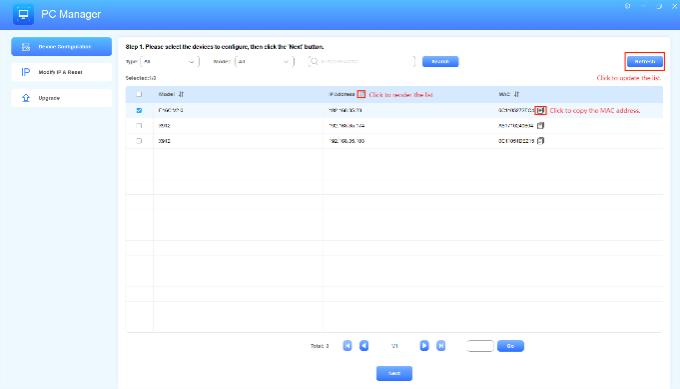
After login, you can see there are three modules on the left columns:AutoP
On the Device Configuration module, you can perform AutoP on target devices.1.Check the target device(s) and click Next. If there are many devices, you can select the device type and model to filter devices. You can also search for the device by entering its IP address or MAC.
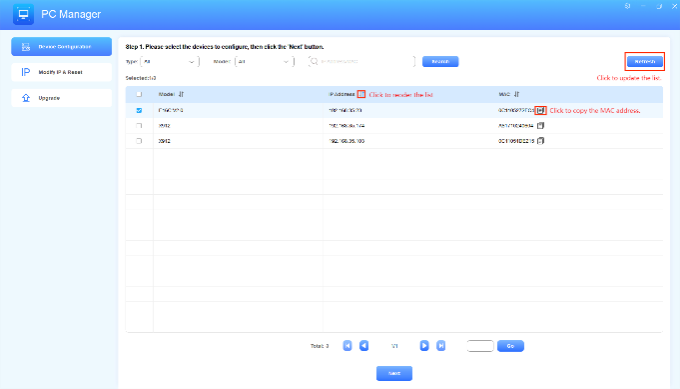
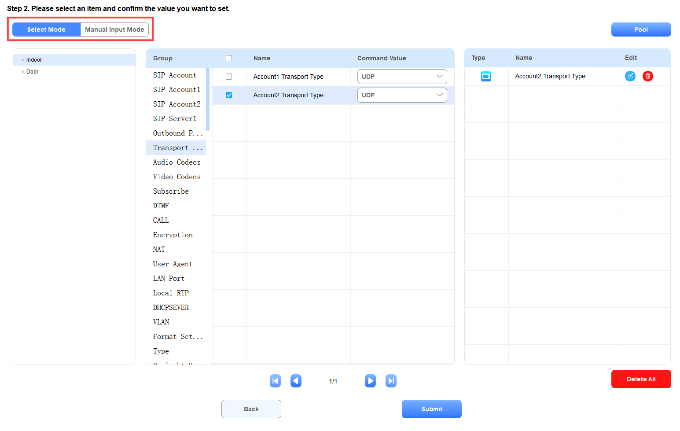
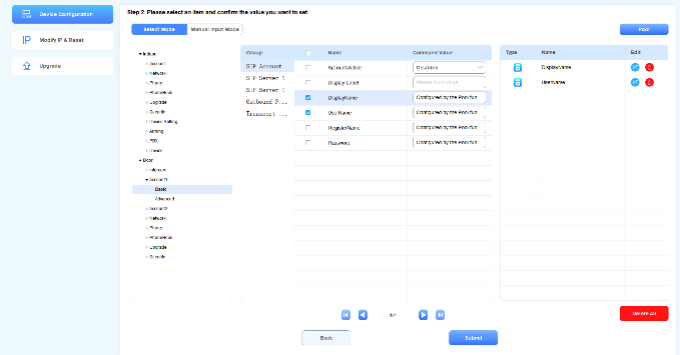
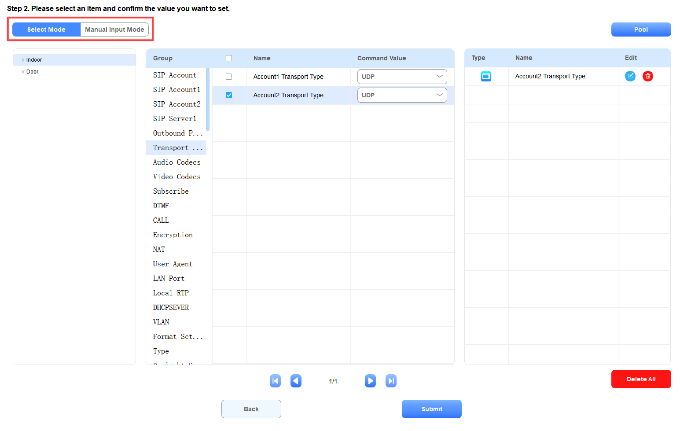
2.Select the configuration mode between Select Mode and Manual Input Mode.
• Select Mode: You can directly check the desired configuration items and update them to the device.
• Manual Input Mode: You can enter the AutoP commands and click Submit to carry out the AutoP.
Select Mode:
 Manual Input Mode:

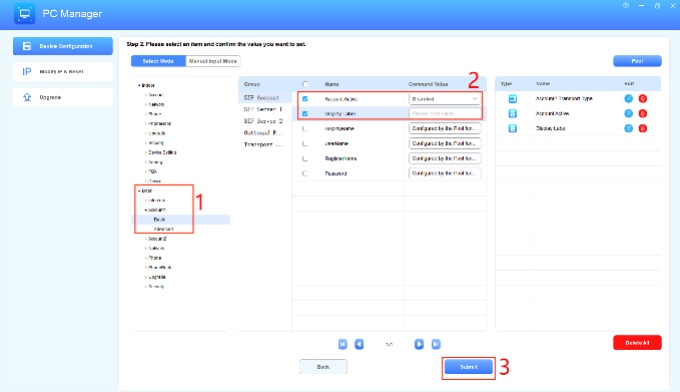
3.When you choose the Select Mode, click the device type and navigate to a specific category.
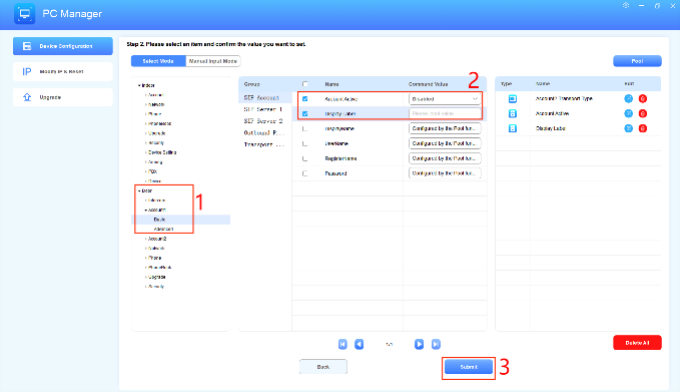
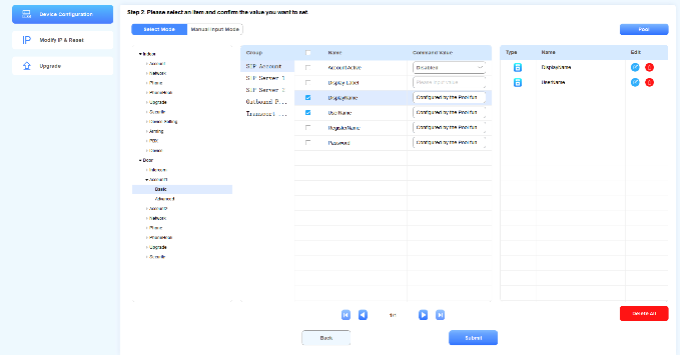
4.Set up and check the configuration items. You can remove the item by clicking .
.
There are three types of configuration items:
 .
.• Selection: Click Command Value to select from available options. For example, select between Enabled and Disabled for account activation.
• Input: Click Command Value to enter a specific value. For example, customize the content in the Display Label field.
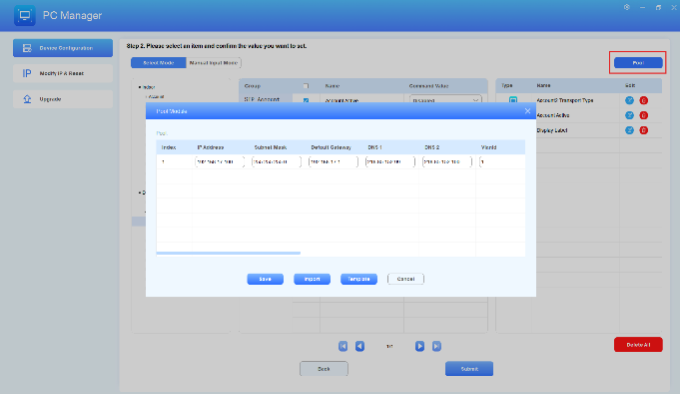
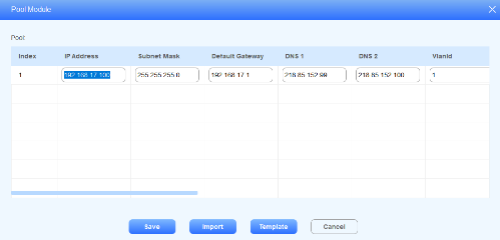
• Pool: The configuration pool is used for batch AutoP of devices. You can prepare and store a set of pre-configured configuration items and upload them to the target devices for quick deployment. For instructions on creating and using Pool, please refer to the chapter Pool AutoP.
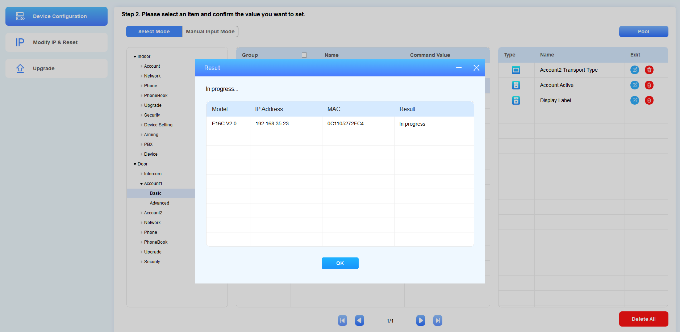
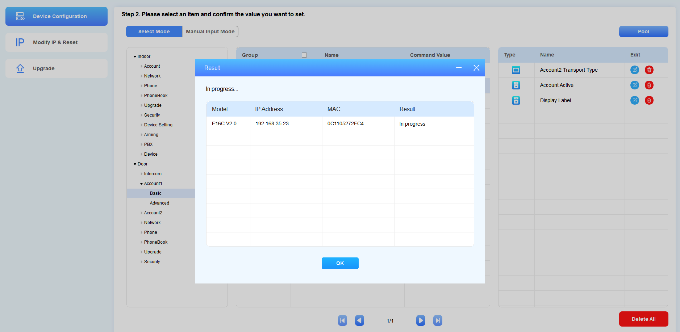
5.Click Submit to synchronize the settings to the device.
 The synchronization status will be displayed on the Result window.
Pool AutoP
The configuration pool is used for batch AutoP of devices. You can prepare and store a set of pre-configured items and upload them to the target devices for quick deployment.1.On the Device Configuration interface, check the device and click Next to enter the configuration selection interface.
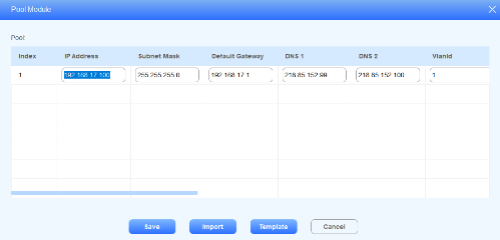
2.Click Pool in the upper right corner and you can see the Pool Module window.
3.Click Template and select a path to download the configuration Excel file.
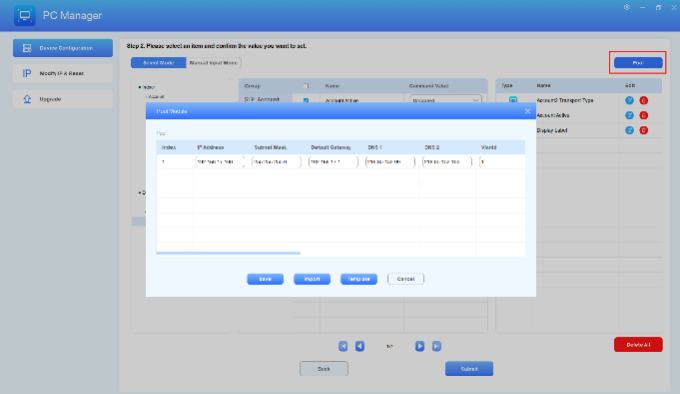
4.Open the template and set up the configuration. In the template, the last four columns indicate the four device types. They are used for setting the synchronization filtering values to “0” or “1”. Only the device types marked with “1” will be synchronized; those marked with “0” will not.
Note
• The values "1" and "0" also determine the order of device synchronization.
• If you select a device with a "0" type, the synchronization will skip it and move to the next device marked with "1." For example, if you choose three devices—first with "1," second with "0," and third with "1"—the third device will be ranked second in the synchronization order, while the second device will be ignored.
• To prevent incorrect synchronization, it's recommended to select devices for AutoP in the same order as they appear in the template.

5.Click Import to upload the file after editing.
6.You can change the item value directly and click Save to confirm the modification.
7.Select the pool-type items on the configuration selection interface and click Submit to start the synchronization.
Device Static IP Setup and Reset
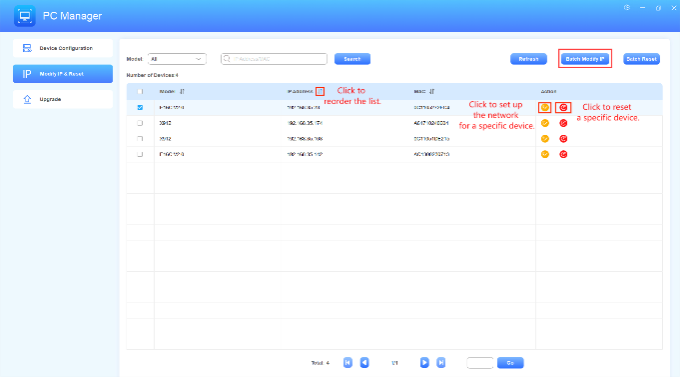
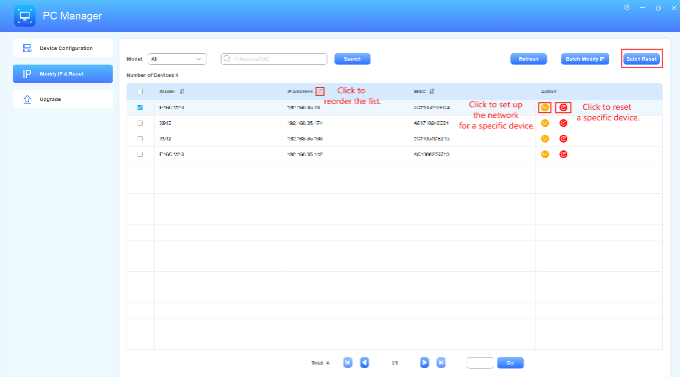
You can set static IPs for multiple devices and reset them to factory settings on the Modify IP & Reset module.Set Static IP
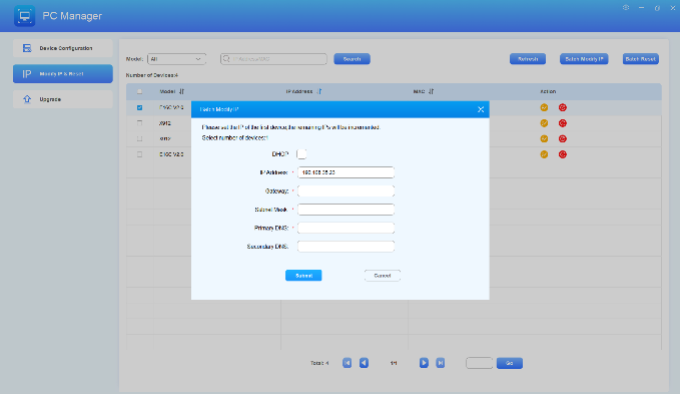
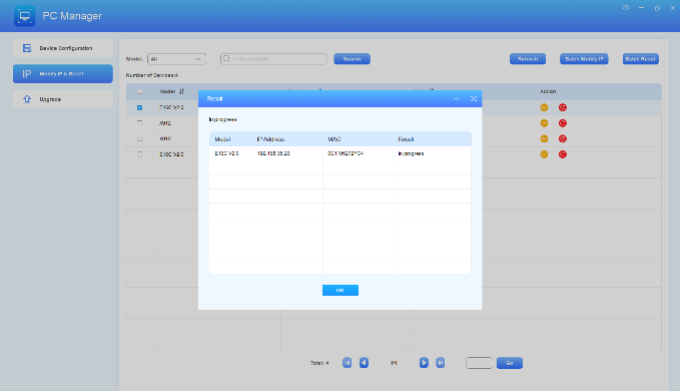
1.Check the target devices and click Batch Modify IP. You can filter devices by selecting their models and search for a device by entering its IP address and MAC.
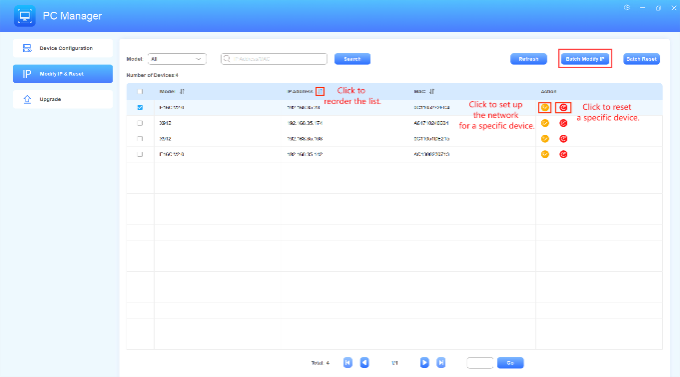
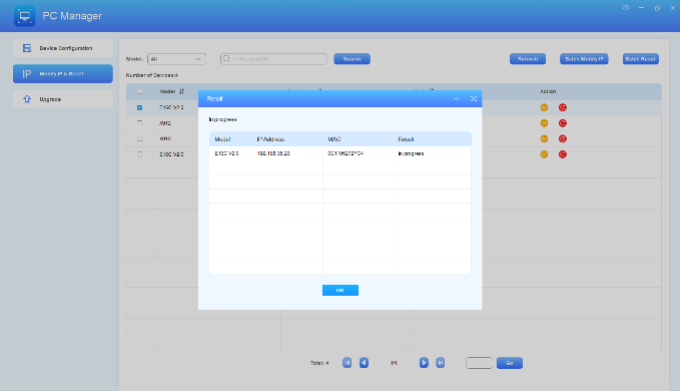
2.Set the network details and click Submit to synchronize the settings to the devices.
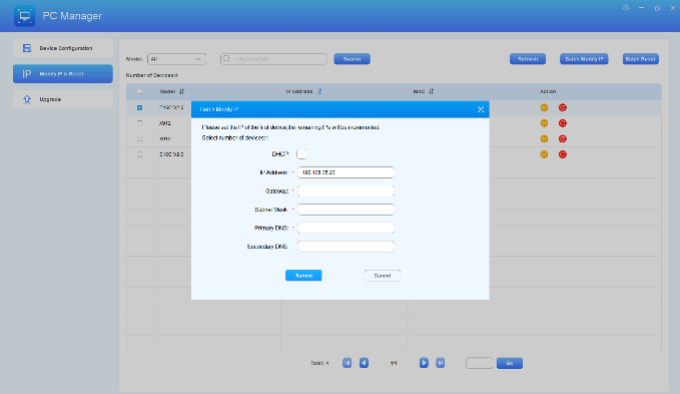
3.The synchronization status will be displayed on the Result window.
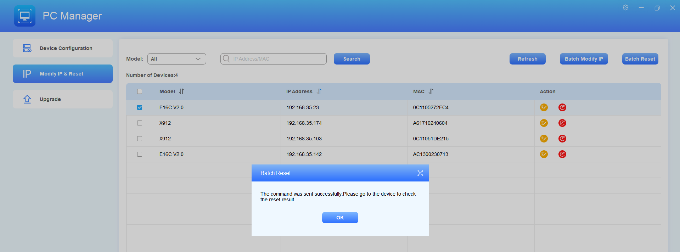
Reset Devices
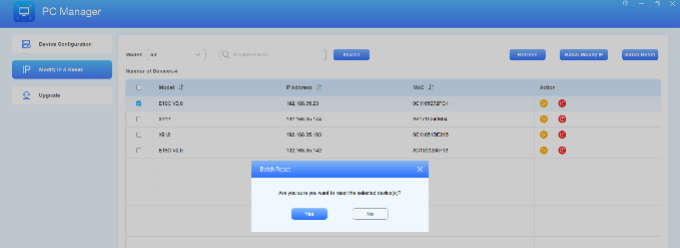
1.Check the target devices and click Batch Reset. You can filter devices by selecting their models and search for a device by entering its IP address and MAC.
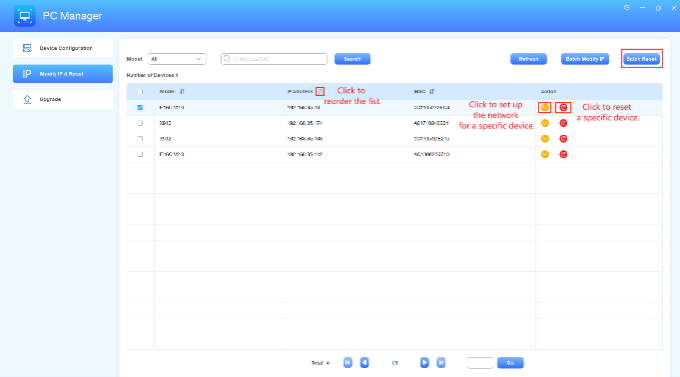
2.Click Yes to confirm the operation.
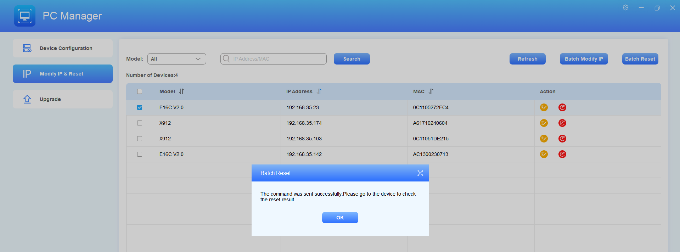
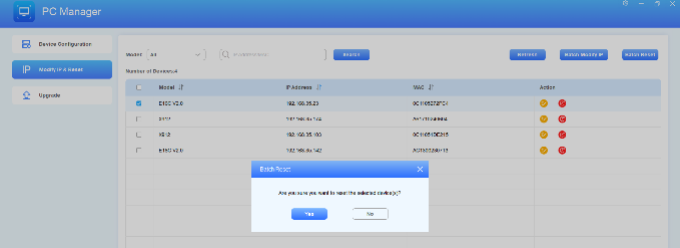 You can check on the device to see whether the resetting is successful.
Upgrade
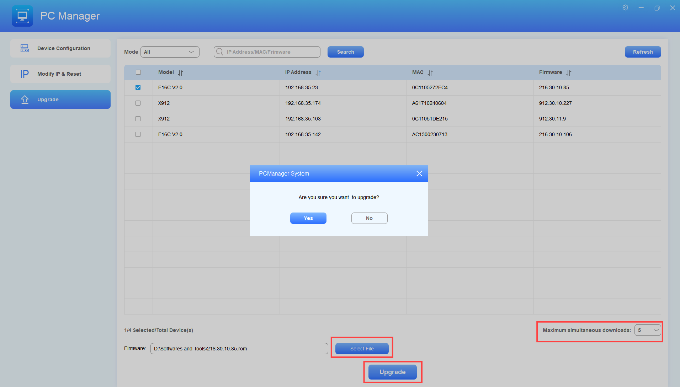
You can upgrade up to 100 devices of the same model each time in a good network condition.1.On the Upgrade module, check the devices to be upgraded. You can set the maximum number of upgrading devices at a time in the lower right corner.
2.Click Select File to upload the firmware.
3.Click Upgrade and confirm it.
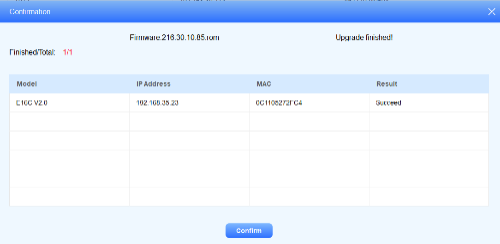
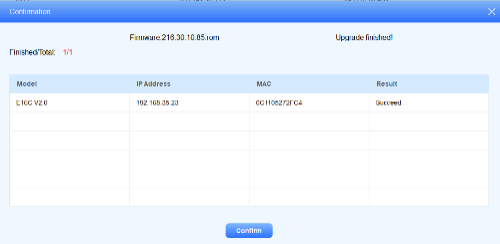
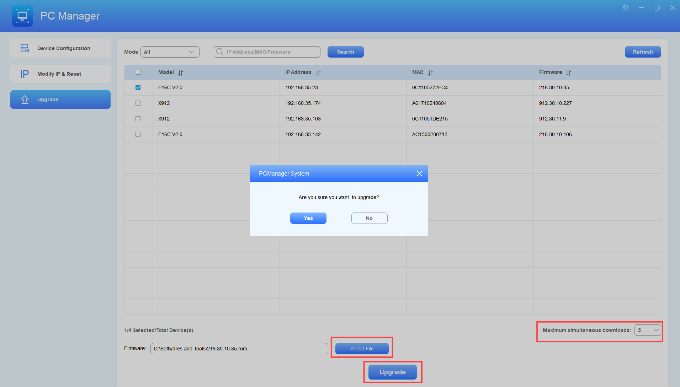 You can check the upgrade status and result on the pop-up window.
Data Backup
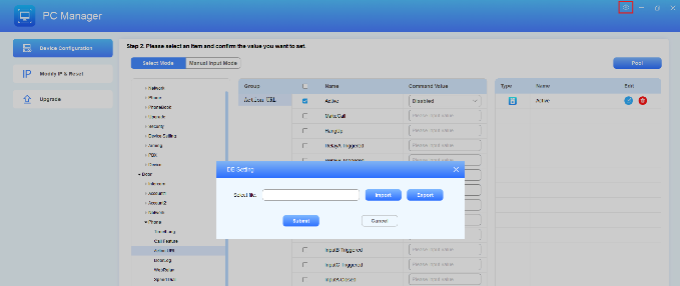
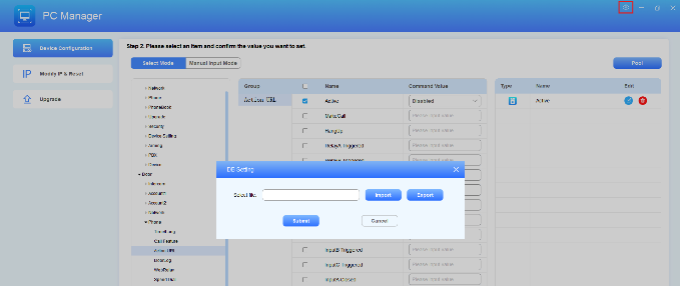
You can export AutoP data as a backup for later use in case you need to recover altered data.1.Click  in the upper right corner.
 in the upper right corner.
2.Click Import/Export to upload/download the file.
Backstage Management
On the PC manager’s backstage, you can change the configuration groups and nodes, add new configurations, modify pool settings, etc.Backstage Login
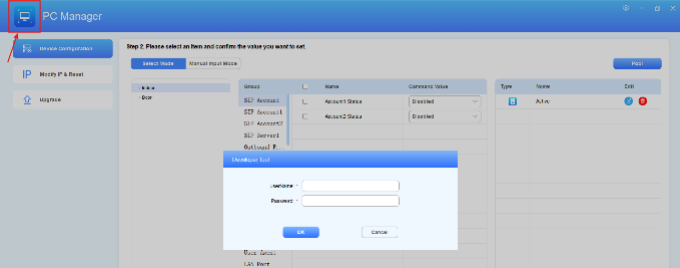
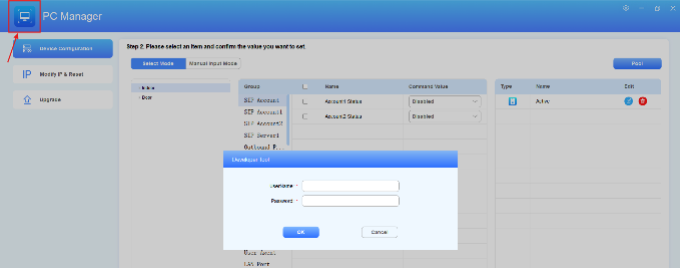
1.Keep clicking  in the upper left corner until the login window pops up.
 in the upper left corner until the login window pops up.
2.Enter the user name and password, both are admin by default.
 Note
Currently, the user name and password cannot be changed.
Note
Currently, the user name and password cannot be changed.
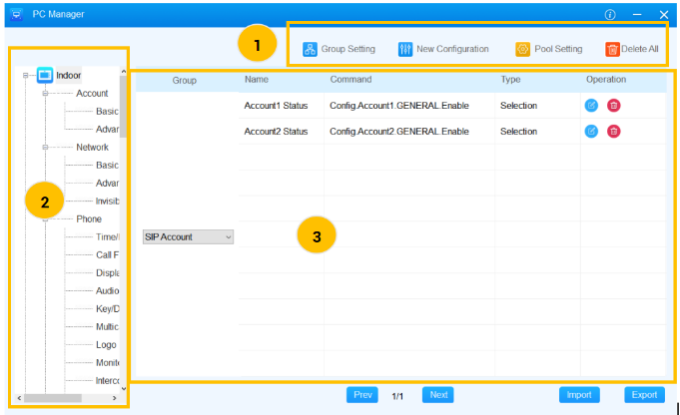
Dashboard Overview
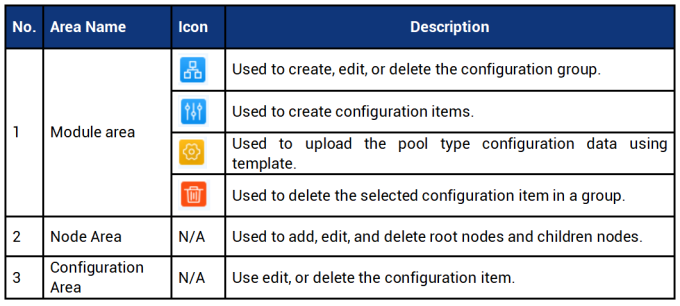
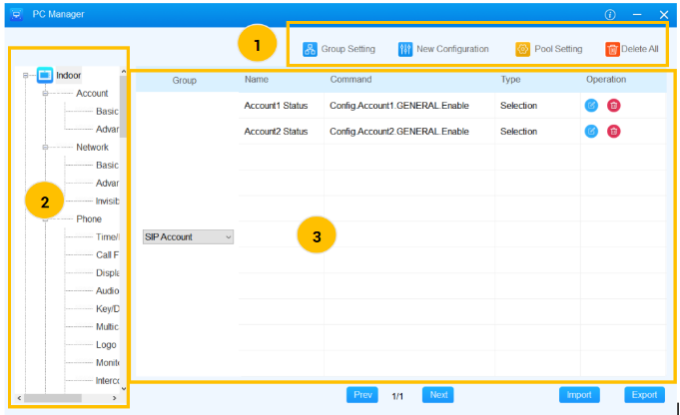 Dashboard Description:
Node Management
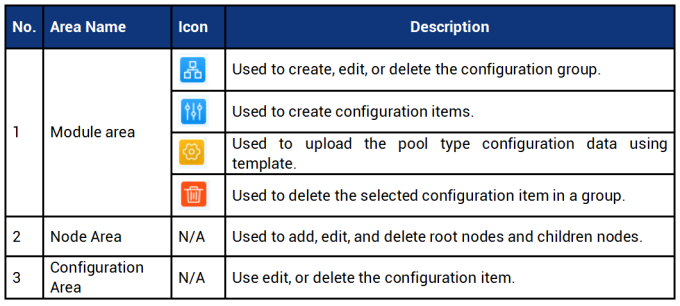
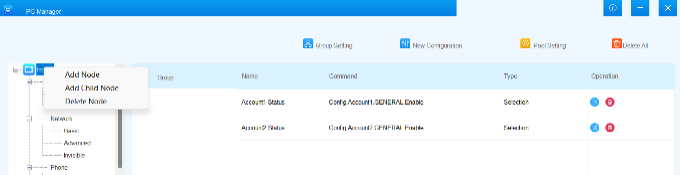
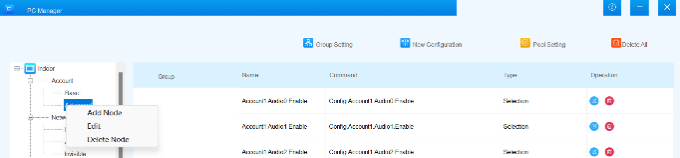
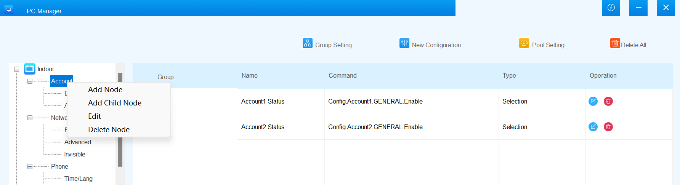
You can manage the node tree by adding, deleting, and renaming nodes. There are three levels of nodes.• Root Node indicates the device type(Door Phone, Indoor Monitor, access-control" class="text-sky-600 dark:text-sky-400 font-medium hover:underline" title="Guides for Access Control">Access Control Terminal, and Video Phone)
Right-click on the root node to add another root node, delete it, or add a child node to it.
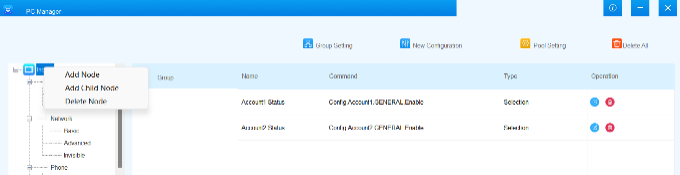
• Second-level Node categorizes various configuration groups.
Right-click on the group node to add another group node, add a child node, rename it, or delete it.
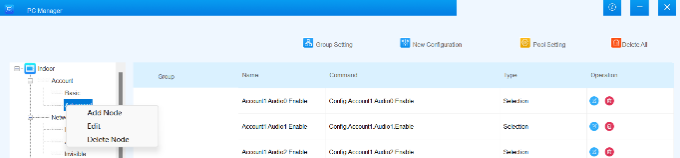
• Third-level Node further categorizes the configuration groups.
Right-click on the configuration node to add another configuration node, rename, or delete it.
Group Management
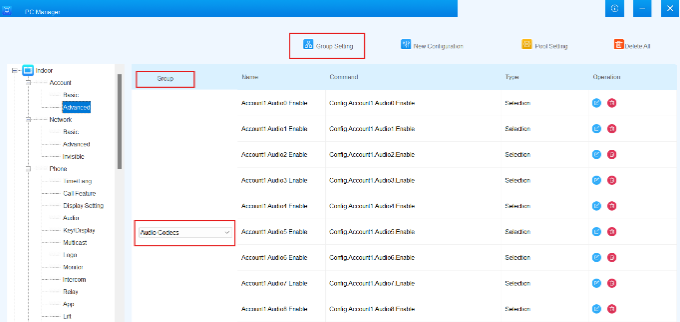
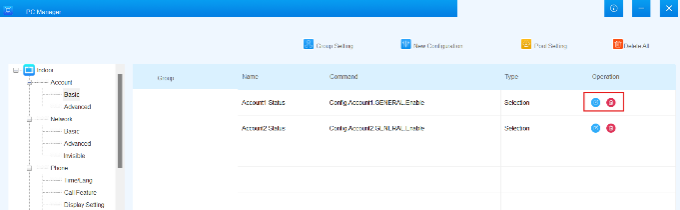
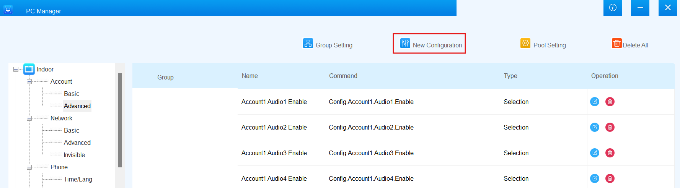
The Group categorizes specific configuration items. You can add, delete, and rename groups. Column Description:• Group: You can switch between different configuration groups.
• Name: Display the configuration name.
• Command: Display the AutoP command.
• Type: Display the configuration type.
• Operation: You can edit or delete the configuration.
Click Group Setting.
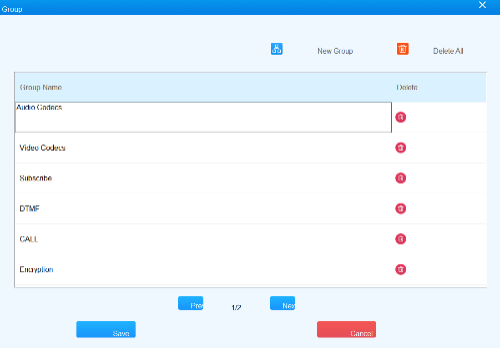
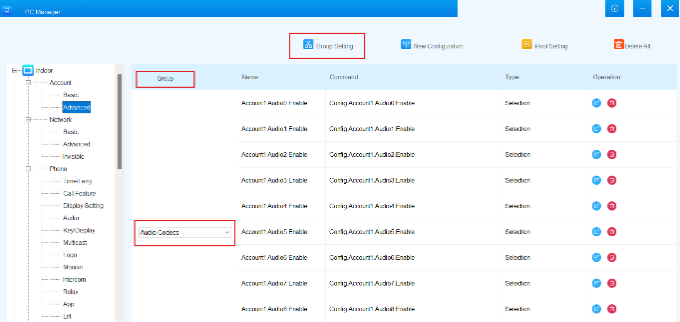 On the Group Setting interface, you can:
• click New Group to add a group;
• click on the desired group and change its name;
• click to delete a specific group;
 to delete a specific group;
• click  to remove all groups in the node.
 to remove all groups in the node.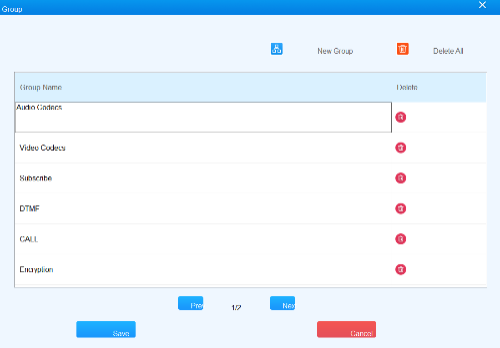
Configuration Items Management
You can edit and delete the existing configuration items, and add a new one.Add a Configuration Item
1.Navigate to the desired node where the configuration item is placed.
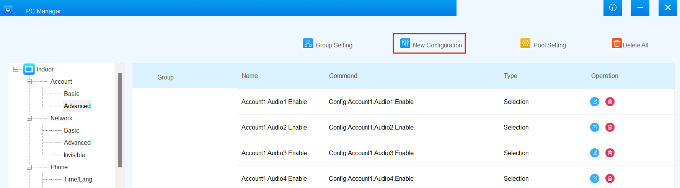
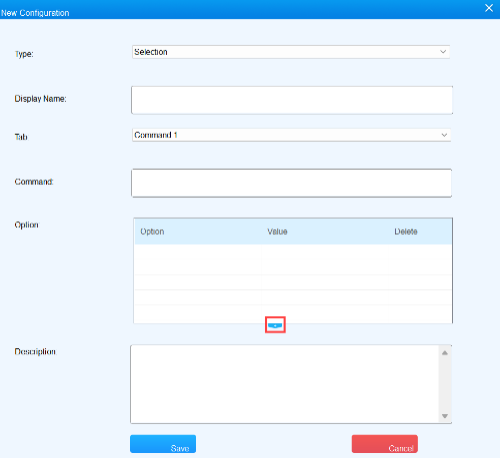
2.Select the desired group and click New Configuration.
3.Set up the new configuration item.
• Select the configuration item type from Selection, Input, and Pool.
• Enter the Display Name which will be displayed on the Name column of the backstage and the front stage.
• One configuration item can have two command tabs since the Android and Linux devices may vary a bit in terms of the same configuration. You can set up Command 1 and click Save. Then edit the configuration item and set up Command 2.
• Enter the AutoP command in the Command box.
• Option is only for the selection type configuration item and you can click + to add a new option.
◦ Option: Name the option.
◦ Value: Specify the option value. For example, “0” for Disabled; “1” for Enabled.
◦ Delete: Click the icon to delete the option.
• Description: You can briefly describe the configuration item.
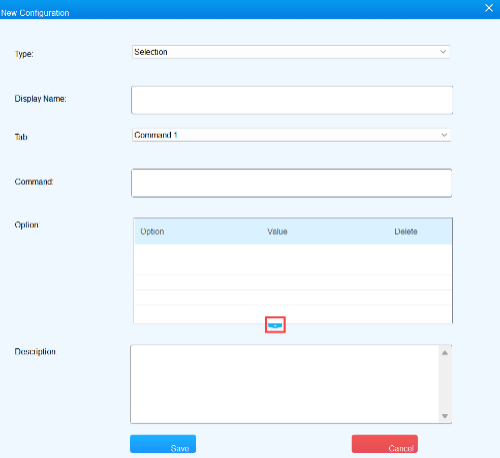
4.Click Save to add the item.
Edit/Delete a Configuration Item
1.Navigate to where the configuration item is placed.
2.Click  next to the specific configuration item to delete it.
 next to the specific configuration item to delete it.
3.Click  next to the specific configuration item to edit it.
 next to the specific configuration item to edit it.
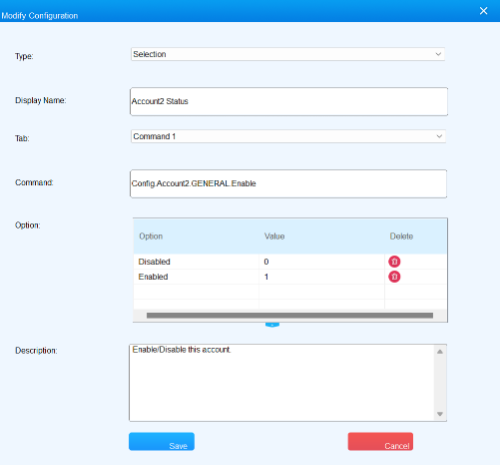
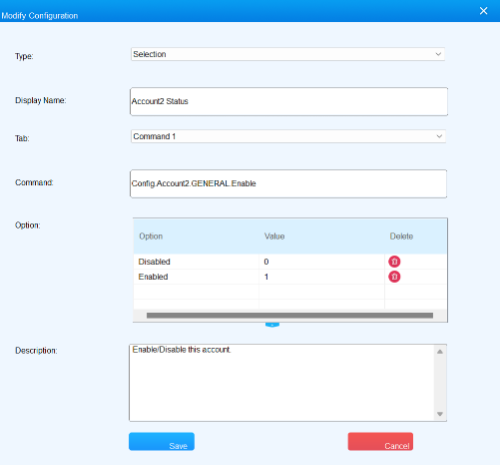
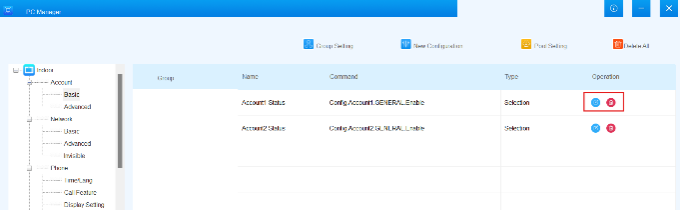 On the Editing interface, you can:
• change the item type;
• change the item’s display name;
• select the command tab;
• define the option(when the item type is Selection);
• Modify the description of the item.
Pool Management
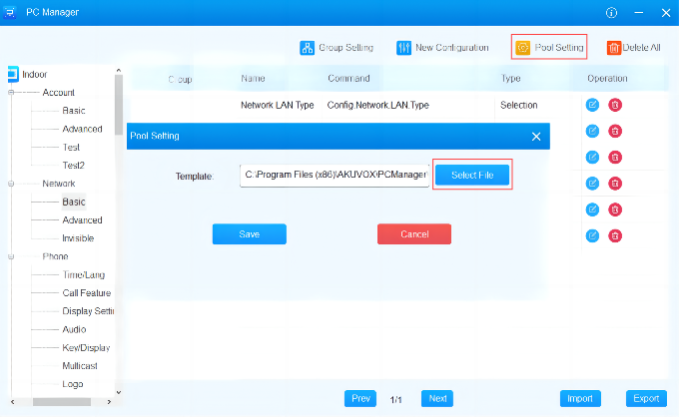
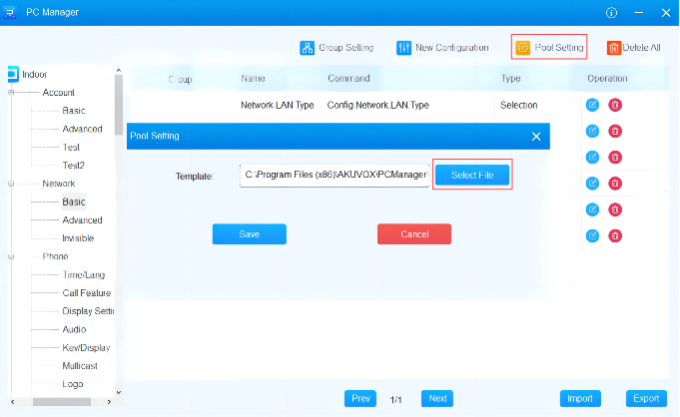
You can upload a pool template to the PC manager for customized AutoP.1.Click Pool Setting.
2.Click Select File to select the template from your computer.
3.Click Save to upload the file.
Data Backup
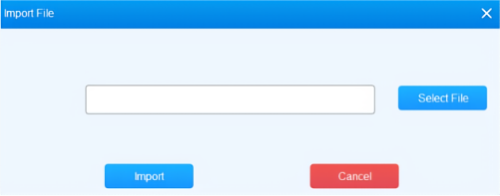
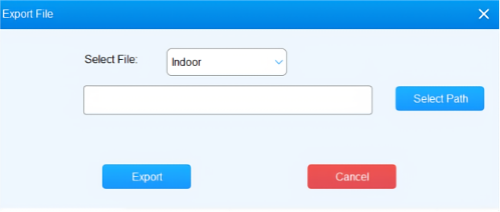
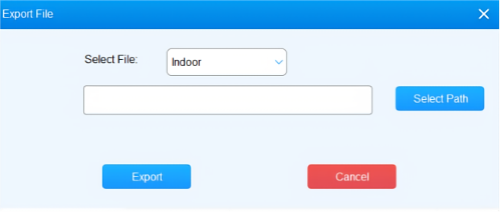
You can import the configuration data for quick device setup by obtaining a template from the Akuvox tech team. Click Import in the lower right corner and select the file to be uploaded. You can export the data covering the node structure, configuration groups, configuration items, etc for backup. Click Export in the lower right corner and select the path to store the file.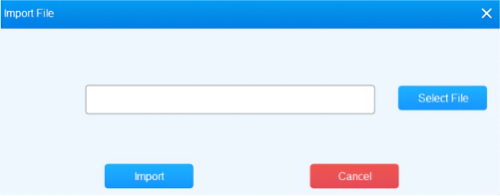
 Note
Make sure that you have installed Microsoft Excel in your computer. Otherwise, the file import and export may fail.
.
Note
Make sure that you have installed Microsoft Excel in your computer. Otherwise, the file import and export may fail.
.
Advertisement

Topics:
#can akuvox pc manager run offline
#can i use akuvox pc manager on mac
#how secure is akuvox pc manager
#how to add devices in akuvox pc manager
#how to assign IP addresses in akuvox pc manager
#how to backup akuvox pc manager config
#how to configure time settings in akuvox pc manager
#how to connect door phones in akuvox pc manager
#how to control access levels in akuvox pc manager
#how to create device groups in akuvox pc manager
#how to detect devices on LAN in akuvox pc manager
#how to disable a device in akuvox pc manager
#how to enable logs in akuvox pc manager
#how to export logs from akuvox pc manager
#how to factory reset via akuvox pc manager
#how to install akuvox pc manager
#how to link akuvox pc manager to ACMS
#how to login to akuvox pc manager
#how to manage users in akuvox pc manager
#how to monitor device status in akuvox pc manager
#how to reset password in akuvox pc manager
#how to restore settings in akuvox pc manager
#how to set network settings in akuvox pc manager
#how to setup akuvox pc manager
#how to troubleshoot akuvox pc manager connection
#how to update firmware via akuvox pc manager
#how to use akuvox pc manager remotely
#what is akuvox pc manager
#what is the default login for akuvox pc manager
#what ports does akuvox pc manager use
Did this security guide help you?
Rate this article to help fellow engineers find the best guides.

Written by
Alex Vance
Senior Security Systems Architect & IoT Consultant with over 15 years in digital surveillance design.
Discussion (0)
No comments yet. Be the first to share your thoughts!
Leave a Comment